Environments
An environment defines where agents work—the Docker image, repositories, tools, and configuration they need to complete tasks. Administrators manage environments through the Web UI.
Configuration Storage
All environment configuration is stored in your organization's coder setup repository—a git repository that defines your CoderFlow installation. This includes Dockerfiles, setup scripts, agent instructions, templates, and environment settings.
The Web UI provides a complete interface for managing this configuration:
- Save — Write changes to disk without committing
- Discard — Revert uncommitted changes
- Commit & Push — Commit changes to git and push to the remote repository
This workflow lets you experiment with configuration changes before committing them. The repository status shows uncommitted changes, and you can pull updates from the remote to stay in sync with your team.
Ask CoderFlow can show what is pending and show the changes. It does not commit or push: it points you to Commit & Push… or Push to Git here (the publish button or the Actions menu). Shared skill files are published with Commit & Push on the Skills page. Pulls, conflicts and account connections stay here too: Ask offers a button that opens this page with the step to take next to the repository status. See Publishing setup repository changes.
Setup repository history
Actions → Setup Repo History, on the Environments page or the Skills page, opens the setup repository's commit history. When you have unpushed commits, the repository status also links to it.
You can:
- choose a branch, search commits and page through them;
- open a commit to see its diff and copy its hash;
- open the commit on your Git host with View on…, when the repository is hosted externally.
The page is read-only: it has no revert, cherry-pick or merge. It needs the settings:setup_repo_history permission (View setup repository commit history), which is separate from permission to commit and push.
Changes saved elsewhere
An open environment stays current when someone saves a change to it somewhere else: another user, you in another tab, Ask CoderFlow, an MCP client, or a task agent updating its environment's instructions, templates, memory or skills. This covers settings, files and instructions, templates, skills, automations, secrets, MCP servers, connections, deployment and IBM i profiles, memory, renames and deletions. Live notices are filtered to sections you are allowed to see. The reconnect/check-for-changes request rechecks current access immediately before returning change metadata. Notices and change metadata contain no setting values, secret names or file bodies.
- No unsaved edits: the changed sections reload in place, without reloading the page, and a short notice says what changed. Secrets, automations and webhooks reload in place even while you have unsaved edits elsewhere on the page.
- Unsaved edits: your edits are kept. A notice says which sections changed and offers Review saved version (opens the saved environment in a new tab), Copy my draft (copies your unsaved values; password fields are never copied), and Discard my edits and reload.
- Saving over a newer change: Save asks Replace newer saved changes? before writing. Cancel keeps your draft unsaved; Save anyway saves it and then shows what the server holds. Save also checks with the server first, so a change whose notice has not arrived yet still asks. If that check cannot be made, Save asks Save without checking for newer changes?
- Editing dialogs: unsaved text in the Memory tab's index is kept the same way. So is an open editor for a memory file, webhook, automation, secret, MCP server, connection or orchestration policy. Its Save asks only if that same kind of item changed elsewhere.
- Renamed or deleted: a renamed environment opens under its new name. If you have unsaved edits, they are kept so you can copy them, and Save is blocked. This also applies when the page only finds out after reconnecting.
- Lost connection: when the page reconnects, it asks the server what it missed and refreshes. After a server restart it cannot tell what changed, so it refreshes, or keeps your draft and asks before you save.
- Lost access: if your access to the environment is removed, its details and any open dialogs for it are removed from the page, and Environment unavailable is shown. Unsaved edits on that environment are not kept. Choosing another environment reloads the page.
Undoing an Ask change
When Ask CoderFlow changes an environment's description, default agent or time zone (and nothing else), the confirmed change offers Undo for 24 hours; it never overwrites an edit made to the same field since. See Undoing environment and automation changes.
Environment Configuration
Navigate to Environments in the Web UI to create and configure environments. Each environment has the following tabs:
For a step-by-step application setup, start with Web Application Environments. Detailed guides cover Skills, MCP Servers, Automations, and IBM i connections.
Overview
Basic environment settings:
- Description — What this environment is for
- Contacts — The people to ask about this environment. They are emailed when a scheduled build fails. See Contacts
- Status — Active; Draft to hide an environment that is still being set up from everyone except the people who manage it; or Disabled to take an environment out of service without deleting it. See Draft Environments and Disabled Environments
- Default Agent — AI agent to use for tasks
- Default Model — Model for this environment's tasks that use the agent selected in Default Agent, overriding the server-wide default in Server Settings → Models. Each agent keeps its own choice: select another agent in Default Agent to see or change that agent's model. Shown when the agent offers more than one model. For Claude and Codex you can select Auto (Task Classifier) to have CoderFlow pick a model per task — see Automatic Model Selection
- Default Effort Level — Effort level for that agent's tasks, kept per agent like Default Model and overriding the server-wide default. For agents that use reasoning levels, such as Codex, it is labelled Default Reasoning Level. A task can still override the model and level on the launch form, under Task options → Model Configuration
- Docker Image — Container image name
- Timezone — Timezone for the environment
- Agent Limit per Developer — How many autonomous agents one developer may run at once in this environment. Leave blank to set no per-developer cap, so only the server-wide agent limit applies. See Agent Limit per Developer
- Skills — Skills assigned to this environment
- README — Documentation displayed to users
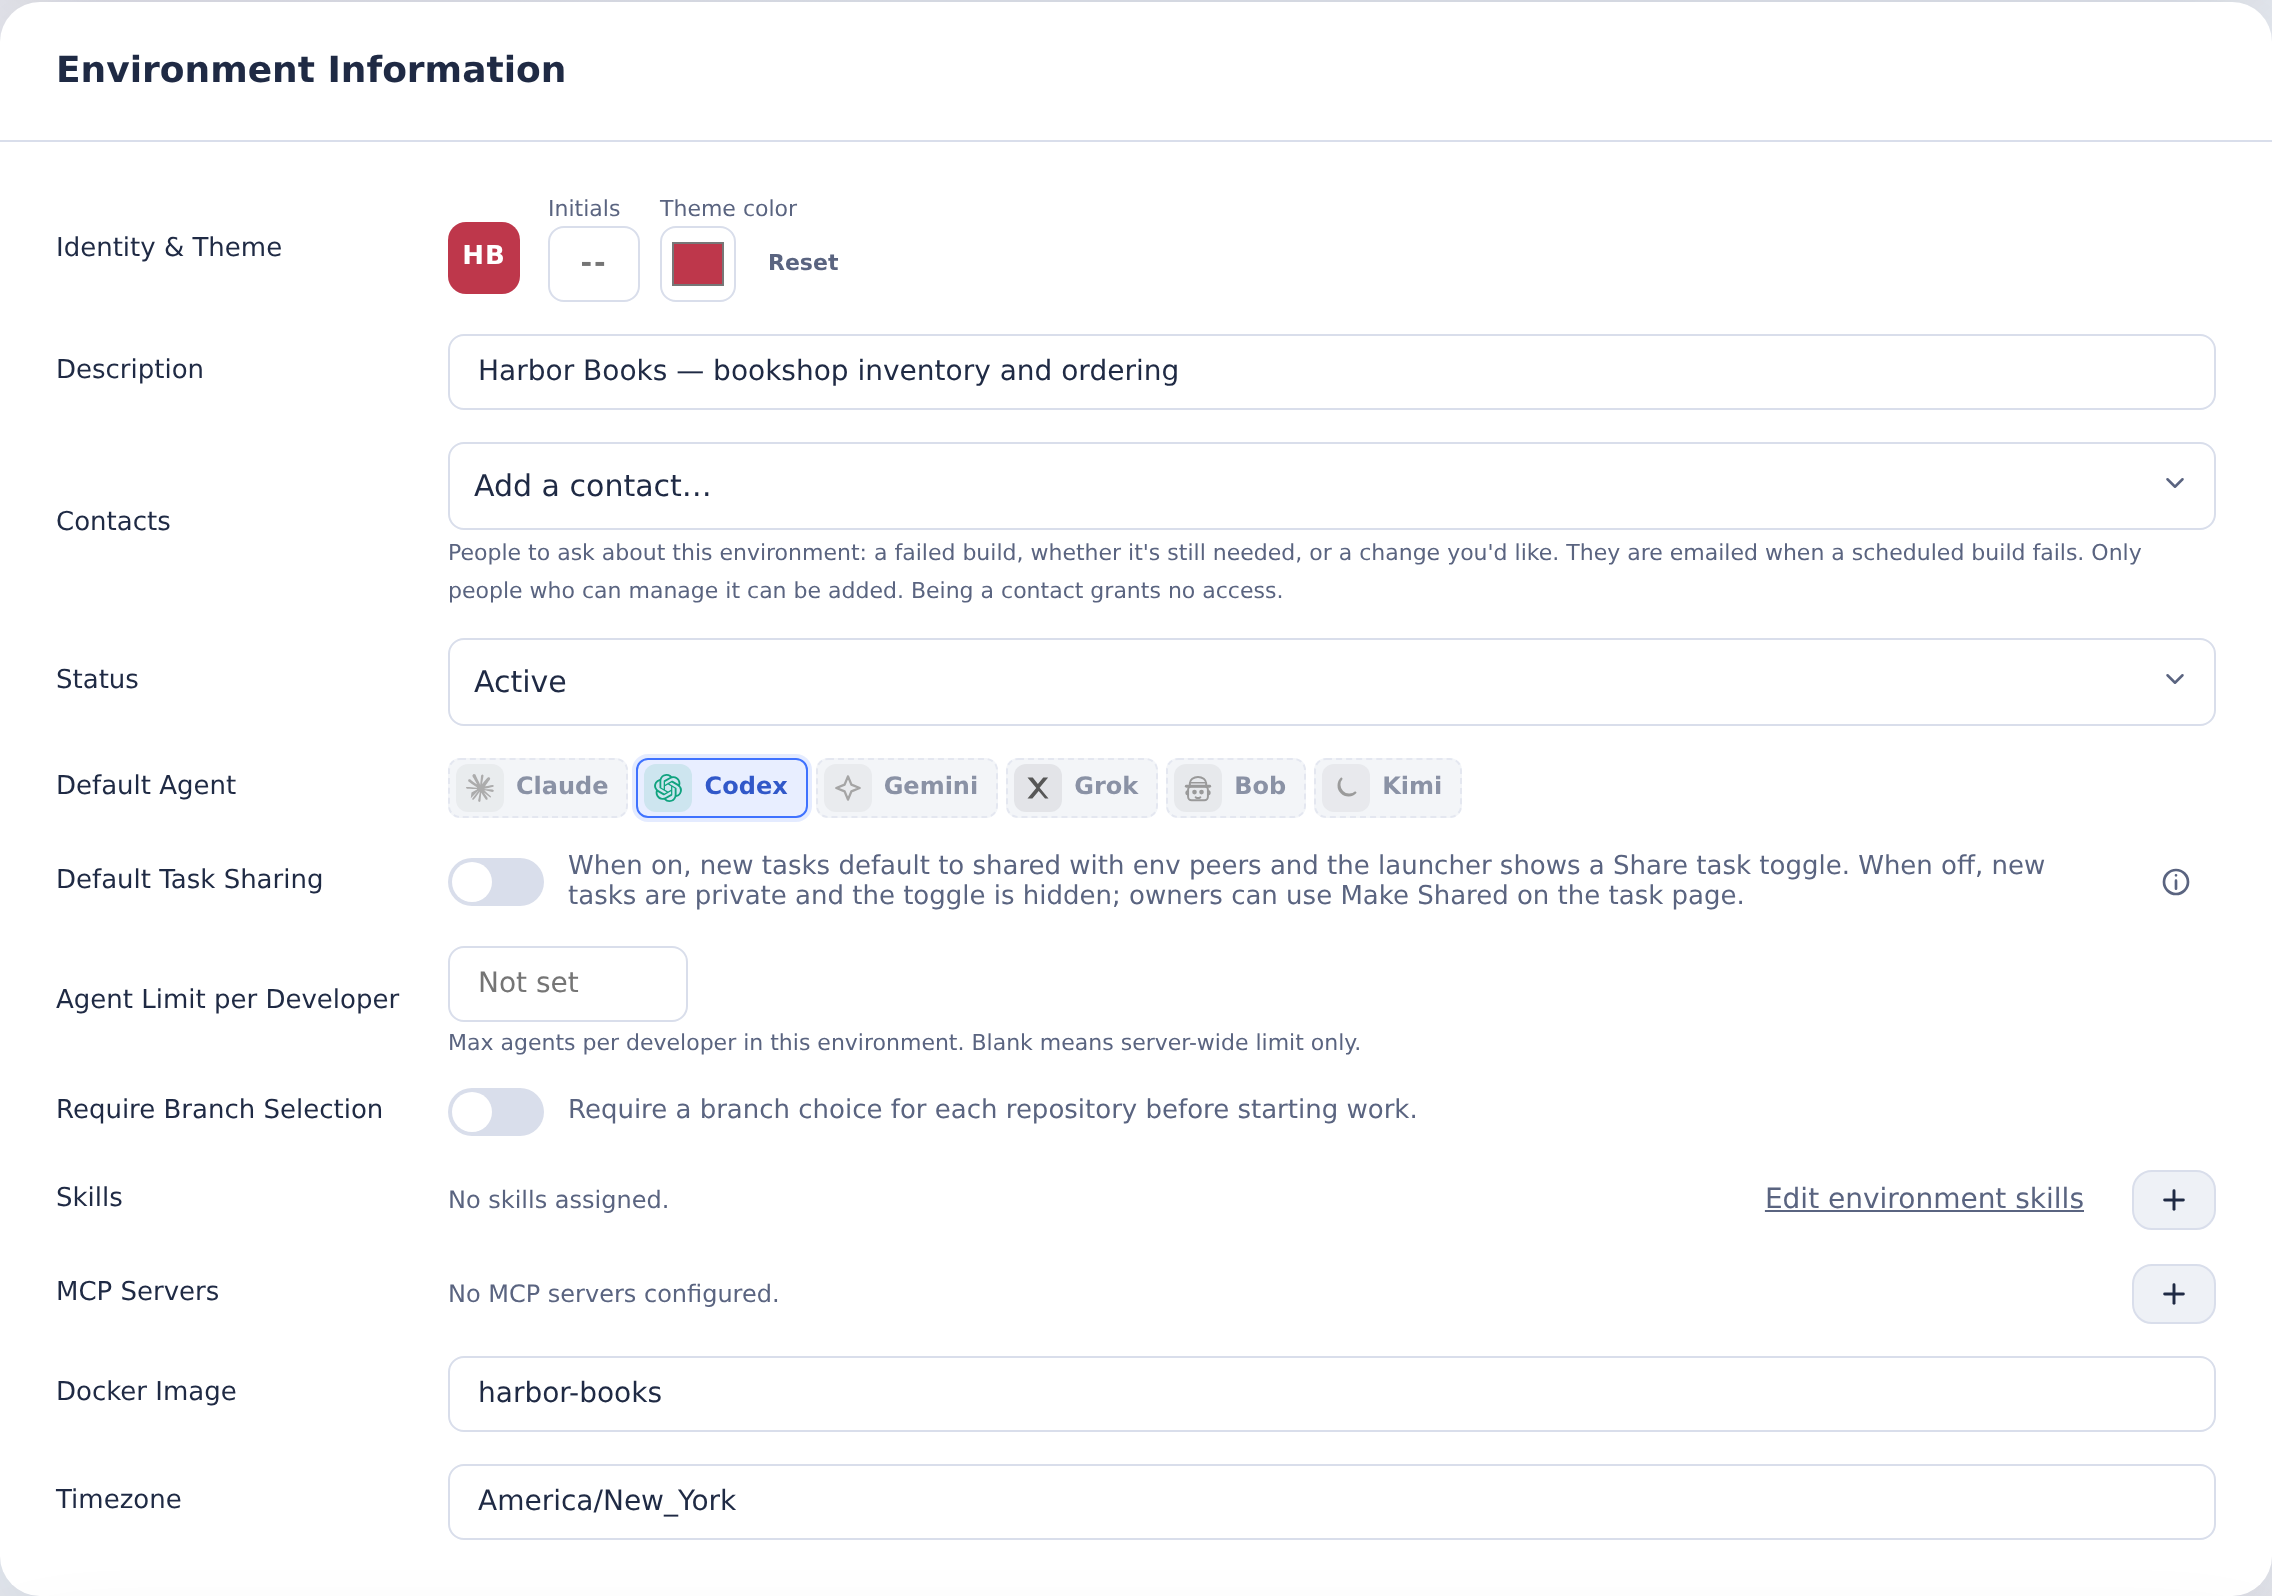
Contacts
Contacts names the people to ask about an environment, for example about a failed build, whether the environment is still needed, or a change someone wants to make. They are shown under the description at the top of the environment for everyone who can open it. An environment can have up to 10 contacts.
Contacts are informational and grant no access: what anyone can do in the environment still comes from their roles.
- Who can be added — Anyone who can manage the environment, whether through their own role, a team, or a Server Admin role. Add a contact lists only those people, and CoderFlow refuses anyone else. When everyone who can manage the environment is already a contact, or it has 10, a note replaces Add a contact and says why. To add someone else, first give them access to manage the environment.
- Who can change them — Anyone who can manage the environment. People who can only view the environment's settings see the list.
- New environments — The person who creates, clones, or imports an environment becomes its contact if they can manage it. Otherwise it starts with none. A clone or import does not keep the source's contacts.
- When people leave — Nothing needs cleaning up. If a contact is deleted from CoderFlow, the environment shows their name with (removed from CoderFlow). If they can no longer manage the environment, it shows (no longer manages this environment). People who manage the environment are asked to remove them or add someone else, and other settings still save in the meantime.
Failed scheduled build emails
When a scheduled rebuild fails, CoderFlow emails the environment's contacts. Builds started by hand are not emailed, since the person who started one is watching it. The email names the environment and when the build failed, and links to the build log. It does not include build output.
A contact is emailed only if all of these are true:
- They still exist and can manage the environment.
- They can view the environment's builds.
- They have an email address.
- They have not turned off Failed scheduled builds under Notifications in their profile.
Email must be configured on the server. The link to the build log uses the server's public URL (site_url); without one, the email tells the reader to open the environment's Build tab instead. A build that keeps failing on schedule sends an email each time it fails.
Agent Limit per Developer
By default the only ceiling on concurrent work is the server-wide agent limit (Max Concurrent Agents in Server Settings → General, 8 by default), which is shared by everyone. One person launching a large batch of tasks can therefore occupy every slot on the server.
Set Agent Limit per Developer to cap how many autonomous agents a single developer can run at the same time in this environment. Accepted values are 1 to 100. Leave the field blank (its placeholder reads "Not set") to set no per-developer cap in this environment. A blank limit is not unlimited: the server-wide agent limit still applies. People who can view but not manage the environment see "Server-wide limit only" in place of a number.
The two limits stack: a task needs both a free server-wide slot and a free per-developer slot before it starts.
When a developer is at their cap:
- New tasks wait in the queue as usual. The queue skips over a developer who is at their cap and starts the next eligible task instead, so one person's full quota does not block other developers or other environments behind them.
- Actions that restart agent work on an existing task — sending a follow-up, or rewinding — are refused with Agent concurrency limit reached rather than queued, because there is no queue slot to wait in. Wait for one of that developer's agents to finish and try again.
What does not count against the limit:
- Interactive terminal sessions — Attaching to a container or opening a terminal is never treated as an autonomous agent.
- Test, deploy, and documentation-publish tasks — These run outside the autonomous agent pool.
Lowering the limit does not stop agents that are already running; it applies to the next launch.
Architecture and Instruction map
Two collapsible cards on the Overview tab draw the environment. Both start collapsed, and the page remembers whether you opened them.
Architecture shows how the environment, its source code and connected systems fit together:
- the runtime, templates, tests, deployment profiles, skills and custom fields;
- the application server, repositories and connections;
- Portal and published documentation.
Secrets, MCP servers, automations and memory appear only if you can view them. Dotted lines are mentions found in the text, not configured connections.
Instruction map shows where instructions, skills and memories mention each other and the repositories. It lists any problems it finds, such as unresolved mentions or missing targets. Select a document to see its mentions.
Both cards have the same controls:
- Fit, the zoom buttons, and dragging nodes. Reset layout undoes your dragging. Node positions are kept in this browser.
- Export → Download PNG or Download SVG. Exports always use a light palette.
- Maximize fills the window; Esc restores it.
Viewing them needs environments:view_details.
Codex speed modes
Codex's Fast and Ultrafast modes finish sooner but use more allowance or credits, so an administrator decides where they may be chosen.
Server-wide: Server Settings → Models → Codex speed modes:
- Availability:
- Disabled everywhere (the default);
- Selected environments: only environments set to allow them;
- All environments: every environment except those that block them.
- Enable Ultrafast also offers Ultrafast where Fast is allowed, on the models that support it. Ultrafast has higher usage and cost and requires OpenAI access.
Per environment: when the server allows selected or all environments, the environment's Overview tab shows Codex speed modes:
- Use server policy;
- Allow accelerated modes;
- Block accelerated modes.
Both levels need settings:manage to change, so managing an environment alone cannot raise spending. Where no faster mode is allowed, the launcher and reply box don't show the speed control, and an Ultrafast option that isn't allowed is hidden. A task already running in a faster mode keeps the control, with the reason and a way back to Standard. For reviewer speed, see Reviewer Speed.
Custom Task Fields
The Custom Task Fields card on the Overview tab defines extra task detail fields for tasks in this environment — for example an SDLC stage, a project code, or a due date. Users set values when launching a task (the fields appear below the template parameters on the home page) and can edit them later in the task page's Details card. Field values are searchable from the task board using key:value tokens.
Click + Add Field to define a field. Key and Label share a row, with labels above the fields and short visible hints. Saving shows all validation errors inline at once:
- Key — Identifier used for storage and search tokens. Snake_case: starts with a lowercase letter; lowercase letters, digits, and underscores only; max 64 characters. The key is locked after creation.
- Label — Display name shown to users. Defaults to the key if blank.
- Type — One of:
- Text — Freeform text, up to 2,000 characters
- Set list — One choice from a list of options you define (up to 200 options)
- Date — A calendar date
- Number — Any numeric value
- Options — For Set list fields, the list of allowed values. Options can be added, removed, and reordered.
- Default Value — Assigned to new tasks when no value is provided. Leave empty for no default.
- Description — Help text shown to users editing the field.
- Show on board tile — When on, the field's value appears as a chip on the task's board tile.
- Use as board lanes — Set list fields only. The task board's Board view groups tasks into drag-and-drop columns using this field's options. Only one field per environment can be the lane field.
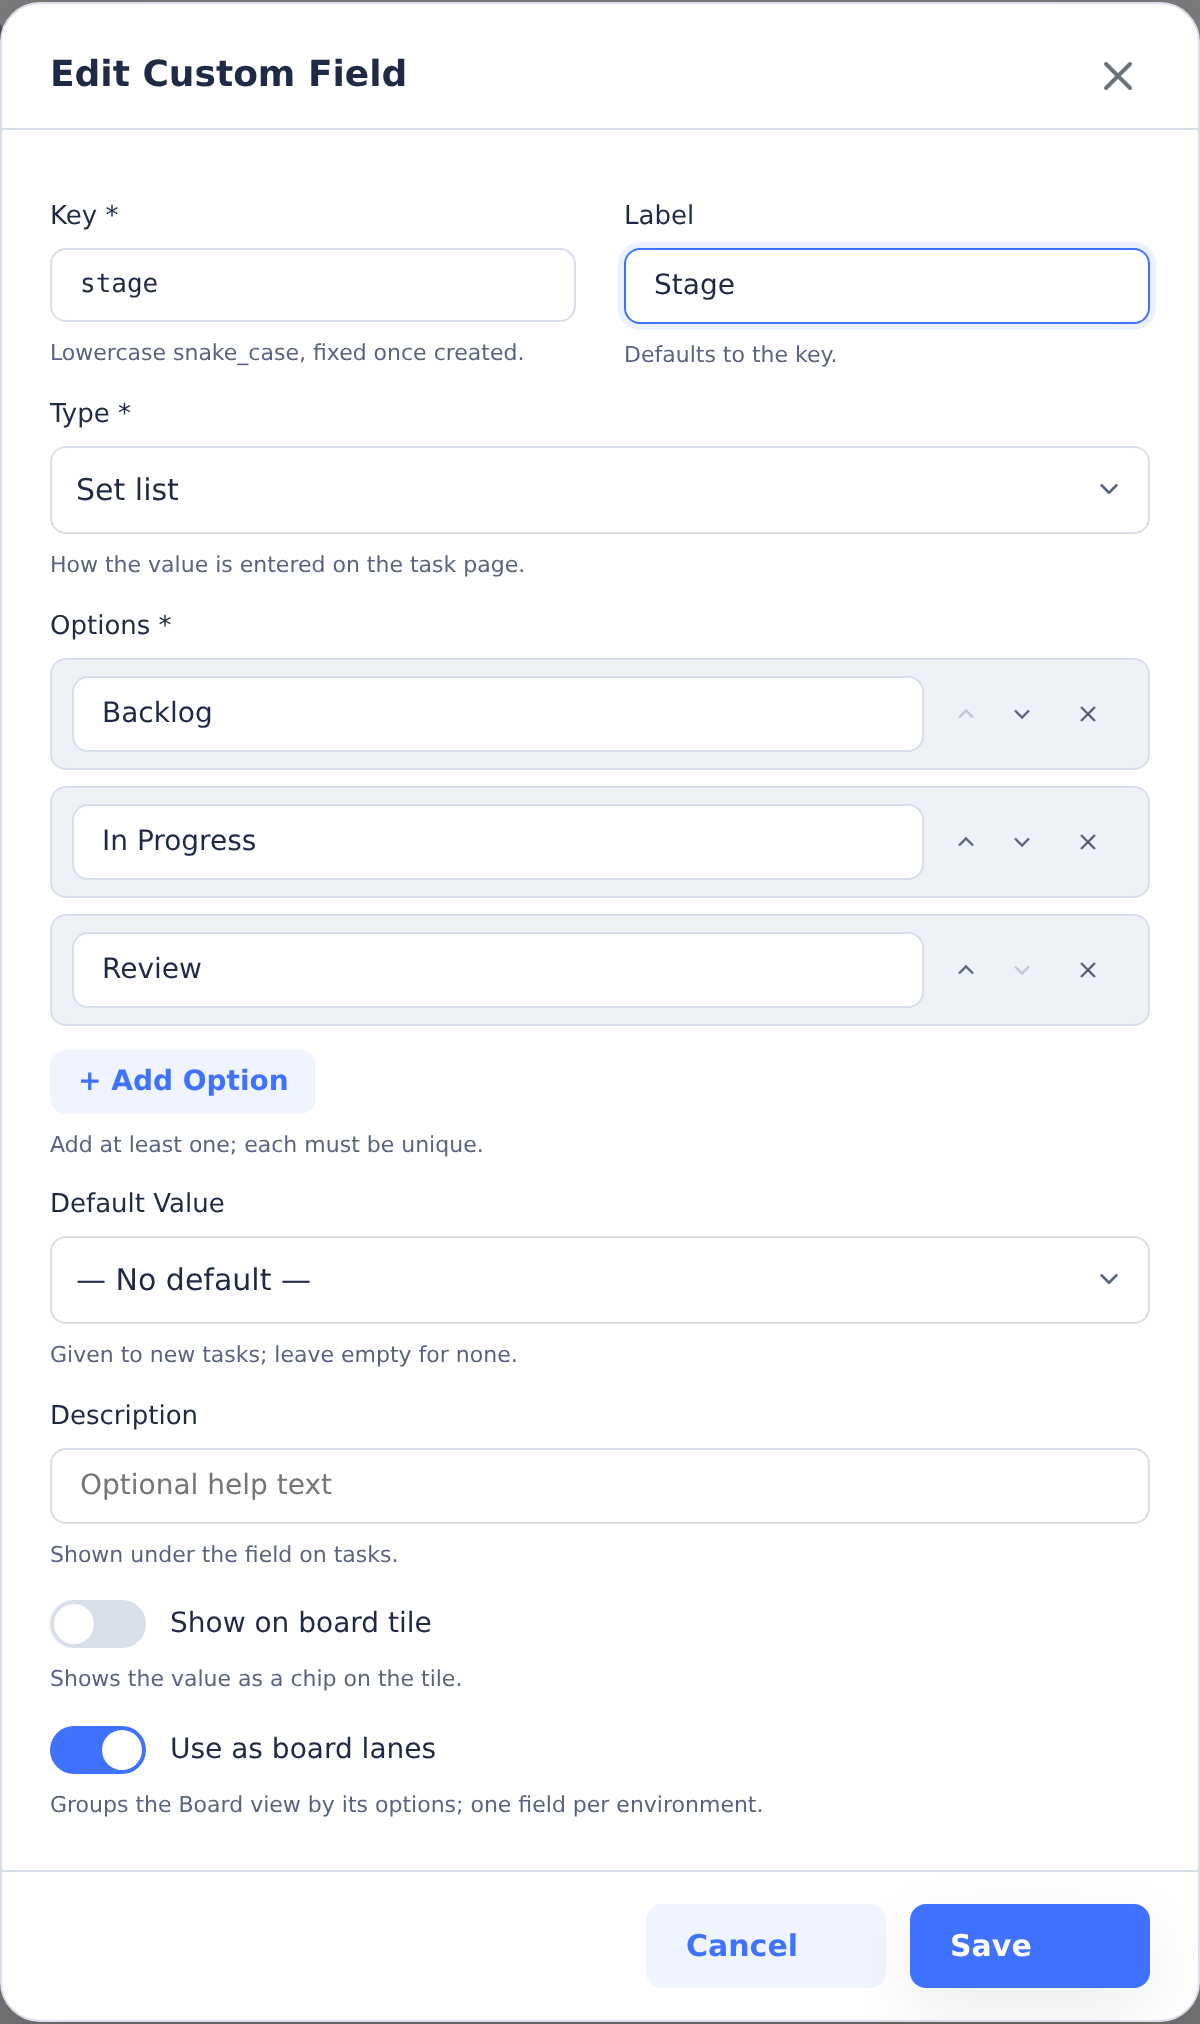
An environment can define up to 50 fields. Use the arrow buttons on the field list to control display order.
Managing field definitions requires the environments:manage permission; editing a field's value on a task requires the same tasks:change capability as other task edits.
Deleting a field definition does not delete stored values — tasks that have a value for a deleted field show it read-only as an Archived field until the value is cleared. Keys cannot be renamed for the same reason: stored task values are tied to the key.
Repositories
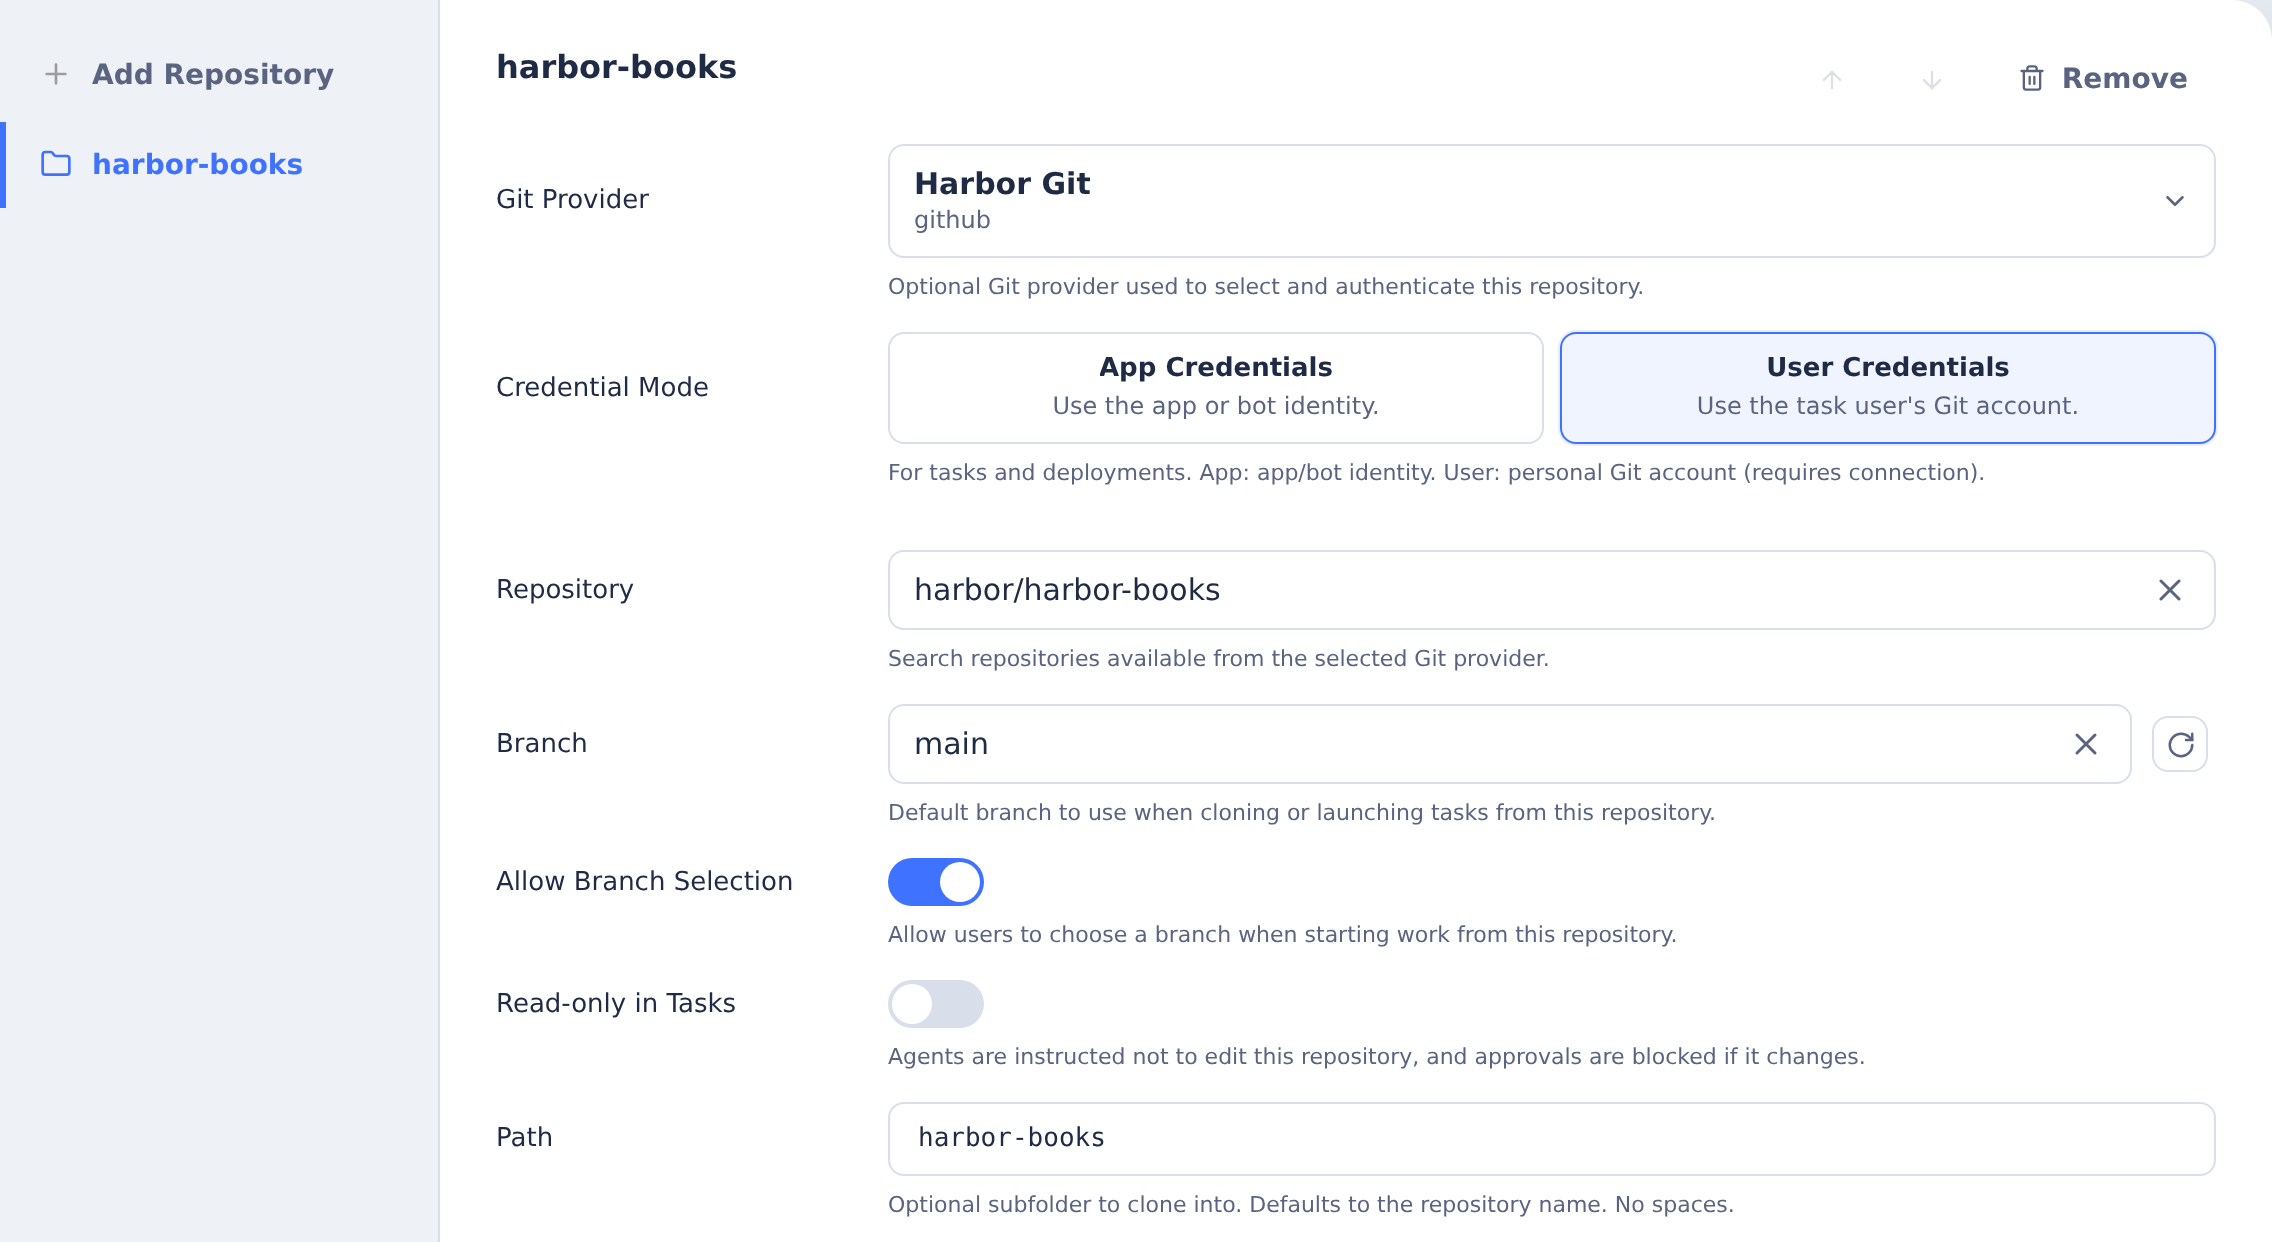
Git repositories cloned into the environment. To add a repository, click Add Repository and choose one of:
- Select from provider — Select a Git Provider from the dropdown, then choose a repository from the list of repos the provider can access. Authentication is automatic for all Git operations (clone, fetch, push) in builds, tasks, and deployments.
- Enter URL manually — Enter a repository URL directly without selecting a provider. Use this for public repositories or when using PAT secrets for authentication.
Repository settings:
- Branch — Default branch to check out
- Allow Branch Selection — Let users choose branches when creating tasks
- Path — Where to clone the repository in the container
- Git History — How much history builds and tasks fetch: a Number of commits (50 by default, up to 500), or Last X days for every commit, including merged branches, from the last 1–365 days. The day window is recalculated at each image build and task start and is limited to 5,000 commits deep. If the window needs more, or the remote cannot provide that history, the build or task start fails with an error instead of continuing with partial history. After upgrading CoderFlow, rebuild the base image and environment images (Actions → Build Images) before using Last X days.
- Credential Mode — How Git operations authenticate with the remote provider (Git Provider repos only):
- App Credentials — Uses the provider's application identity (default for providers without user OAuth)
- User Credentials — Uses each user's personal Git account via OAuth; requires users to connect their Git account before running tasks (default for providers that support user OAuth)
- IBM i Source Import — Designate this repository as the target for the Import IBM i Sources and Generate IBM i Build Rules tools. Only one repository per environment can have this enabled.
- Docs Hosting — Publish a docs folder from this repository as a static docs site served by the CoderFlow server at a stable URL. See Docs Hosting for setup, publishing, and access settings.
Application Server
Configuration for running and testing applications:
- Start Command — How to launch the application server
- Proxy URL — URL for proxying requests to the application
- QA URL — URL template for testing (supports placeholders)
- Authentication — Credentials for accessing the application
- Ports — Ports to expose from the container
- Launch URLs — Quick links for testing the application
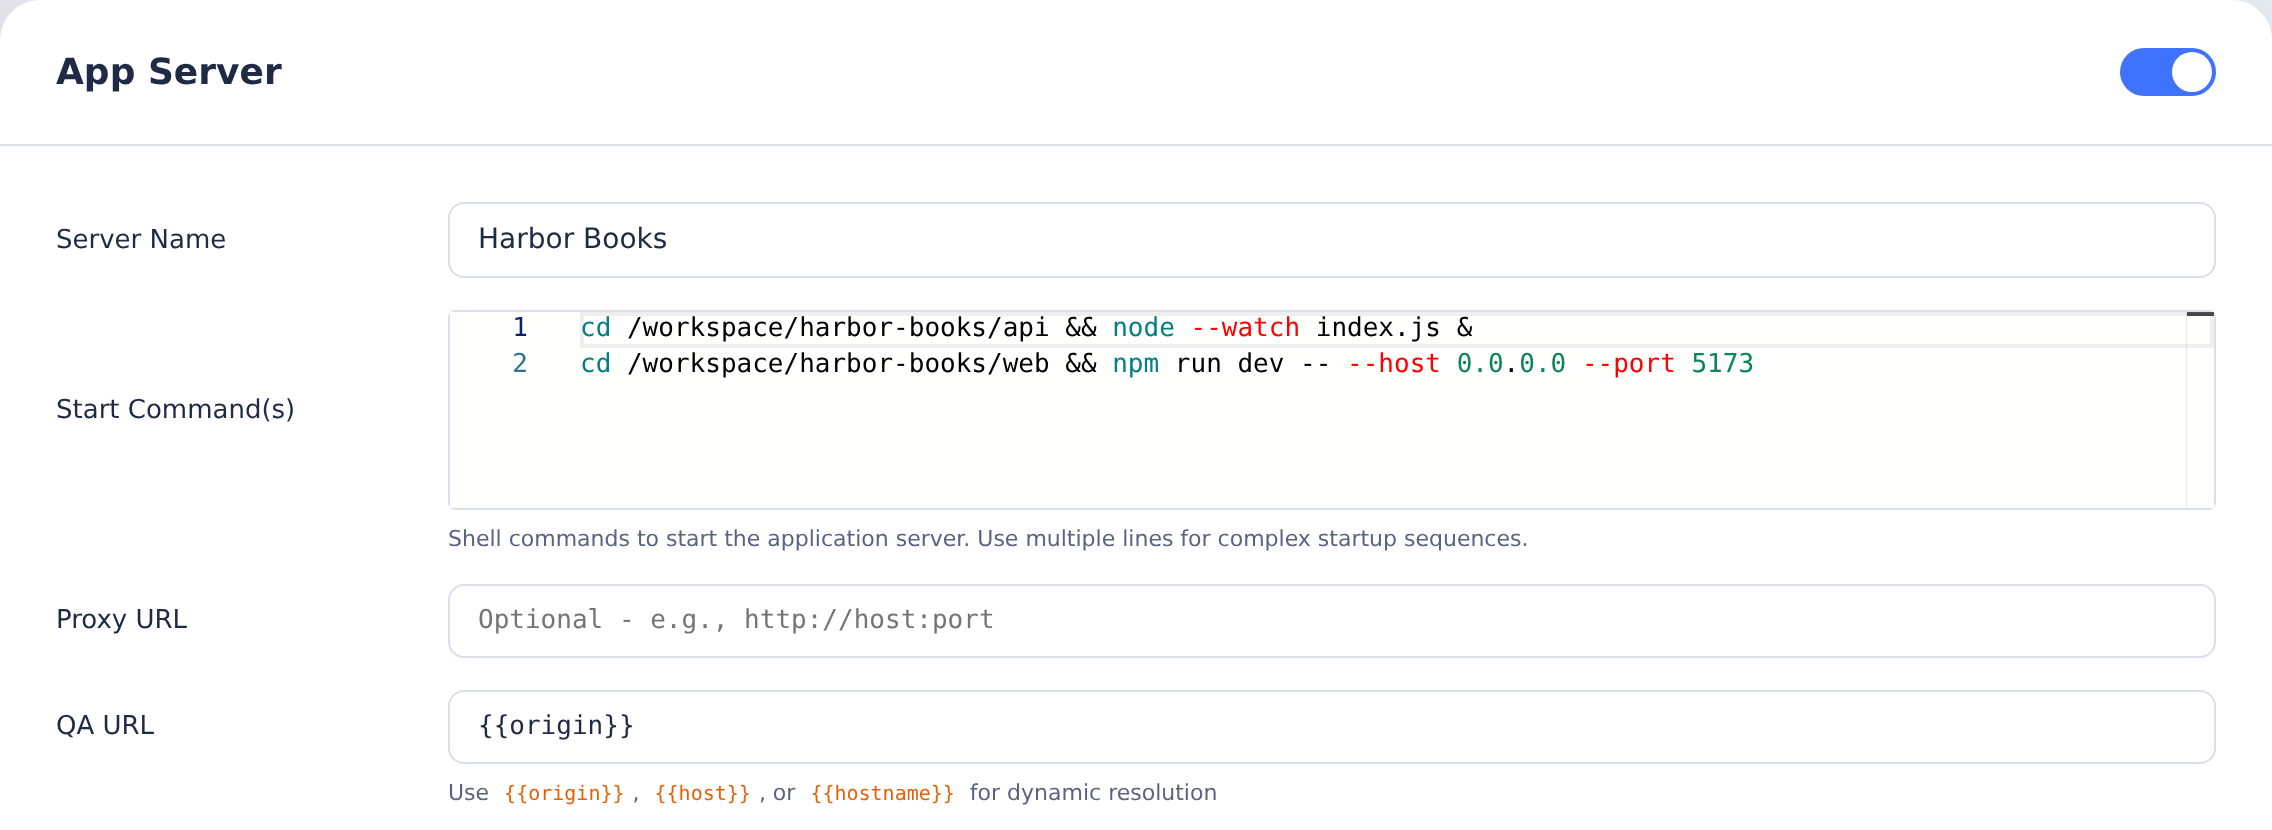
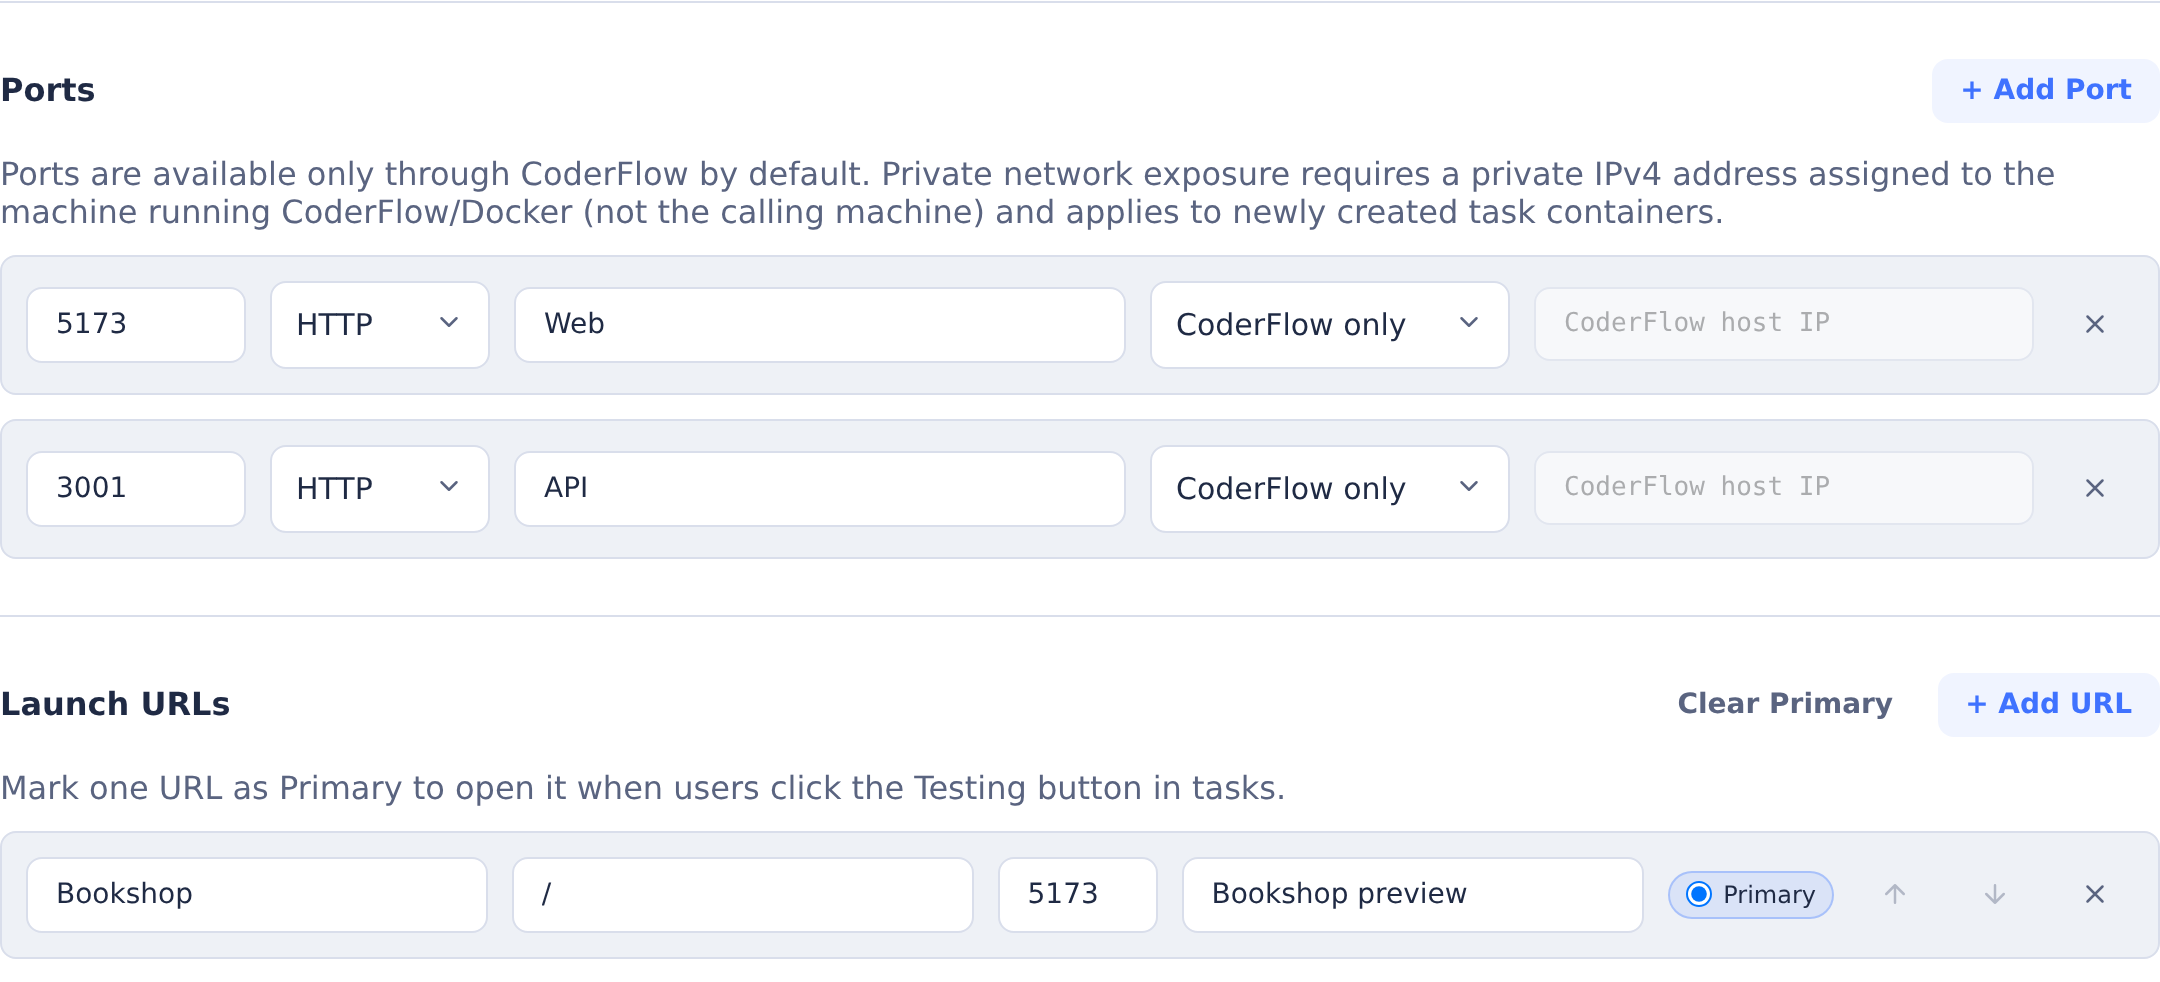
This Harbor Books example runs a Node.js API on 3001 and a React/Vite front end on 5173. The primary launch URL opens the front end.
Next to its port number, each port sets the protocol the application serves on that port: HTTP, the default, or HTTPS. Choose HTTPS when the application accepts only TLS on that port, for example a Profound.js server configured with a certificate; CoderFlow's task proxy then connects to it over HTTPS. That connection stays on the CoderFlow host, so CoderFlow does not check the application's certificate and a self-signed one works. People who open the application through CoderFlow still see CoderFlow's own address and certificate. In environment.json, the setting is "protocol": "https" on the port.
Proxy URL vs. QA URL
Use Proxy URL when CoderFlow should forward task app traffic to an already-running application server instead of starting one inside the task container. In proxy mode, task app links go through CoderFlow's task proxy, which forwards requests to the target URL, adds forwarded headers, handles configured basic auth and proxy headers, and injects the feedback widget into HTML responses.
Use QA URL for QA Mode launch links. QA URLs point to the externally reachable application address that testers should open through the QA proxy. They support {{origin}}, {{host}}, {{hostname}}, and {{protocol}} placeholders, plus port-specific QA URL overrides. All four placeholders resolve from the administrator-configured Site URL (site_url, or SITE_URL if unset), not the browser origin. When Site URL is missing, template URLs are omitted and the server logs a warning; configure Site URL or use literal QA URLs. QA Mode uses these URLs to expose the app through /qa/... routes with widget injection; it does not use the task app proxy target as a fallback.
Screen Rendering (IBM i)
The Server tab also has a Screen Rendering card. Its Screen Render URL is the Genie page that displays IBM i screens captured by tasks. The card appears only when the environment has an IBM i connection. An interactive IBM i connection fills the URL in and makes it read-only. With another IBM i connection, enter a full http:// or https:// URL such as http://host:port/profoundui/genie, or clear the field and click Save to remove the manual URL.
Without an IBM i connection, the card is hidden but any saved screenRenderUrl is kept in the environment configuration. You cannot view or edit that URL in the UI while the card is hidden, even if it is valid. The server still uses a saved manual URL to render captured screens; hiding the card does not disable rendering.
Adding an IBM i connection makes the saved manual URL visible again unless an interactive connection supplies its own URL. A saved invalid value such as admin will therefore show its validation error again when the manual field is visible.
To clear a saved URL while the card is hidden or read-only, an administrator can send an authenticated PUT /environments/{name} request with JSON body {"screenRenderUrl":""}. Replace {name} with the URL-encoded environment name. This removes the manual value from environment.json and reloads the configuration; the usual environment-management permissions and edition restrictions apply. Clearing the manual value does not change a URL supplied by an interactive connection.
Agent Instructions
The Agent Instructions tab manages the environment's AGENTS.md file. This is the durable, project-specific guidance mounted into task, interactive, and deployment containers at /coder-setup/{environment}/AGENTS.md.
Use AGENTS.md for standing instructions that every agent should know before working in the environment:
- Project structure and architecture
- Build, test, and verification commands
- Coding conventions and review expectations
- Repository-specific safety rules
- Domain-specific knowledge agents need
The tab also includes Standard Instructions toggles. These are predefined instruction blocks, such as output requirements or IBM i verification guidance, that CoderFlow appends at task startup when enabled. Keep custom instructions focused on your project; use the toggles for CoderFlow-managed conventions that should remain consistent across environments.
User Preferences adds the task creator's profile Agent Preferences, and their Check with me before significant decisions choice when they turned it on. Turn it off to keep the environment's instructions the same for every user.
Portal questions and reports include Credential Handling, which is always on there, and User Preferences when it is enabled. They also receive interactive-reply guidance automatically. The blocks for IT development work, such as task summaries, commits, builds and IBM i verification, are left out of Portal turns even when they are enabled. Custom instructions in AGENTS.md still apply to Portal turns.
Agents with permission to update environment instructions can also use the Environment Instructions skill during a task to view or propose updates to AGENTS.md. The skill can also view, update and reset the environment's orchestration policy. Use the separate Memory tab for accumulated project notes that should be loaded as memory; AGENTS.md is best for stable operating rules.
Use task retrospectives to collect suggestions from completed work for a person to review in the Lessons tab.
Lessons
Open Environments, select the environment and open Lessons to review suggestions people kept from task retrospectives. The tab and its numbers are available with either environments:instructions or environments:manage on this environment, plus environments:view_details to open Environment Management for it.
Retrospectives
Choose when to run automatic retrospectives with Retrospectives, then click the page's Save button. Changing this setting requires environments:manage.
| Setting | When it runs |
|---|---|
Off (off) | No automatic retrospectives. This is the default. |
Tasks with corrections or findings (signals) | After a person approves an eligible task that has at least one of the signals below. |
Every approved task (always) | After each person's approval of an eligible task, subject to the task's run and repeat limits. |
The signals are a follow-up typed by a person, a review finding of medium priority or higher, a rewind, or a failed agent turn. Human follow-ups can come from the Web UI, API, Slack or Teams. Automatic review feedback, messages from other tasks and answers to interactive questions do not count as human follow-ups for this setting. A command or test failing inside a turn is not itself a failed turn, and an agent error followed by successful completion of that same turn does not count.
Run retrospective on a task works in every mode. See when a run can start and its usage limits.
Decide on Proposals
Each proposal shows its suggested rule, evidence, kind, suggested home and confidence, plus who proposed it and when. The source task is linked only if you can view it; otherwise you can read the proposal but no other content from that task. Product feedback is not included in this list.
The list has four groups:
| Group | Meaning |
|---|---|
| Waiting for a decision | Someone kept the lesson on a task; no environment decision has been made. |
| Accepted | A person accepted the proposal. Acceptance alone changes no instructions, skills or templates. |
| Applied | An apply task reported that it made the change or that the guidance was already covered. |
| Rejected | A person decided not to use the proposal. |
Choose Accept or Reject with environments:instructions on this environment. You can change an accepted proposal to rejected, or a rejected proposal to accepted, while it is neither applied nor held by an apply task. Applied decisions are final. The Applied and Rejected groups start collapsed; open them to see their lessons. Use Refresh to read the latest list and numbers.
The environment keeps up to 1,000 proposals. When it reaches the limit, the oldest applied and rejected proposals are removed first. If there is still no room, reject proposals you do not want or apply accepted ones, then try keeping the lesson again.
Apply Accepted Lessons
Click Apply accepted lessons, then Start task, to launch an ordinary task in this environment for the accepted proposals. The task runs as you and starts private to you, subject to the normal permissions for viewing private tasks.
It reads the current instructions, skills and templates, treats the proposals as suggestions to weigh, merges duplicates and skips guidance already covered. It edits only the environment's instructions, skills and templates through the shipped Environment Instructions, Skill Editor and Environment Templates skills, using your own permissions. It never writes memory or edits repository files. Starting it needs environments:instructions and permission to create a task here; each edit also needs the permission for its destination, including environments:templates for templates and skills:task-edit with environments:skills for environment-owned skills. A lesson that needs an edit you cannot make stays accepted.
The server refuses an apply task's attempts to write environment memory. Through CoderFlow's task tools, the apply task cannot create, fork or take over tasks, control other tasks, or land or deploy anything.
The suggested home is the retrospective's recommendation, not a destination Apply must use. If a lesson suggests memory or repository documentation, the task puts the rule in the environment's instructions, a skill or a template when it belongs there. Otherwise the lesson stays Accepted, and the task's result says where a person should put it. You can then reject it or handle it by hand.
A held lesson is reserved for an apply task while that task is queued, starting or running its first turn, so nobody can change its decision or send it to another apply task. The lesson says “A task is applying this lesson now.” While any lesson in the environment is held, Apply accepted lessons is not offered: “A task is applying accepted lessons now.” appears in its place, and another apply task cannot start. The hold ends when that turn ends, including failure or interruption, or when the task can no longer start. Lessons reported as changed or already covered move to Applied, with Already covered on the latter; lessons not applied or missing from a usable result stay Accepted.
Use Open the task to read the result; applied proposals also link to the applying task if you can view it. Review the changes in the setup repository's uncommitted changes before publishing them through the configuration workflow. Edits through these skills are saved configuration changes, so publishing to Git is not what makes them take effect.
Read the Numbers
The figures cover the last 30 days and use the task history currently loaded by the server:
| Figure | What it counts |
|---|---|
| Retrospectives run | Eligible tasks approved within the window that have a retrospective record, including records still running, failed or unable to start. It counts each task's latest record, not every past run. |
| Lessons kept | Lessons currently marked kept in those tasks' records, including carried lessons from earlier retrospectives. |
| Accepted | Proposals made within the window whose current state is accepted. |
| Applied | Proposals made within the window whose current state is applied. |
| Follow-ups per approved task | Total recorded follow-ups on eligible tasks approved within the window, divided by the number of those tasks; zero when there are none. |
The task-based figures include eligible tasks regardless of who approved them, even when another task or an automation approved them. Follow-ups include automated messages and review feedback, not just human corrections. Proposal figures use when the lesson was proposed, not when it was accepted or applied. The group counts in the list cover all retained proposals, so they can differ from the figures for the window.
When loaded history is shorter than 30 days, a note says the numbers cover less than that. These are counts of current records, not a permanent history of every run or decision, and the figures expose no task names or lesson text.
For a regular review of accumulated guidance, use the scheduled consolidation recipe.
Skills
Skills are reusable prompt-based actions that agents can invoke during tasks. In the Overview tab, use Manage Skills to assign skills to the environment. Assigned skills are injected into every task launched in this environment, so agents have them available immediately.
If you need different skills for different projects, create separate environments or update the assigned skill set before launching new tasks.
See Skills for creating, importing, and assigning skills. For external tools, see MCP Servers.
Files
Manage build and lifecycle scripts under Build → Scripts:
- pre-clone — Dockerfile instructions run before repositories are cloned
- post-clone — Dockerfile instructions run after repositories and their post-clone actions
- setup.sh — Initialization script run when containers start
- cleanup.sh — Cleanup script run when containers stop
cleanup.sh runs inside the container, only when it is sent SIGTERM as it stops, with a few seconds to finish and no retry, and a deployment container never runs it when its script finishes. To delete something a script creates outside the container, such as an IBM i library or a scratch SQL schema, register it with cfres instead; the server deletes it over the environment's connection after the container is removed. See External Resources. The server retries a failed deletion with a growing wait, up to CODERFLOW_EXTERNAL_RESOURCE_MAX_ATTEMPTS attempts (default 10, about a day; set it in the server's environment), then marks the resource orphaned. A deletion that cannot run at all, for example because its connection was deleted, is orphaned on its first attempt. Each orphan appears as an error in the server log naming the resource, which then has to be deleted by hand.
CoderFlow generates the Dockerfile from the environment settings. Use Build → Preview Dockerfile to inspect it. The build-hook guide explains where runtime installation and dependency commands belong.
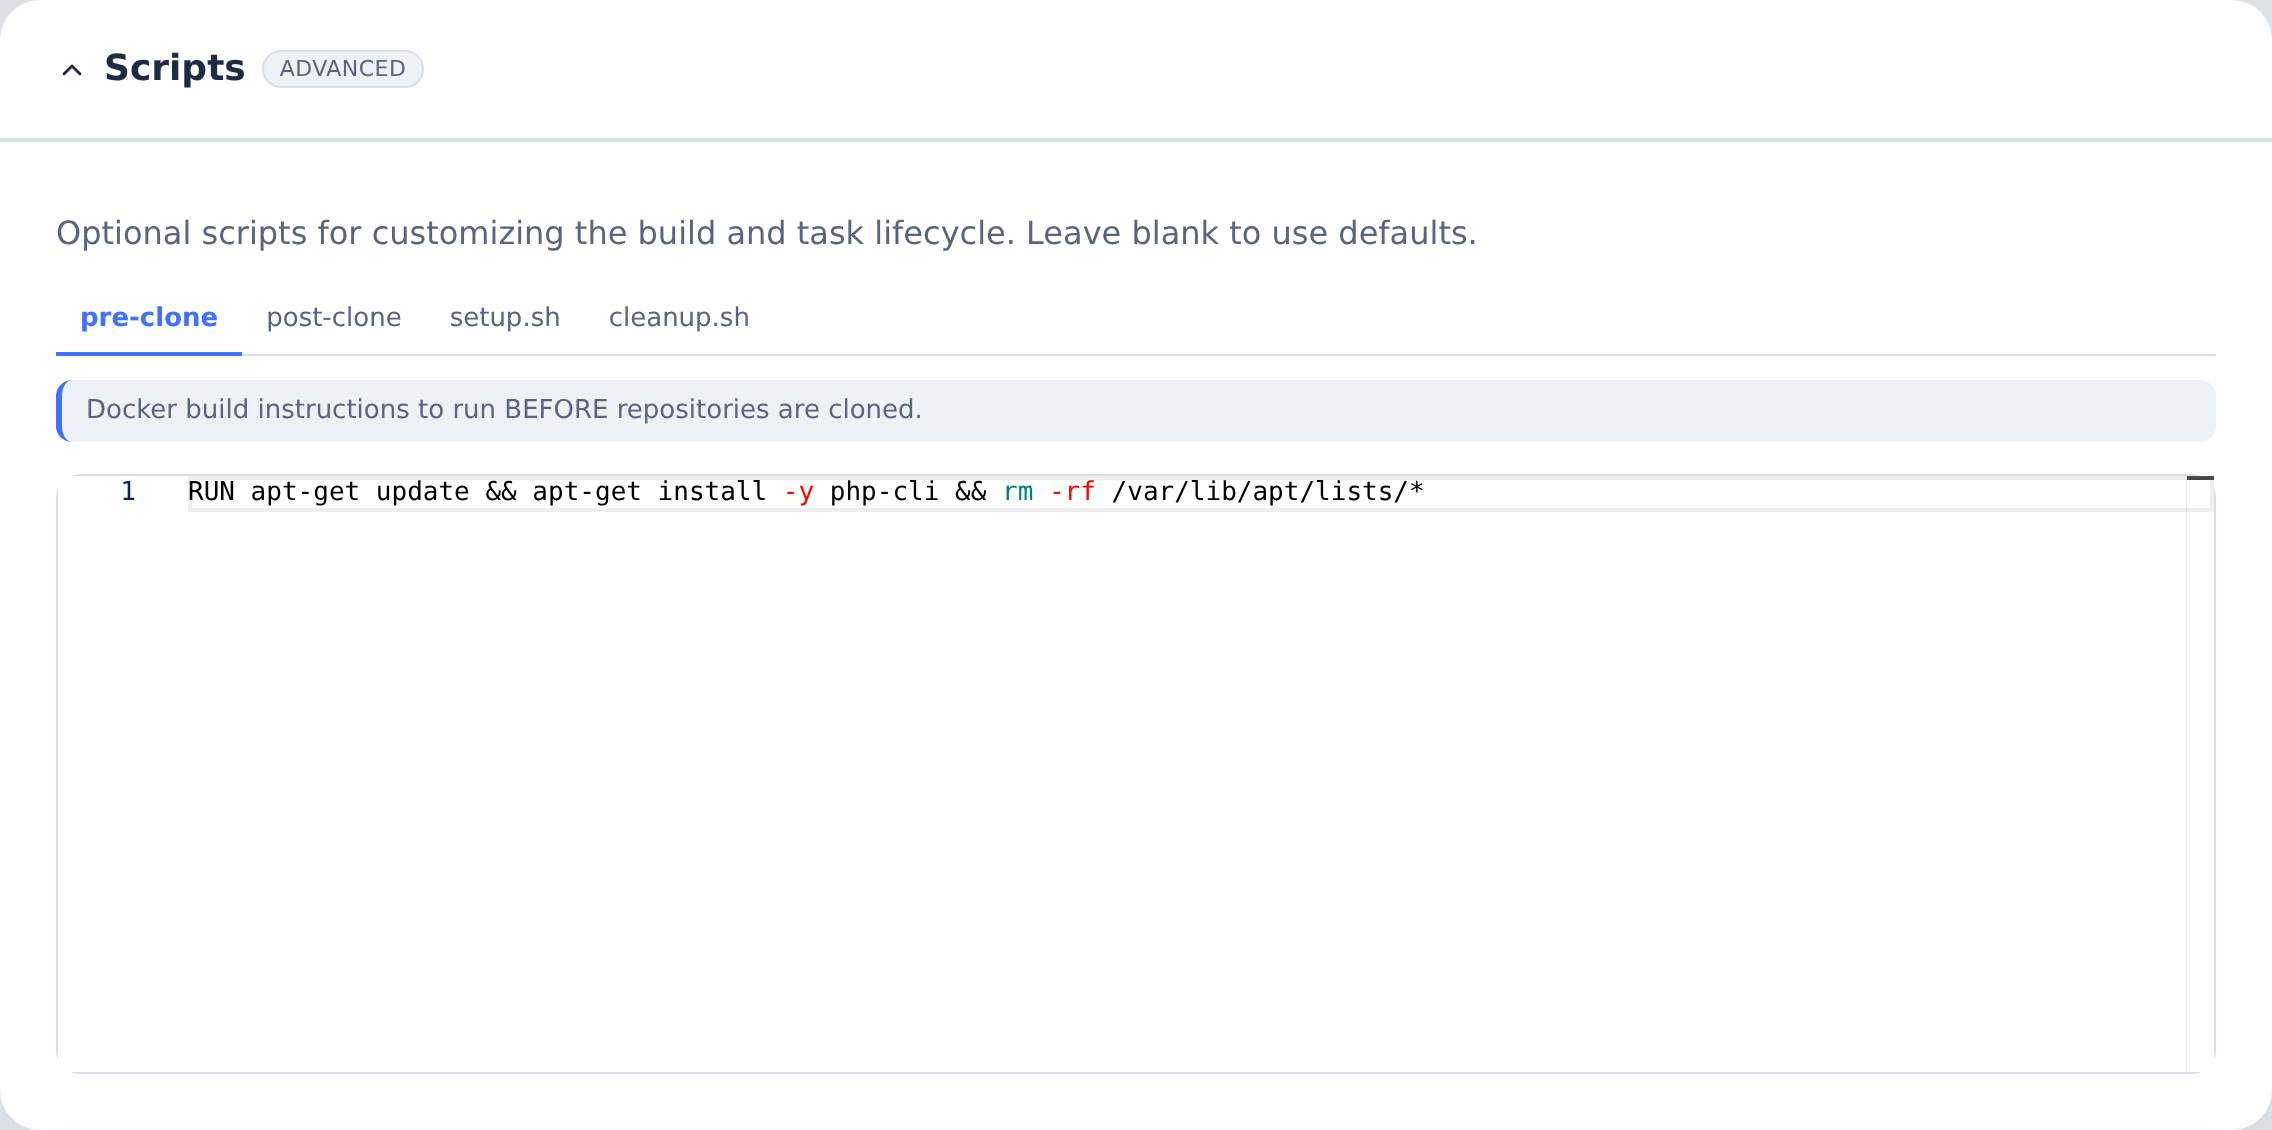
The pre-clone example installs PHP. Use the commands for your runtime in the Stack reference.
Secrets
Secrets store sensitive values like API keys, credentials, and certificates for use in builds, tasks, and deployments. They are also used to define non-sensitive environment values like external service URLs, ports, and so on.
Defining Secrets
Navigate to the environment's Secrets tab and click Add Secret to open a form with labels above the fields, arranged in this order:
- Secret Name and Description share a row.
- Source Type selects File on host or Direct value.
- Special uses groups Each user provides their own value and Use as Git PAT (Personal Access Token). PAT settings include Git Host and, for a custom host, Custom Git Hostname.
- Value or Host File Path appears as appropriate. Selecting Each user provides their own value removes the shared value; each user supplies theirs under Profile Settings → Secrets in CoderFlow or the Portal. A user can limit a personal secret to selected environments; in the others, their value does not replace the environment's.
- Available For presents Build, Tasks, Deploy, and Portal on one line.
- Expose As and Variable Name share a row when exposure settings apply; file mounts use a container path instead. PAT secrets do not need these settings.
Save Secret shows all validation errors inline at once. The form uses short visible hints.
Environment secret values are stored unencrypted in the environment's .secrets.json; the Value badge says Saved, not encrypted. Only the per-user values entered under Profile Settings → Secrets are encrypted, using the server's .user-secrets-key. If that key is lost, see the administrator Lost server key recovery steps.
Secret Types
- Value — Stores literal strings such as API keys, passwords, or tokens. Can be exposed as an environment variable.
- File — References a file on the host system such as SSH keys or certificates. Can be mounted read-only in containers.
Using Secrets in Tasks
Secrets with Tasks availability are injected when task containers start, in the way the secret's Expose As setting chooses:
- Environment Variable — The secret value becomes available as the specified variable name
- File (bind mount) — The file is mounted read-only at the specified container path
Using Secrets in Builds
Secrets with Build availability are passed to Docker BuildKit during image builds. Access them in your Dockerfile using --mount=type=secret:
RUN --mount=type=secret,id=my_secret cat /run/secrets/my_secret
For example, to use an .npmrc file during build:
RUN --mount=type=secret,id=npmrc,target=/root/.npmrc npm install
To expose a secret as an environment variable:
RUN --mount=type=secret,id=api_key,env=API_KEY ./configure.sh
See Docker Build Secrets for more details.
Using Secrets in Deployments
Secrets with Deploy availability are injected when deployment scripts run, in the way the secret's Expose As setting chooses:
- Environment Variable — The secret value becomes available as the specified variable name in the deployment script
- File (bind mount) — The file is mounted read-only at the specified container path during deployment
This is useful for storing deployment credentials, SSH keys for remote servers, API tokens for deployment services, or configuration files specific to deployment targets (Base, QA, Production).
Copy from another environment
When another environment already has the secrets you need, copy them instead of entering them again. On the Secrets tab, click Copy from another environment, choose the Environment, tick the secrets under Secrets, then click Copy. The dialog lists names and kinds only; values are never shown. The result lists each secret: copied, replaced, filled in, or why it wasn't copied.
The button appears only for people who manage this environment and its secrets (environments:manage and environments:secrets) and do the same in another environment. The list includes only environments where you have both permissions and that you can see; a Draft you can't see is never listed. CoderFlow checks both permissions on both environments again when you copy, so a copy started after your access was removed is refused and nothing changes.
What is copied:
- the value, or for a file secret its file, copied on the server;
- the description (left out when it contains the secret's own value, see below), Available For, Expose As and Variable Name (or container path), as written;
- for a Git PAT secret, its Git Host. The token stays with that host.
What isn't copied:
- secrets with Each user provides their own value, which have no shared value;
- secrets with no value;
- file secrets whose file is outside the other environment's directory, and files over 1 MB. A link that stays inside the directory is followed; one that leads outside it is refused. CoderFlow never opens a file outside; the secret is listed with the reason it can't be copied.
A file secret's file is copied into this environment's .connection-secrets/secret-files/ folder, one file per secret, and the copied secret points there. Exports leave that folder out, and the setup repository's .gitignore must ignore it (.connection-secrets/ does; CoderFlow refuses the copy otherwise), so the file can't be committed. A copy never overwrites a file that another secret in this environment uses.
Names, descriptions, Git hosts and the other plain fields are configuration: they are copied as written, as anyone who can view the other environment already sees them. A secret's value, or its file, is never shown or sent to the browser, and is copied only on the server. Each secret is checked against its own value only. It is listed with its name hidden, and isn't copied, when its own value appears in its name, Git host, Expose As or Variable Name (or container path). A value under 6 characters counts as the whole field or a whole word of it; a longer one counts anywhere. A description that contains the secret's own value doesn't stop the copy: the secret is copied without its description, and the result says so. Other secrets' values and connection passwords don't affect it. An environment whose secrets can't be read lists none, and nothing is copied from it.
A secret that already has a value here is left as it is unless you tick Replace secrets that already have a value here. An empty secret, such as one Generate from repository added, is filled in either way, keeping its Expose As settings. A PAT secret declared here for a different Git host is never filled with another host's token.
Using Secrets as Git PAT
A secret can provide Git authentication for HTTPS repositories. When adding a secret, check Use as Git PAT (Personal Access Token) under Special uses and specify a Git Host (e.g., github.com) to use the secret as a Personal Access Token for Git operations. The PAT applies to any repository under Repositories that matches the hostname.
PAT secrets can be either Value type (token entered directly) or File type (token read from a file on the host). Select Available For contexts as needed—Build, Tasks, or Deploy. PAT secrets do not require "Expose as" configuration.
In builds, PAT credentials are available as the git-credentials build secret. Mount it to the standard Git credentials location:
RUN --mount=type=secret,id=git-credentials,target=/root/.git-credentials \
    git clone https://github.com/myorg/private-repo.git
In task and deployment containers, the PAT is automatically configured in the Git credential store.
Note: PAT secrets are ignored for repositories that have a Git Provider configured.
Connections
Connections define external servers that containers can access during tasks and deployments, and services used by server automations. Microsoft 365 connections are used only by automations and never reach containers. For container connections, instead of manually configuring SSH keys, database credentials, and environment variables through secrets and setup scripts, declare a connection once and CoderFlow injects the appropriate configuration into every container that needs it.
Click Add Connection, then choose the Database, IBM i, SSH, or Microsoft 365 type card. Database then asks for its Database engine: SQL Server, PostgreSQL or MySQL (also MariaDB). Nothing is preselected; the form appears after you choose. When editing, the title identifies the fixed type, for example Edit IBM i Connection or Edit PostgreSQL Connection; the type and the database engine can't be changed.
The form is arranged in titled panels: General contains Name, Description, and Available For; Server contains Host, Port, Transport, CoderFlow Bridge, Database, User, and Password as applicable. IBM i Features and each enabled feature's settings follow, then Portal Applications (application hosting and launch trust), Advanced, and Connection checks where applicable.
Expand the collapsed Advanced panel to change the preflight requirement using Block task startup if this connection fails its preflight check. Its summary shows Preflight: warns only or Preflight: blocks task startup. Saving marks every invalid field at once and shows an error summary at the top. Credential badges distinguish Saved securely (connection password and SSH private key) from Not saved (temporary setup and configuration-check passwords).
Saved credentials are never sent back to the browser. When you edit a connection, the password and SSH private key fields are empty, and a Saved placeholder shows that a value is stored. Leave a field blank to keep the saved value, or enter a new one to replace it. Test connection and the setup checks use the saved values. People who can view the environment but not manage it see the connection list without credentials or edit controls.
Saved credentials stay with the target they were saved for: the connection's host, user, transport, type and port. Host names are compared without letter case or a trailing dot, and IBM i user profiles without letter case. When you change the host, port, user or transport, the dialog explains that the saved password and SSH private key are not kept, and marks them Required for new target. Enter each one again; a saved credential you leave blank is removed, and a required one stops the save. The server applies the same rule, comparing with the connection as currently saved, so a save from a dialog opened before another manager changed the host is refused until you enter the credentials again. With a changed host, port, user or transport, Test connection and the setup checks use only a password or key you enter; without one they report that saved credentials are only used with the target they were saved for. If a connection's host or user is changed outside the editor, for example in environment.json through the setup repository, its saved credentials are not used until they are entered again in the dialog.
Microsoft 365 has its own panel for Tenant ID, Client ID (application ID), Client secret and Delivery. Choose Webhook with a Public base URL, or Azure Event Hubs with Namespace, Event hub and Consumer group. Available For is fixed to Automation. The secret is encrypted on the server; leave it blank on edit to keep it, but re-enter it when the tenant or client ID changes. Test connection checks authentication and, for Event Hubs, receiving access; mailbox access and delivery are checked when an automation is enabled. See Microsoft 365 mailbox for tenant permissions, delivery setup and troubleshooting.
Connection Types
-
Database — Connects to an existing SQL Server, PostgreSQL, or MySQL or MariaDB database. Requires host, database, user, and password. Containers receive a pre-configured database connection that agents use through the
sqlskill. See Database connections below. -
IBM i — Connects to an IBM i system. IBM i connections are feature-based—you select which capabilities to enable, and CoderFlow configures only what's needed. Features are independent and can be selected in any combination. See IBM i Features below.
-
SSH — Connects to a generic SSH server. Requires host, user, and an SSH private key. Containers receive a configured SSH key and host entry so agents or scripts can connect using
ssh <connection-name>. -
Microsoft 365 — Read-only mailbox access for the When an email arrives (Microsoft 365) environment automation. Uses a single-tenant Entra app and Exchange RBAC for Applications scoped to intake mailboxes.
Available For
Controls which contexts can use the connection, and whether its configuration is injected into a container at all:
- Tasks — Injected into every task container, interactive test container, and standalone test container in the environment.
- Deploy — Injected into every deployment script container in the environment.
- Portal Applications — Available for IBM i when Portal is enabled. Lets users launch applications with their personal IBM i login; see IBM i Portal Applications.
- Automation — Read directly by headless background automations (for example an IBM i Import automation) and never injected into any task or deployment container.
At least one scope must be selected. Most connections use Tasks. Add Deploy when deployment scripts need access to the same external server. Use a dedicated Automation-only connection for a background job so its credentials aren't exposed to every task or deployment in the environment — especially if that connection needs broader IBM i authority than an interactive user's own connection would.
Database connections
Use a Database connection for an existing development or test database that tasks share, such as a database server your team already runs. For a disposable database that runs inside each task container, use a development database instead; it needs no connection.
Choose the Database engine under the Database card:
- SQL Server — A Microsoft SQL Server database.
- PostgreSQL — A PostgreSQL database.
- MySQL (also MariaDB) — A MySQL or MariaDB database. MariaDB connections use this engine.
The engine is saved as the connection's type and can't be changed later; to switch engines, add a new connection. Every engine uses the shared sql skill, which saving the connection imports and assigns, as listed under Skills Auto-Import below.
The Server panel has these fields:
- Host — The database server's fully qualified host name, for example
db.mycompany.com. - Port — PostgreSQL and MySQL only. Leave it blank for the engine's default, shown in the field: 5432 for PostgreSQL, 3306 for MySQL. Otherwise a whole number from 1 to 65535. SQL Server connections have no port field.
- Database — The database to connect to.
- User — The database user that agents and scripts connect as. See Least privilege below.
- Password — Stored encrypted on the server and never shown again. When you edit the connection, leave it blank to keep it. Changing the host, port or user asks for it again: for PostgreSQL and MySQL, Test connection doesn't run until you enter it.
Encryption and certificates
- Encrypt connection (TLS) — PostgreSQL and MySQL only, on by default. The database server must have TLS enabled. Turning it off shows a warning: the password and all data then cross the network in clear text. Turn it off only for a server on a network you trust. SQL Server connections are always encrypted.
- Verify the database server certificate — On by default. CoderFlow then accepts only a certificate that is issued by a trusted certificate authority and matches the host name. For PostgreSQL and MySQL it applies only to an encrypted connection, so it can be turned off only while Encrypt connection (TLS) is on. Turning it off keeps the connection encrypted but no longer checks the server's identity, and shows a warning.
When the database server's certificate is issued by your organization's private certificate authority, keep verification on and add that authority's certificate under Settings → Server Settings → CA Certificates (see CA Certificates). Server administrators get a link to it in the dialog; other people are asked to have a server administrator add it. New task containers trust the certificates saved there. Existing containers keep their previous certificates, so test from a new task container after adding one.
Test connection signs in with the values in the form and reports it as, for example, PostgreSQL sign-in as the user. For PostgreSQL and MySQL, a failed sign-in is explained by a fixed message: for example, the host name couldn't be found, the server refused the connection or didn't answer, the server requires or doesn't support TLS, its certificate isn't trusted, the user name or password was refused, the database doesn't exist, or the user may not use it. The database driver's own error text isn't shown.
Database privilege warning
Saving a PostgreSQL or MySQL connection checks whether its user has elevated privileges:
- PostgreSQL: superuser, or the CREATEROLE, CREATEDB, REPLICATION or BYPASSRLS attributes.
- MySQL and MariaDB: ALL PRIVILEGES on all databases, or the global SUPER, GRANT OPTION, CREATE USER, FILE, SHUTDOWN, PROCESS or RELOAD privileges.
When the user has any of them, a warning lists them and recommends a read-only or development-only user. When CoderFlow can't tell, for example because the check timed out or the server didn't answer it, the warning says so. Can't tell never means the user has no elevated privileges: check the user's privileges on the database server yourself. In both cases, saving needs your acknowledgement: select I understand, and want to save the connection with this user., then Save Connection. Cancel leaves the connection unsaved. CoderFlow records the acknowledgement with the connection: who acknowledged it, when, and what the check found.
The check runs every time the connection is saved. When it finds no elevated privileges, any earlier acknowledgement is removed. Test connection runs the same check after a successful sign-in and reports it as Database user privileges, without asking for an acknowledgement. SQL Server connections aren't checked; the same advice applies to them.
Least privilege
Agents can run any statement the connection's user is allowed to run. Give the connection a user that can do only what tasks need:
- a read-only user, when agents only need to read data; or
- a development-only user, when agents also change data: it may write, but only in a development or test database, and has none of the server-wide privileges listed above.
Never use the database's administrator account. Use a strong password, and where the database server allows it, accept the user only from the addresses CoderFlow and its task containers connect from.
For example, to create a read-only user for an orders database:
PostgreSQL:
CREATE ROLE coderflow_reader LOGIN PASSWORD 'choose-a-strong-password';
GRANT CONNECT ON DATABASE orders TO coderflow_reader;
-- Connected to the orders database:
GRANT USAGE ON SCHEMA public TO coderflow_reader;
GRANT SELECT ON ALL TABLES IN SCHEMA public TO coderflow_reader;
ALTER DEFAULT PRIVILEGES IN SCHEMA public GRANT SELECT ON TABLES TO coderflow_reader;
ALTER DEFAULT PRIVILEGES covers tables that the user who runs it creates later. Repeat the schema grants for each schema agents need.
MySQL or MariaDB:
CREATE USER 'coderflow_reader'@'%' IDENTIFIED BY 'choose-a-strong-password';
GRANT SELECT, SHOW VIEW ON orders.* TO 'coderflow_reader'@'%';
Replace % with the address or subnet CoderFlow connects from when you can.
SQL Server:
CREATE LOGIN coderflow_reader WITH PASSWORD = 'choose-a-strong-password';
USE orders;
CREATE USER coderflow_reader FOR LOGIN coderflow_reader;
ALTER ROLE db_datareader ADD MEMBER coderflow_reader;
For a development-only user, grant the data-changing privileges (for example INSERT, UPDATE and DELETE) on the development database only.
IBM i Features
Features only apply to a connection scoped for Tasks or Deploy — none of them are used by an Automation-only connection, and the IBM i Features panel is hidden when neither Tasks nor Deploy is selected. A note explains this under Available For. The feature choices return if you select either scope again before saving; they are not saved while both scopes are off. When creating a Tasks/Deploy-scoped IBM i connection, select one or more features:
-
SQL — Database access via DB2. Agents use the
sqlskill to execute queries, inspect schemas, and verify data. Connectivity is provided by Profound Logic Remote Access Server (RAS), which must be installed on the IBM i system. Requires a password. -
Build — IBM i program compilation using
codermake. Each task gets its own isolated build library, created automatically when tasks start and cleaned up when they end. Requires an SSH key. Additional fields appear for Build Repo (which environment repositorycodermakeruns in), optional Build Directory (subdirectory within the repo), and Build Library Name Prefix (1–5 character prefix for task library names, e.g.,AITSK). Optional Library Lists name the library lists tasks can compile with, one of which can be the default — see Build library lists. -
Sync — Sync task changes to an IBM i library. When enabled, the approval dialog offers a Sync to IBM i checkbox, and tasks with changed files show a Sync to IBM i button that can be used repeatedly, before or after approval. Source members are created from changed files and written to the specified library. A Sync / deploy credentials setting controls how member sync and UI deploy authenticate:
- Prompt (default for new connections) — You are prompted for a user profile and password each time you sync or deploy. No SSH key or SSH feature is required.
- Connection — Sync and deploy use the SSH user and key configured on the connection. Requires the SSH feature to be enabled.
See IBM i Sync for usage details.
-
Profound UI htdocs Files — Deploys task changes under
htdocs/profoundui/to the configured IBM i htdocs directory, preserving the path belowhtdocs. Like source member sync, deploy does not require task approval and can be run repeatedly. Requires PUI htdocs Path (for example/www/myinstance/htdocs) and the Tasks availability scope. Deploy uses the same Sync / deploy credentials mode as source member sync on that connection. -
Agentic Display Files — Enables task-scoped Profound UI EJS screen overlays for RPG Open Access applications. Requests for
/profoundui/userdata/ui/*can be served from files inside the task workspace instead of the IBM i IFS, so developers can preview EJS templates, CSS, and JavaScript without changing the shared system. This feature also enables Profound UI htdocs deploy and requires PUI htdocs Path and the Tasks availability scope. -
SSH — SSH shell access to the IBM i system. Agents use the
ibmi-clcmdskill to run CL commands remotely. Requires an SSH key. -
Interactive Sessions — Agent-driven interactive testing through Profound UI. Agents can operate 5250 terminal and Rich Display sessions, with recordings visible in task visualizations. Requires a password. Additional fields appear for PUI Base URL, PUI Render Path, and PUI Launch Path. This feature requires the Tasks availability scope.
When multiple features are selected on the same connection, they share configuration where appropriate—for example, Build uses the SSH key from the SSH feature when both are enabled.
SSH Key Management
Connections that require SSH access (IBM i with SSH or Build features, Sync/htdocs deploy in "Connection" mode, and generic SSH connections) need a keypair. The connection form provides several options:
- Import from file — Upload an existing private or public key file from your local machine
- Generate Keypair — Generate a new RSA 4096-bit keypair on the server (
ssh-keygen -t rsa -b 4096). Both key fields are populated automatically. - Install Public Key on Remote — After saving a connection with a keypair, this button appends the public key to the remote host's
authorized_keys. Enter the remote user's password (used only for this operation, not saved). For source-address restrictions and other hardening considerations, see SSH Key Management.
Testing Connections
Choose Test connection in the Add/Edit dialog footer for any connection type. Results appear in Connection checks. SQL Server and SSH show their sign-in results. PostgreSQL and MySQL show theirs as PostgreSQL sign-in as or MySQL sign-in as the user and, after a successful sign-in, a Database user privileges row: Passed when the user has no elevated privileges, Needs attention with the elevated privileges found, or Could not check when CoderFlow can't tell. Only Save asks you to acknowledge them; see Database privilege warning. IBM i also reports the selected services’ readiness. For IBM i, Check configuration with another profile lets you supply temporary credentials for configuration inspection.
Tests use the values visible in the form, not the last-saved values, so you can change a field and test immediately without saving first.
CoderFlow records the result of a test of the saved connection, run with its saved host, user, database and credentials, for the Finish setup connection step. A test with a host, user, database, password or key typed into the form isn't recorded. Changing the connection's host, user, port, transport, database, password or SSH private key makes its recorded result out of date until it's tested again.
Skills Auto-Import
When you save a connection, CoderFlow automatically imports and assigns the skills agents need:
| Connection Type | Feature | Skill |
|---|---|---|
| Database (SQL Server, PostgreSQL, MySQL) | — | sql |
| IBM i | SQL | sql |
| IBM i | Build | codermake |
| IBM i | Profound UI htdocs Files | (none) |
| IBM i | Agentic Display Files | ejs-screen-designer |
| IBM i | SSH | ibmi-clcmd |
| IBM i | Interactive Sessions | ibmi-interactive-session |
| SSH | — | (none) |
Skills are only added, never removed—deleting a connection does not remove its associated skills.
IBM i User Profile Setup
IBM i connections require a properly configured user profile on the IBM i system. Click How to set up IBM i user profile in the connection form to see the CL commands for creating and configuring the profile. Each command can be copied individually. Additional manual setup includes configuring the user's JOBD or initial program for the appropriate library list, and ensuring PUISETENV is called for interactive sessions.
Restrictions
- An environment can have at most one IBM i connection with the Build, Sync, or Interactive Sessions feature per availability scope. Multiple IBM i connections with only SQL and/or SSH features are allowed.
- The Interactive Sessions feature requires the Tasks availability scope.
Reuse from another environment
When you've already set up a connection in another environment, copy it instead of entering it again. In Add Connection, click Reuse from another environment. Choose the Environment and the Connection, optionally enter a Name in this environment, then click Reuse.
It appears only for people who manage this environment and another one (environments:manage on both). The list includes only environments you manage and can see; a Draft you can't see is never listed. CoderFlow checks both permissions again when you reuse a connection, so a copy started after your access was removed is refused and nothing changes.
It works for Database connections to SQL Server, PostgreSQL and MySQL as for the other types.
What is copied:
- the connection's settings, under a new ID;
- its saved password and SSH private key, copied on the server and never sent to the browser. The copy keeps the same host, user, port and transport, so its credentials stay with the target they were saved for. Only its name can change;
- the skills it needs, which are added to this environment and, when this server doesn't have one yet, imported, as when you save a connection.
What isn't copied:
- CoderFlow Bridge connections, whose tunnel is set up for each environment;
- Microsoft 365 connections, which deliver their mailboxes to one environment's automations;
- connections managed by CoderFlow Essentials;
- IBM i Build, Sync, SSH, Interactive Sessions and Profound UI deploy features, when this server doesn't offer them;
- connections whose saved credentials were saved for a different host or user;
- connections whose own saved password or SSH key (or a line of the key) appears in their name, description or settings, or in the Name in this environment you enter. They're listed with every detail hidden (name, type, host, port, features and Available For), so you can't choose them. So are connections whose saved credentials can't be read. An environment whose connections can't be read lists none, and nothing is copied from it.
The connection's name, description, host and other settings are configuration: they are copied as written, as anyone who can view the other environment already sees them. Each connection is checked against its own saved credentials only; another connection's password typed into a description, for example, doesn't affect it.
An environment's connection files must be plain files in its own folder. When the environment's folder itself, its environment.json or its .connection-secrets folder is a symbolic link, saving its connections is refused (409, connection_store_invalid) and nothing is saved. Reuse from another environment and Copy from another environment then refuse to copy into it, list it as unreadable when it is the other environment, and its Finish setup connection check shows Can't tell. Replace the link with the real folder to save again.
A name already used in this environment is refused; enter another under Name in this environment. Saving checks the connection as Save Connection does, for example that an environment has only one IBM i connection with Build, Sync or Interactive Sessions per scope.
CoderFlow then runs Test connection on the copy and shows the result in the dialog: passed, or why it failed (the server couldn't be reached, the credentials were refused, or the user lacks authority). The result is recorded for Finish setup. If the connection's Build feature names a repository this environment doesn't have, the result says so; open the connection and choose its Build Repo.
Test reachability
A web app or API often calls internal services that are not CoderFlow connections: an internal REST API, a license server, a database front end. Test reachability, beside Add Connection, checks whether a task container on this environment's image can reach such a URL.
- Click Test reachability and enter the URL, an
http://orhttps://address with its port when it isn't the default. Leave user names and passwords out of it. - Click Test reachability. CoderFlow starts a short-lived container on the environment's built image, with the network view a task container gets (the server's host entries and CA certificates) and nothing else: no repositories, secrets, tokens or mounts. The test takes up to about a minute.
The result reports each step separately, with what the container saw:
- DNS — whether the host name resolves, and to which addresses. An IP address in the URL skips it.
- TCP — whether a connection opens on the port, or is refused, timed out or blocked.
- TLS — for
https://only: the protocol, whether the certificate is trusted, who it is issued to and by, and when it expires. A self-signed certificate, or one from an authority the image doesn't trust, needs that authority added to CoderFlow's CA certificates so tasks trust it. - HTTP — the status code and response time, and the host it redirects to. Any HTTP answer, even an error status, means the URL is reachable.
The overall answer is Reachable, Not reachable (a step failed) or Can't tell. Can't tell means CoderFlow couldn't find out, not that the URL is unreachable: for example Docker didn't answer, the test took too long, or the image isn't built yet. For an image that isn't built, the result offers Open the Build tab, and Finish setup when the environment's setup has a build step.
Test reachability needs environments:manage on the environment. One test runs at a time per environment, and the server runs only a few at once; a second request is refused until one finishes. It isn't available for a disabled environment.
Build
Building and scheduling:
- Schedule — Rebuild the image automatically. Choose Days of the week to pick the days, as for automations (Every day, Weekdays and Weekends set them in one click), and a time; or Custom for a five-field cron expression. The schedule runs in the environment's timezone, or the server's when the environment has none, and the card shows the next rebuild in your own time.
- Build History — Previous builds with status and duration
- Build Now — Trigger an immediate rebuild
For build-time secrets (SSH keys, tokens), see Secrets / Env Vars.
Rebuild the environment after changing build settings, scripts, or dependencies. See Automations for scheduled workflows beyond image rebuilds.

Tests
Test commands available in the Testing menu:
- Define commands agents can run to verify their changes
- Configure expected outputs or assertions
Test definitions are stored in tests.json in the environment directory. See Test Definitions for the file format, parameters, and CLI behavior.
Environment managers can also turn on Allow Ask to run this test for a saved test without parameters, so that Ask CoderFlow can run it in the environment's interactive containers after the user confirms each run. See Running a test from Ask.
Templates
Task templates for this environment:
- Reusable task definitions with parameters
- See Templates section for details
Deployment Profiles
Deployment Profiles provide built-in CI/CD capabilities for deploying code to different targets.
Each profile defines:
- Target — Where code deploys (Base, QA, Production, etc.)
- Deployment script — Commands to run (e.g., setting environment variables, running build tools)
- Credentials — Separate authentication for each target
Deployments aren't just for production—they're part of the regular workflow. For example, with IBM i development, after code is approved and pushed to repositories, a deployment compiles the changes to the base environment. Additional profiles can then deploy to QA or production systems.
For IBM i environments, this includes setting the right library list and running codermake against the target system.
Deployments can be triggered from the Web UI.
Profiles are stored as paired JSON and shell files under deployment-profiles/ in the environment directory. See Deployment Profiles for authoring details.
Task environments for IT requests
A Portal environment usually serves business users and has no repositories of its own; the changes they request are developed in separate environments. On the Portal environment's Portal tab, under Portal Access, check Task environments for IT requests to choose where IT launches tasks from that environment's IT requests. With two or more checked, Default task environment sets which one the Launch task dialog selects first.
With none checked, tasks launch in the request's own environment, as before. The setting is saved as request_task_environments in environment.json, default first. An environment that was deleted stays checked, marked (unavailable), and launches skip it. Uncheck it to remove it; saving other settings leaves the list unchanged.
In the Launch task dialog on a request:
- When the task can only run in the request's own environment, the dialog shows no environment choice.
- When there is one other environment, a note names it, with its avatar and repository count.
- When there are several, Environment lists them like the other environment pickers, with avatar, description and repository count. The default is first.
The list offers only the checked environments where you can create tasks, and never disabled ones. The server checks the choice again when you launch. The new task follows that environment's repositories, task sharing default and permissions.
Instructions for the agent uses the same Markdown editor as replies. You can also attach files, paste them, or capture a screenshot. These files go to the task only, never to the request or the requester; up to 10 files and 10 MB.
Include the request's files (off by default) copies the files on the original request and on shared replies into the task. The label shows how many there are. Files on internal notes are never copied. A task takes up to 25 files in all, yours first, and the request's files are limited to 50 MB. The task's instructions say how many files were left on the request.
People who can see tasks in that environment can read what you include from the request: its number, title and description, the reviewed context and shared conversation when you tick them, and the files you add or copy. Internal notes are never copied.
Linked work names the task's environment, for example Task in crm-dev: Running, and the internal note reads "launched task … in crm-dev". IT users who can't view tasks in that environment see only that work exists. Link existing… also accepts tasks and Objectives from the checked environments. Unchecking an environment later keeps existing links and launches but stops new ones there. The requester never sees linked work or where it runs.
External Resources
The External Resources tab lists what this environment's containers registered with cfres for the server to delete once the container is gone, such as each task's IBM i task library. Use it to find a resource whose deletion is stuck, and to delete, retry or forget it.
The tab is the last one, after Automations. It appears only to people with environments:manage on the environment, and only while the environment has at least one record, in any state, from any of its task, interactive, test or deployment containers. Its badge counts the records not yet deleted or forgotten. Deleted and forgotten records are pruned after 30 days, so the tab disappears on its own about a month after the environment's last resource is deleted or forgotten. An orphaned record is never pruned: it keeps the tab until someone deletes, retries or forgets it.
It lists the same rows as Server Administration → External Resources, without the Environment column, newest first:
- Not deleted / Orphaned / Failed / All — Filter by state, each with its count. Not deleted, the default, lists everything not yet deleted or forgotten
- Refresh — Read the environment's records again
- Delete now — Run the resource's own deletion at once, after a confirmation. For a resource whose container still exists, CoderFlow refuses
- Retry — For a failed or orphaned resource, run the deletion at once and start its attempt count again
- Forget — Stop tracking the resource and leave it in place, after a confirmation
- Show command — The deletion as it would run: the connection and the commands, with Copy command
The actions work as in Server Administration, on this environment's records only; see Seeing what is stuck and External Resources. They give an environment manager nothing they could not already do: they control the environment's connections and the setup and deployment scripts that register these deletions. The records of an environment that has been deleted are listed only in Server Administration.
Check repositories for changes
Repositories change after an environment is set up: a new runtime version in global.json or .nvmrc, a new test script, another port. To have CoderFlow read an environment's repositories again and suggest what to update, select the environment, open the actions menu and click Check repositories for changes. It works for Active environments and Drafts.
CoderFlow reads each repository with the environment's own access (its Git provider, its PAT secret, or the repository hosted in CoderFlow) and runs the same detection as Generate from repository. Nothing is changed. The dialog lists:
- Repositories — each repository and whether CoderFlow could read it: Checked, Couldn't check fully (it read the repository but not everything in it, for example it didn't recognize the stack), or Couldn't check, with the reason. A repository it couldn't check is never reported as unchanged.
- Notices — information with nothing to apply. When a repository asks for another Node version than the base image's (in
.nvmrc,.tool-versionsorpackage.json'sengines.node), the notice says which version it asks for and in which file, while environments keep the base image's Node. CoderFlow doesn't change the Node version. - Suggestions — each suggested change with its setting and tab, the Current and Proposed values, and why, naming the file it came from (for example "Found in global.json"). Suggestions cover the pre-clone instructions (runtime versions), the application server's start command, ports and Launch URLs, tests, each repository's post-clone action, and secret names. A local development database is never suggested: an environment keeps the database choice it was generated with.
While any repository couldn't be checked fully, CoderFlow leaves out the suggestions that depend on every repository: the start command, ports, Launch URLs, tests, installs and runtime instructions. The summary names those repositories. Secret names are suggested only to people who can manage the environment's secrets (environments:secrets).
Click Apply to form on a suggestion to fill it into the environment's tabs. Nothing is saved until you click Save, as for any other edit, and you can review or change the value first. For tests, only new tests and changed commands are filled in; a test's own description and parameters stay as they are. For a secret, Apply to form opens Add Secret with the name filled in on the Secrets tab. Check again reads the repositories again.
Check repositories for changes needs environments:manage on the environment. A Draft whose configuration hasn't been generated yet uses Generate configuration instead.
Creating Environments
To create a new environment:
- Navigate to Environments in the Web UI
- Open the actions menu and click New Environment
- Configure the basic settings. Give it a repository to have CoderFlow propose the configuration — see Generate from repository. Without one, turn on Start as Draft to keep the environment hidden while you set it up — see Draft Environments
- Add repositories and configure build scripts as needed
- Build the environment
You can also start from an existing environment instead of a blank one — see Importing and Exporting Environments — or begin a generated environment from a starter.
Generate from repository
When New Environment has a repository (Select from provider, Enter URL manually or Host in CoderFlow), Configuration offers two choices:
- Generate from repository — the default. CoderFlow reads the repository and proposes the environment's configuration: runtime, install and start commands, ports, serving model, tests and the secrets it needs. Generate from repository describes what it reads and proposes.
- Create without generating — the plain dialog: a starting Dockerfile, agent instructions (
AGENTS.md) and admin notes (README.md) for you to fill in.
For a repository from a provider or a URL:
- Optionally set the Branch (blank reads the repository's default branch) and a Starter (see Starters; None by default).
- Click Preview. CoderFlow reads a shallow copy of the branch and shows what it found before anything is created: the repository and branch, the stack, each start command and port, the tests, and the names of the secrets and connections the environment will need. A start command that listens on
127.0.0.1is shown with its correction to0.0.0.0, because a task's browser preview can't reach127.0.0.1. - Choose the Serving model. CoderFlow's proposal is first, marked (proposed), followed by the alternatives it found. When the repository uses a database, also choose under Database between a local database in each task container and Connect to an existing database; see Database.
- Click Create Draft. CoderFlow selects the new environment and opens its Finish setup wizard, as after importing an environment with setup steps (see Finish setup).
A blank Environment Name is filled in from the repository, and Docker Image follows it. Changing the repository, the branch or the starter after a preview means previewing again.
For an environment with several repositories, such as a separate front end and API, click Add another repository (up to five in all, each with its own branch); the preview then lists each repository, the combined start command, ports and Launch URL. To create a separate Draft for each of several repositories from a provider, click Generate several Drafts under Select from provider. See Several repositories and Many repositories at once.
The result is always a Draft, visible only to the people who manage it. Nothing is built, nothing is activated and no credentials are copied: what CoderFlow couldn't settle, such as secret values or a database connection, becomes a Finish setup step. When the Draft is ready, set it to Active on its Overview tab.
Generating needs the same permission as creating an environment, environments:manage on any environment, and because the result is a Draft you must also be able to manage the new environment: Server Admins, or roles that grant environments:manage on all environments. For Server Admins, Generate from repository is the default. Someone who manages every environment they can see is offered it with this rule explained, and Create without generating stays the default; if they can't create a Draft, the preview says so. Someone who doesn't manage every environment sees the plain dialog. Like other new environments, the Draft is an uncommitted change in the setup repository until someone commits it.
When the preview can't read the repository
The dialog says why in fixed words (for example "No repository was found at that address" or "Reading the repository took too long") and offers:
- Create without generating — switches to the plain dialog, keeping the repository and filling in a blank name from it.
- Import a reference app — opens Import Environment on its Git repository tab, with the reference apps ready to load.
- Create Draft and detect later — only when CoderFlow couldn't read the repository, for example a private repository with no Git provider or access token that reaches it. The Draft is created now, with its configuration still to be generated. Connect a Git Provider that can reach the repository, or add a PAT secret for its host on the Draft's Secrets tab, then click Generate configuration on its Overview tab.
When CoderFlow reads the repository but couldn't tell how it builds or starts, the preview says so and offers Create without generating and Import a reference app as well. Create Draft still works; the Draft gets Finish setup steps for what was left open.
Host in CoderFlow
With Host in CoderFlow there is nothing to read yet, so Create Draft creates the Draft at once with an empty hosted repository, and its configuration is generated later. The Add your source note appears with Upload files. Upload your source, then click Generate configuration on the note or on the Draft's Overview tab.
Drafts waiting for their configuration
A Draft whose configuration hasn't been generated yet shows a Configuration not generated yet card on its Overview tab, saying what it is waiting for:
- Generate configuration — opens a dialog that reads the Draft's repository and shows the same preview, with a Starter, a Serving model and, when the repository uses a database, the Database choice. A Draft that already has its own
setup.sh, pre-clone instructions orAGENTS.mdkeeps them, so only Connect to an existing database is offered for it (see Development databases). Click Generate configuration to write the configuration into the Draft; its Finish setup then opens. The environment stays a Draft. - Upload files — for a hosted repository that is still empty. Generate configuration appears once the repository has files.
- Open Git Providers and Open the Secrets tab — when CoderFlow couldn't read the repository, for the people who can change those.
Its Finish setup ends with a Generate the environment step, which offers the same Generate configuration.
The card and Generate configuration need environments:manage on the Draft.
Configure this environment
Configure this environment has an agent finish a Draft's setup within budgets you set: it works until the image builds, the app answers and the tests pass (a Draft with no tests is verified without them). It changes only that Draft, and you set the environment Active yourself. Three ways open the same panel, and opening it starts nothing:
- The Configure this environment step in a generated Draft's Finish setup.
- The Configure this environment card on a Draft's Overview tab, which also shows the latest run.
- A link to
index.html?env=<environment>&template=configure-this-environment, which opens the panel on the Environments page.
The panel shows the budgets (Builds, Time (minutes) and Tokens), the estimate, the extra verification container, and anything that prevents a run, before you click Launch. A run needs the server's MCP Server, which is off by default: turn it on under Settings → Integrations → MCP Server. It is offered only to people with every permission a run needs on the Draft: managing it and its details (environments:manage, environments:view_details), its files (environments:files), building it (environments:build), and creating and running tasks in it (tasks:create, tasks:execute). It isn't offered on an Active environment.
Starters
A starter carries your organization's conventions from one environment to the environments generated after it, so each new one doesn't start over.
To save one, select the environment, open the actions menu and click Save as starter. Enter:
- Starter name — lowercase letters, numbers and hyphens, up to 64 characters. People choose the starter by this name.
- Description — optional; what the starter is for. Everyone who can create environments sees it.
Then click Save as starter. Saving shares this environment's instructions, skills, templates and deployment profiles with everyone who can create environments:
- Kept: the default agent, models and effort levels, standard and custom instructions (
AGENTS.md), orchestration policy, environment skills, task templates, test conventions (tests.json, with literal environment values cleared), generic deployment profiles, custom task fields and memory settings. - Copied as written: deployment profile scripts and skill files. Check them before saving.
- Not copied: repositories, connections, secret values, the Docker image name, the application server, schedules, contacts and setup progress. Secret names are kept, so a generated environment gets a Finish setup step for each one.
Before anything is written, CoderFlow checks that no stored secret value appears in what the starter would keep. If one does, nothing is saved and the dialog names the secret, for example "The value of the secret STRIPE_KEY appears in a file". Change that content, or change the secret if the match is a coincidence.
The dialog lists the existing starters, with who saved them. Delete appears on the starters you may delete: your own, or any of them if you manage every environment. Deleting a starter doesn't change the environments already generated from it.
Starters are saved in the setup repository under starters/<name>/ as an uncommitted change. Committing and pushing them needs settings:manage (or a Server Admin), as for automations. A starter folder is also a valid Import Environment archive when zipped.
To use a starter, choose it as the Starter in New Environment → Generate from repository, or in Generate configuration. CoderFlow begins from the starter and layers what it finds in the repository on top.
Save as starter needs environments:manage on the environment and the ability to create environments.
Draft Environments
Mark an environment as a draft while you are still setting it up, so that developers do not start work in it before it is ready. A draft is visible only to the people who manage it: anyone with the Create/edit/delete environments permission (environments:manage) on it, such as its Environment Admins and Server Admins.
For everyone else, a draft environment behaves as if they had no access to it, even when a role grants them access to all environments:
- It is left out of the Environments page, the dashboard's environment selector, the environment quick switch, the Portal, and the environment lists returned by the API, MCP, Slack, and Teams.
- They cannot open it, start tasks in it, or view tasks that were already created in it.
The people who can see a draft find a Draft badge next to its name on the Environments page tabs, in the dashboard's environment selector, and in the quick switch, as a reminder that nobody else can see it yet.
To change an environment's status, open its Overview tab, set Status to Draft or Active, and click Save. The change applies as soon as it is saved. When the environment is ready, set it to Active to make it available to everyone who has access to it. To create an environment as a draft, turn on Start as Draft in the New Environment dialog. Generate from repository always creates a draft.
The status is stored in the environment's environment.json as "status": "draft". Active is the default, so saving an environment as active removes the key. Like other settings, commit the change to the setup repository to keep it.
Some things to know about drafts:
- Creating and cloning drafts — Creating a draft does not grant you any access to it, so CoderFlow creates one only if you can already manage the new environment: Server Admins, or roles that grant
environments:manageon all environments. A clone keeps its source's status, so the same applies to cloning a draft (or a disabled environment, whose clone starts as a draft). Otherwise, create the environment as active or ask a Server Admin. - Automations — Environment automations keep running while the environment is a draft. Personal automations and Portal scheduled questions owned by people who cannot see the draft are skipped, and their run history explains why. They stay turned on and run again once the environment is set to Active.
- Editions — Draft status is part of environment management, which is not available in CoderFlow Essentials. Essentials provides one pre-configured environment and has no Status setting.
Disabled Environments
Disable an environment to take it out of service without deleting it — for example, when a project is finished or the environment has been replaced. Its settings, repositories, tasks, and history are kept, and setting it back to Active restores everything.
A disabled environment is hidden like a draft: only the people who manage it can see it or its tasks. In addition, no one can start new work in it, including those people:
- New tasks, follow-ups, forks, resubmits, judge tasks, objective launches, test runs, interactive containers, deployments, and docs publishing are refused, wherever they come from (Web UI, API, CLI, MCP, Slack, Teams, or the Portal). Approving a task still works; any docs publication it would start is recorded as failed.
- Automations and Portal scheduled questions pause: their scheduled, webhook, and repository-polling runs are skipped, and Run now is refused. They run again once the environment is active.
- Scheduled image rebuilds are skipped.
To keep the dashboard uncluttered, a disabled environment is also left out of the dashboard's environment selector, the quick switch, and the menus for moving objectives or choosing an environment for new tasks, even for the people who manage it. It is never used as a default environment. Its tasks still appear, and the task filter still lists it.
The people who manage it can still open it on the Environments page, where its tab carries a Disabled badge, change its settings, view its tasks, and stop tasks that are still running. Disabling an environment does not stop running tasks. Objectives can still be saved in it but not launched, and manual image builds still work. In Actions → Build Images, a disabled environment is listed but starts unchecked; select it to rebuild its image, for example before setting it back to Active.
To disable an environment, open its Overview tab, set Status to Disabled, and click Save. The status is stored in environment.json as "status": "disabled"; commit the change to the setup repository to keep it. Like draft status, it is not available in CoderFlow Essentials.
For integrations, refused requests return HTTP 409 with the code ENVIRONMENT_DISABLED, and MCP list_environments reports the environment's status as disabled with canCreateTasks set to false.
Renaming Environments
To rename an environment, click the edit icon next to its name on the Environments page, enter the new name, and click Rename. Names use lowercase letters, numbers, and hyphens.
The environment's name is its identity, so a rename updates everything on the server that refers to it:
- Its directory in the setup repository, its local repositories, agent memory, and published repository docs
- Access bindings for users and teams, and users' default environment
- Automations, webhooks, and Slack and Microsoft Teams channel mappings
- Tasks and objectives, including older tasks that are no longer loaded, plus usage activity, build history, and deployment history
- Portal reports, dashboards, favorites, saved personal IBM i logins, IT requests, and private media assets and staged files
- Other environments' task environments for IT requests, and IT request work linked or launched in the renamed environment
- The environment's Docker image, when its image name matches the environment name, is retagged to the new name
The rename appears in the setup repository as deleted and added files. Commit and push it like any other change.
Rename refuses, and changes nothing, while the environment is in use. Wait for running tasks, image builds, and automation runs to finish, stop any of its task containers that are still running, and unpin or remove container protection from tasks whose containers are pinned or protected. Stopped task containers are removed, because they still refer to the old directory. Rename is also refused when another environment's image name equals the new name, because the renamed environment's image would replace that environment's image, and when a directory with the new name already exists in the setup repository.
CoderFlow can't update anything that refers to the environment from outside the server. After a rename, update scripts, MCP clients, and bookmarks that use the old name, and any CLI default_environment setting. Public media volumes keep their files, but their URLs include the environment name and change with the rename. If the environment uses legacy private media staging, add the new name to CODERFLOW_MEDIA_ENVIRONMENTS so its media can be published again.
Microsoft 365 mail also blocks a rename while an email automation is enabled, any subscription record remains (including pending deletion), or a managed mail webhook remains. Disable the email automations and wait for their History view to show no subscription and for managed-webhook cleanup to finish before renaming. The refusal lists the remaining blockers. Enabling email automations or saving Microsoft 365 connections is refused during a rename. See Disable mail before renaming an environment.
If a reference can't be updated, the rename still completes and lists what still uses the old name. Check the server log for details.
Deleting Environments
To delete an environment, open it on the Environments page and choose Actions → Delete Environment. Deleting needs the Create/edit/delete environments permission (environments:manage) on it, and, like the other environment management actions, is not available in CoderFlow Essentials.
Delete refuses, and changes nothing, while any of the environment's task containers is running or pinned. Stop the containers or unpin their tasks first. Stopped task containers that use the environment's directory are removed.
Deleting an environment removes its directory in the setup repository, its local repositories and its agent memory. It also removes every access binding on the environment: the roles granted on it to users and teams. Bindings on other environments, bindings on all environments (*) and server-wide bindings stay. Anyone whose only access came from those bindings loses it at once, including their open task streams and terminal or VS Code connections. An environment page they have open shows that their access was removed and clears its details, unsaved changes included; someone who keeps access another way sees This environment was deleted instead and can still copy their unsaved changes.
A new environment never inherits grants from an earlier environment of the same name, however that one disappeared: deleted here, removed by pulling or discarding changes in the setup repository, or deleted with an earlier CoderFlow version. When you create, import, clone or rename an environment onto a name, CoderFlow first removes any bindings still left on that name, so the new environment starts with only the access you give it (and, after a rename, the renamed environment's own). An environment that a pull brings back is not created again, and keeps its bindings.
Tests activated for Ask CoderFlow are not carried over either: deleting, renaming, importing or cloning an environment clears those activations, and a manager activates the tests again on the new environment's Tests tab. See Running a test from Ask.
If the delete fails partway, for example because a file cannot be removed, the environment may remain without its bindings. Nobody gains access from that. Grant access again on the environment's Access tab, or retry the delete.
The deletion appears in the setup repository as deleted files. Commit and push it like any other change.
Importing and Exporting Environments
Environments move between CoderFlow installations as credential-free bundles. Export packages an environment's configuration into a portable .zip; Import recreates it elsewhere, either from that file or straight from a public Git repository. Use this to share a starting point across teams, seed a new installation from a reference app, or hand an environment to support to reproduce an issue.
Export deliberately omits .secrets.json (the secret values), declared secret files and directories inside the environment, copied secret files and connection credentials under .connection-secrets/, and each repository's .git history. Secret files are not exported; supply them again after importing. The bundle instead records the names of the secrets the environment references, so you know what to re-create on the Secrets tab after importing. No tokens, passwords, or keys ever leave in an export, and none are ever read from an import.
Exporting
On the Environments page, open the actions menu and choose Export Environment (📤). CoderFlow builds a .zip of the environment directory — environment.json, the Dockerfile-generating settings, scripts, AGENTS.md, templates, deployment profiles, and so on — alongside a manifest (coderflow-environment.json) that describes the bundle and lists the referenced secret names. The downloaded file is what you hand to another installation or commit to a sharing repository.
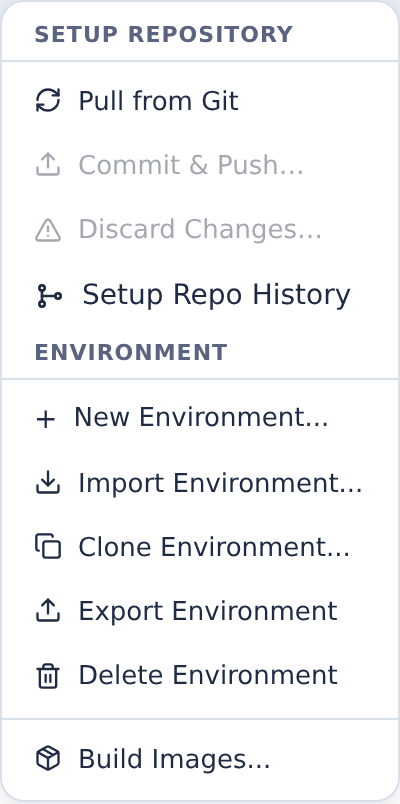
Importing
On the Environments page, open the actions menu and choose Import Environment… (📥), then pick a source tab:
Upload a file
Choose a .zip produced by Export Environment and click Import.
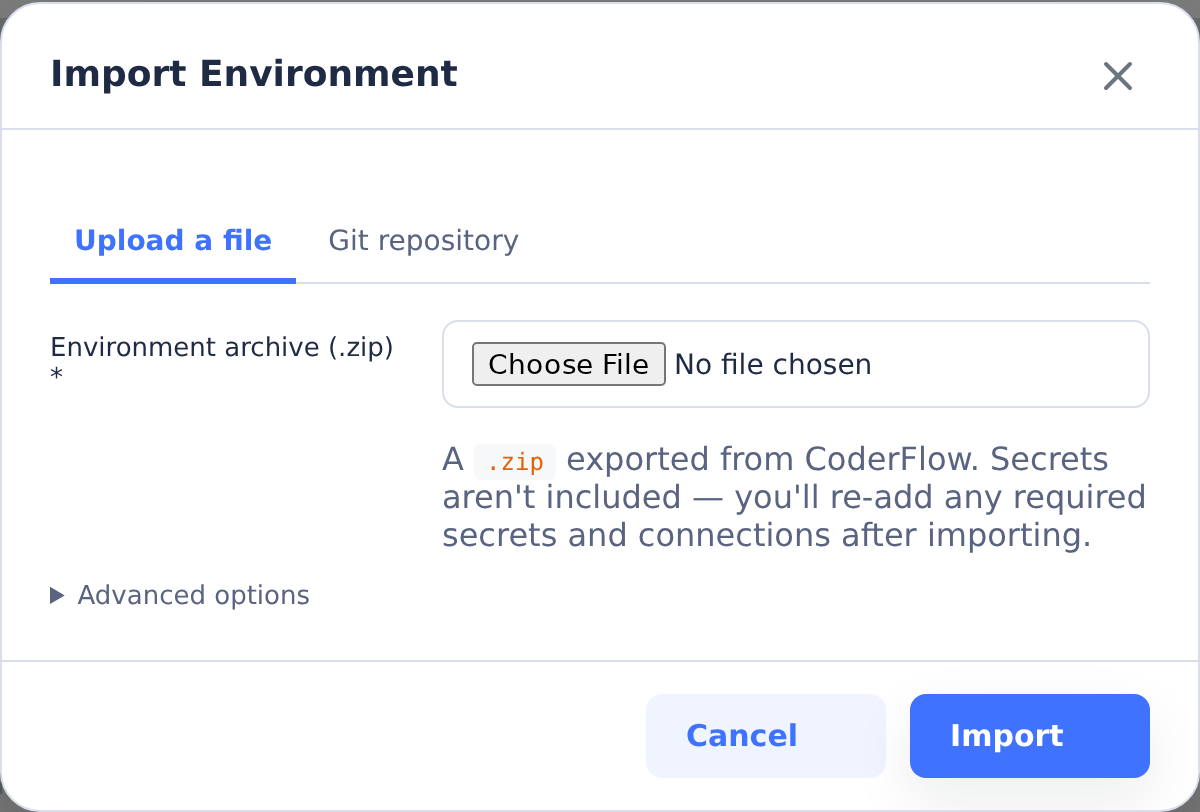
Git repository
Import an environment directly from a public Git repo:
- Enter the Repository URL (an
https://URL). The field is prefilled with the CoderFlow reference apps repository as a convenient starting point. - Click Load environments. CoderFlow shallow-clones the repo and lists every importable environment it finds — any directory containing an
environment.json, including one at the repository root. This is how the reference apps expose all of their backend/front-end combinations in a single picker. - Pick one from the Environment list.
- (Optional) Expand Advanced options to import from a specific Branch or tag, from a Path within the repository (use this for an environment the picker can't reach, or to skip the list entirely), or under a different name with Import as a different name.
- Click Import.
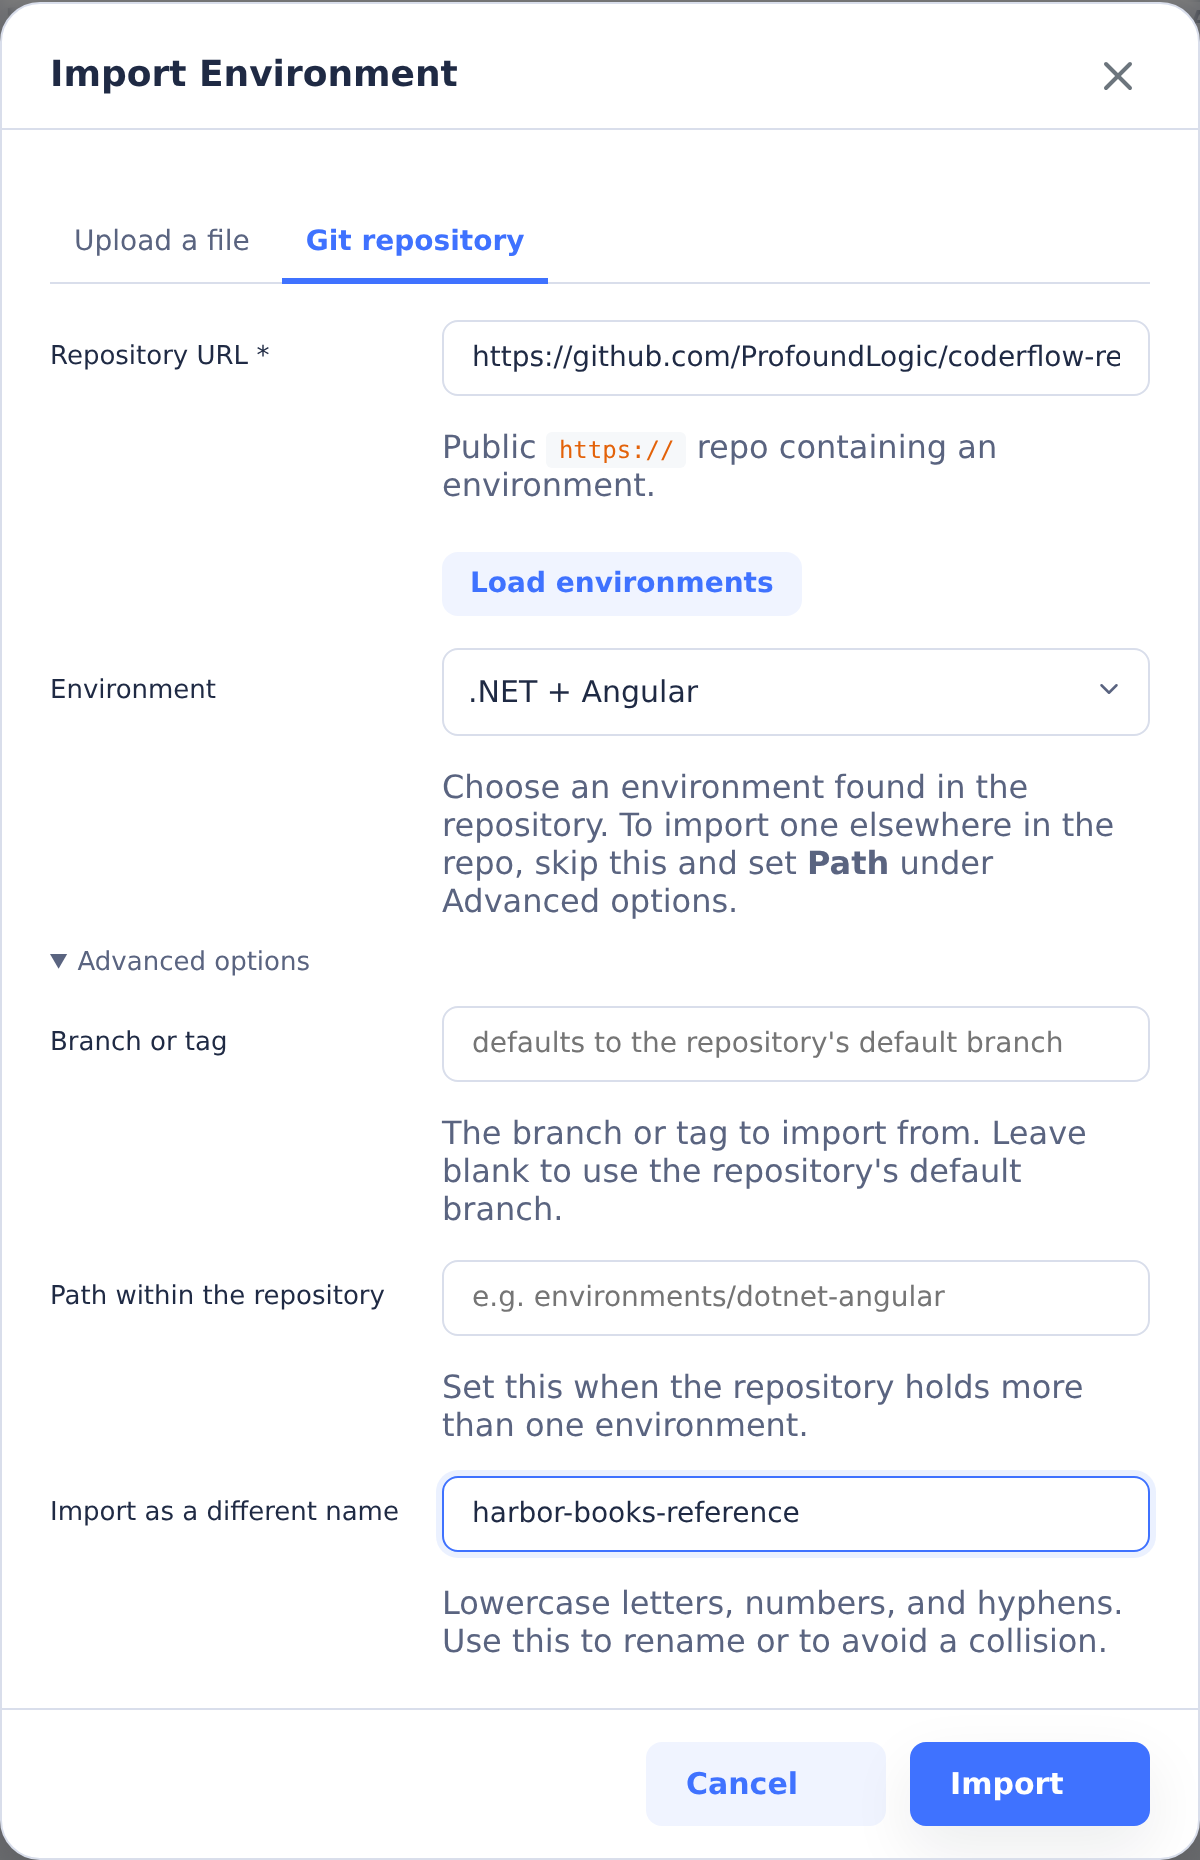
In both cases CoderFlow copies the environment's files in — again excluding .secrets.json and .git — attributes it to you, and adds it as an uncommitted change, exactly like a Save. Review it, then Commit & Push to keep it (or Discard to back out). If an environment with that name already exists, the import is rejected rather than overwriting it; re-import under a different name with Advanced options.
Environment lists and post-import setup instructions are checked against current access before they are returned. Losing the permission to view environments blocks a list already loading, even if your environment assignment remains. If access changes repeatedly while loading, refresh the page; an environment you can no longer access will be unavailable. Setup read failures show a fixed error message without underlying service details.
After importing
An imported environment is configuration only, so finish the setup before running tasks:
- Re-create its secrets. The bundle lists the secret names the environment expects but not their values. Add them on the Secrets tab, along with any Connections the environment used.
- Check repository access. If the environment clones private repositories, make sure a Git Provider or PAT secret can reach them.
- Build the image. Build it on the Build tab before creating tasks.
If the imported environment has a repository hosted in CoderFlow that is still empty, the Add your source note appears with Upload files, as after creating an environment with Host in CoderFlow. Clone Environment shows the same note when the copy's hosted repository is empty. The note needs environments:git on the environment, and goes away when you select another environment or Dismiss it. The same Upload files link is on the Repos tab for each hosted repository.
Finish setup
An environment's author can include setup steps in its environment.json (a setup block), such as the IBM i reference app's.
- After you import such an environment, the Finish setup wizard opens once.
- Later, the Overview tab shows a Setup card with how many steps are done and a Finish setup button.
Each step explains what to do. It may link to a guide or offer an action, such as opening another tab or running the IBM i save-file installer.
- Tick I've completed this step as you go. Your progress is saved, and the wizard reopens at the first unfinished step.
- Skip for now closes the wizard and keeps your progress.
- Mark setup complete removes the setup steps from the environment, and the card disappears. If steps are still unticked, it asks you to confirm.
The wizard and card need environments:manage.
Some steps check themselves. Such a step shows what CoderFlow found, and is marked done as soon as its condition holds, without the tick:
- Done when the check passed.
- Not done yet when CoderFlow read the records and the condition doesn't hold, for example the secret has no value yet.
- Can't tell when CoderFlow couldn't find out: Docker didn't answer, a check took too long, or you don't have access to what the check reads. Click Check again to read it again.
The tick stays available on every step. A step offers only the actions you're allowed to take.
Writing setup steps
The setup block in environment.json lists the steps in order:
{
  "setup": {
    "title": "Finish setting up orders",
    "steps": [
      {
        "id": "stripe-key",
        "title": "Add the Stripe API key",
        "body": "Tasks call the Stripe test API. Add a test-mode key.",
        "docs": "/docs/admin/environments#secrets",
        "action": { "type": "add-secret", "config": { "name": "STRIPE_KEY" } },
        "check": true
      },
      {
        "id": "build",
        "title": "Build the image",
        "action": { "type": "build-image", "label": "Build it now", "config": {} },
        "check": true
      }
    ]
  }
}
Each step needs an id and a title. body is plain text. docs must be a path in these docs (/docs/...); docsLabel replaces the link's text. action.label replaces the action button's text. CoderFlow keeps the ticks in the block as completedSteps; don't write it yourself.
action.type | config | What the step does | What check: true checks |
|---|---|---|---|
navigate | { "tab": "<tab>", "connection": "<name>" } (connection optional) | Opens that tab of the environment in a new browser tab | No check |
ibmi-savf-install | See the IBM i reference app | Restores a library from a save file over SSH | No check |
test-connection | { "connection": "<connection name>" } | Runs Test connection on that connection (Microsoft 365 connections are tested from their dialog). If it doesn't exist yet, offers the Connections tab to add it, and Reuse from another environment to copy one from another environment you manage under that name | The connection exists and its latest recorded test passed. Can't tell when no test of the saved connection is recorded, or the connection changed since |
add-secret | { "name": "<SECRET_NAME>" } | Opens the Secrets tab with Add Secret filled in with the name. Offers Copy from another environment to copy that secret from another environment where you manage secrets | The secret has a value. A secret each person supplies in their profile shows Can't tell |
connect-git-provider | { "repo": "<repository name>" } (optional) | Opens Server Settings → Git Providers for Server Admins; offers the Secrets tab for a PAT secret | Every repository (or the named one) has a Git provider with its credentials, or a PAT secret for its host. Repositories hosted in CoderFlow need neither. A host whose token each person supplies in their profile shows Can't tell |
build-image | {} | Says so first if the base image is missing or Docker can't be reached; otherwise starts the build and follows it | The base image exists, and the environment's image exists and is up to date |
run-test | { "test": "<test name>" } | Runs that test from the Tests tab as a test task | The test's latest run passed |
launch-template | { "template": "<template name>" } | Opens New Task with that template selected. For configure-this-environment, opens the Configure this environment panel instead | A task from that template in this environment completed |
Get to know this repository ships with CoderFlow. Generated Drafts offer it in the last Run a first task step through Start the first task. The dashboard setup guide offers it too. It asks the agent to summarize the code, run the build and tests, start the app and capture a screenshot, without changing files.
This shipped template is not in the environment's template list. Following its
link applies it in New Task. A launch-template step can name it as
get-to-know-this-repository; an environment's own
task-templates/get-to-know-this-repository.md replaces the shipped template.
Opening or launching it needs permission to create tasks in that environment.
Its Finish setup check records a completed task, not proof of every success
criterion. Review the task's evidence yourself.
The test and template checks show Can't tell when nothing matches but the server has loaded only recent tasks, or has not finished loading its task history.
check is optional. Leave it out, or set it to false, for a step that only the tick completes. It applies only to the last six types.
Each check reads only what the person viewing it may see:
- The secret check needs
environments:secrets. - The image check needs
environments:build. - The test and template checks need
tasks:view, and count only tasks that person can open. - The connection check needs
environments:managefor the test result. - The Git check needs
settings:git-providersto see whether a repository's Git provider has its credentials, andenvironments:secretsfor PAT secrets. A repository that a PAT secret covers needs onlyenvironments:secrets.
Without the permission, the step shows Can't tell.
A step whose type CoderFlow doesn't know shows its text without an action. One whose config is wrong shows its action as unavailable, and its check as Can't tell. The setup steps come with the environment, so imported bundles and generated environments can include them. They hold names only, never secret values.
Importing from a private Git repo works transparently when a Git Provider for that host is connected — CoderFlow authenticates the clone automatically. With no provider connected, only public repositories can be imported.
Building Environments
After configuring an environment, build its Docker image from the Build tab. Click Build Now to trigger a build. The build history shows previous builds with their status and duration.
In Full edition, you can also ask Ask CoderFlow
to build the environment. Building needs environments:build, and each build
needs your confirmation. Saving a build setting and starting a build use separate
cards. Ask tracks the build and links its output. If Ask cannot tell whether a
build started, it never starts another one; check Build History. A
workflow can save a change, build the
image and then start a task, with a confirmation for each step.
For automation or command-line workflows, you can also build from the server:
coder-server build <env-name>
For automated workflows, scheduled rebuilds can pull the latest code and rebuild the image at regular intervals.
When an environment's most recent build fails, such as an overnight scheduled rebuild, CoderFlow marks the environment with a red badge on its avatar in the Environment Management tabs and on its Build tab. The dashboard's environment selector shows Build failed next to the environment name. Hover over a badge to see when the build failed, and open Build History for the build output. The badge clears when a later build succeeds.
Base Image
All environments build on top of a shared base image. Rebuild the base image to update agent CLIs (Claude Code, Codex, Gemini, Bob Shell, Grok Build, Kimi Code) to the latest version or after updating core dependencies. Use Actions → Build Images... on the Environments page and tick Rebuild base image (it needs the server:build permission; Ask CoderFlow can point you to it), or from the CLI:
coder-server build base
Run this as the dedicated user that runs the server — the base image bakes in that user's UID/GID. From another account (including root) the command asks the running server to build instead, which needs an authenticated session (coder login, or CODER_API_KEY); see Build Base Image for the details.
After rebuilding the base image, rebuild any environments that depend on it.
Scheduled Base Image Rebuilds
To keep the base image current automatically, open Server Settings → Base Image, turn on Enable Scheduled Rebuilds, choose when to rebuild, and save:
- Days of the week — pick the days, as for automations (Every day, Weekdays and Weekends set them in one click), and a time.
- Monthly — a day from the 1st to the 28th, and a time.
- Custom — a five-field cron expression of numbers, ranges, lists and steps (such as
*/2); names and modifiers such asMON,L,Wand#aren't supported. It can set a day of the month or days of the week, but not both, and must run at least once in the next two years.
The schedule runs in the server's timezone; the card shows the next rebuild in your own time. It defaults to Sundays at 12:00 AM, ahead of the early-morning window (1:00–4:59 AM) that environment rebuild schedules default to, so environments rebuilt later that night build on the new base. The Build tab's Schedule card links to this setting for server administrators.
- Build Without Cache is on by default. With the cache, an unchanged base image definition reuses its cached layers and picks up no operating system or agent CLI updates.
- A scheduled rebuild is skipped if a base image build is already running.
- Scheduled environment rebuilds that come due while the base image is building wait for it to finish, then build on the new base. If the base image build is still running after three hours, they stop waiting and build on the current base.
- Environment images are not rebuilt automatically when the base changes. Give each environment its own rebuild schedule, or rebuild them with Actions → Build Images.
Saving the schedule requires the server:build permission in addition to access to Server Settings.
Public media volumes
Under Server → Volume Mounts, add a Public media volume, choose a name (for example images) and a container path (/public-media/images), then save. CoderFlow provisions persistent storage and displays a public base URL using the existing HTTPS Site URL. Select the URL to copy it. No separate Media settings page or publishing grant is needed.
Keep draft images, source evidence and review copies elsewhere. After your existing human approval workflow, finalize only the reviewed bytes into this destination. Finalizing is disclosure: anyone can retrieve the image without signing in. CoderFlow does not certify that files have been approved.
New task containers receive this helper and their exact base URLs in agent instructions:
node /usr/local/lib/coderflow/public-media-finalize.cjs PRIVATE_FILE /public-media/images PUBLIC_BASE_URL REVIEWED_SHA256
Use the hash recorded during review. The helper checks it before writing and returns {filename, sha256, bytes, url}. It makes a durable temporary copy and atomically installs a content-hash filename without overwriting existing files. Ordinary cp is not atomic. This helper is mounted by the server; it is not available in older CLI releases. Check the returned public URL before using it in an external service.
Single-frame PNG/JPEG images up to 10 MiB and 25 million pixels are served as <sha256>.png or <sha256>.jpg. MP4 videos are served as <sha256>.mp4: H.264 (8-bit yuv420p) with optional mono or stereo AAC up to 48 kHz, at most 200 MiB, 10 minutes, 60 fps, 18,000 frames and 1920×1080. Inspect a file privately first with node /usr/local/lib/coderflow/public-media-finalize.cjs --inspect PRIVATE_FILE; checking a long video can take up to about 3 minutes, so run one helper at a time. Video links support HEAD and range requests and play directly in the browser. When sharing a video for playback, add ?play=1: it serves the same verified video under a fresh cache key, so current Chrome plays it even if a browser or CDN still holds the bare link with headers from before a server update. Add ?download=1 for a download. Other query strings return 404. The server fully checks each video on its first request after finalizing or a restart. For a long video that request can return 503 with Retry-After while the check finishes, so repeat a HEAD request until it returns 200 before sharing the link. Unsupported files, partial copies, symlinks and directory listings are unavailable. No anonymous upload endpoint exists. Other environments cannot write this volume through their mounts.
Files and URLs survive task/container cleanup, forks, rebuilds and server restarts. Removing a mount does not delete public files or revoke URLs. Tasks sharing an environment share its public destination. Publish revisions under new hashes; changing an existing file makes new origin requests fail validation. Successful public responses are cacheable for one year as immutable content, so previously fetched bytes can remain available after a file is changed or deleted. Deletion is not immediate revocation. Writers can still delete files, so retain and back up referenced media. There is no automatic cleanup or volume quota; monitor server disk capacity. An interrupted finalization can leave a .partial-* hard link that keeps the image unavailable; an operator can remove that temporary link after stopping writers.
The supported deployment is the Linux host CoderFlow server running as a non-root user with local Docker and the existing main HTTPS ingress, including ordinary PM2 installations. Missing Site URL or unsupported task App Server/containerized server/remote Docker setups are refused with inline recovery guidance. Unusual filesystem, UID mapping and ingress arrangements need operator verification; this feature cannot make an authenticated external proxy public. No new domain or proxy is needed in the ordinary deployment.
If a public base URL cannot be read, the volume shows “Public media URLs are unavailable. Check the server Site URL and public media configuration.” Check the HTTPS Site URL and the saved volume settings, then reload the environment.
Replace legacy private staging
If forks fail with “Publishable media is not configured on this server,” edit the legacy images volume at /media-staging/images, explicitly select Public media volume, and save its new /public-media/images destination. Leave the existing knowledge mount unchanged. New unique volume names allocate empty storage; reusing a prior public volume name reattaches its retained files. No old private files are copied or exposed. Fork after saving successfully, and recover any private drafts separately for review.
Old private snapshots and published legacy URLs remain intact. Keep their legacy storage/configuration while they are in use. The new public-volume workflow requires no legacy media IDs or approval receipts, but the external publishing agent must still enforce the existing human approval requirement.
Recover an interrupted finalization
Stop all writers to this volume first. From an authorized task with the volume mounted (or using its host directory), run the command below with the actual temporary UUID and hash filename. It removes only the temporary name after checking that both regular files refer to the same inode; it never removes the hash-named image. Do not use a wildcard deletion or run this during finalization. If multiple abandoned temporary names reference that image, repeat for each confirmed pair. Retry the public URL afterwards; normal hash/image validation still applies.
python3 - /public-media/images/.partial-UUID /public-media/images/SHA256.png <<'PYRECOVER'
import os, re, stat, sys
from pathlib import Path

temporary, image = map(Path, sys.argv[1:])
if (temporary.absolute().parent != image.absolute().parent
        or not re.fullmatch(r"\.partial-[0-9a-f-]{36}", temporary.name)
        or not re.fullmatch(r"[0-9a-f]{64}\.(png|jpg)", image.name)):
    raise SystemExit("Refused: supply a temporary/hash pair in the same directory")
directory = os.open(temporary.parent, os.O_RDONLY | os.O_DIRECTORY | os.O_NOFOLLOW)
try:
    a = os.stat(temporary.name, dir_fd=directory, follow_symlinks=False)
    b = os.stat(image.name, dir_fd=directory, follow_symlinks=False)
    if not (stat.S_ISREG(a.st_mode) and stat.S_ISREG(b.st_mode)
            and (a.st_dev, a.st_ino) == (b.st_dev, b.st_ino)):
        raise SystemExit("Refused: these are not regular-file links to the same inode")
    os.unlink(temporary.name, dir_fd=directory)
    os.fsync(directory)
finally:
    os.close(directory)
print("Temporary link removed; hash-named image retained")
PYRECOVER