Core Concepts
Environments
An environment represents a complete development workspace packaged as a Docker image. It contains your source code repositories, build tools, runtime dependencies, and any application servers needed to run and test your software.
Administrators configure environments to match your team's development setup. When you create a task, you select which environment to use, and CoderFlow launches an isolated container from that image. This ensures every agent works in a consistent, reproducible environment with access to the correct codebase and tools.
Environments can be scheduled to rebuild automatically, keeping dependencies current and repositories synced with your latest code.
Skills
Skills are reusable, prompt-based actions that agents can invoke while working. Skills can include their own instructions and supporting files, and they are managed by administrators in the Skills area of the Web UI.
Skills are assigned at the environment level. When a task launches, CoderFlow injects the assigned skills into the task container so the agent can use them immediately.
The Parallel Agent Workflow
CoderFlow's most powerful capability is running multiple AI agents in parallel on the same task. This approach dramatically improves code quality by leveraging the diverse problem-solving approaches of different agents.
1. Submit a Task to Multiple Agents
When you have a complex task—fixing a tricky bug, implementing a new feature, or refactoring existing code—you can submit it to multiple agents simultaneously. Each agent works independently in its own isolated container, approaching the problem from its unique perspective.
For example, you might run the same task with Claude, Codex, Gemini, Bob, Grok, and Kimi. Each agent reads your instructions, explores the codebase, and produces its own solution. Because they work in parallel, you get multiple candidate solutions in roughly the same time it would take to get one.

Each result appears in its own variant tab. You can also run the same agent more than once to compare separate attempts.
2. Automatic Evaluation by Judge Agents
Once the execution agents complete their work, CoderFlow can automatically launch judge agents to evaluate the results. Judges are AI agents configured specifically for code review and quality assessment.
Multiple judges can evaluate each solution independently, examining:
- Whether the implementation correctly addresses the requirements
- Code quality, readability, and adherence to project conventions
- Test coverage and whether existing tests still pass
- Potential edge cases or issues the solution might miss
The judges score each variant and can reach a consensus on which solution is best. This multi-judge approach reduces bias and provides more reliable evaluations.
3. Feedback Loops
Judges don't just score—they provide detailed feedback. When a judge identifies issues or improvements, that feedback can be automatically passed back to the execution agents. The agents then iterate on their solutions, addressing the judge's concerns.
This creates an automated refinement cycle:
- Execution agents produce initial solutions
- Judge agents evaluate and provide feedback
- Execution agents improve their work based on feedback
- Judge agents re-evaluate until quality standards are met
You can choose how many AI feedback rounds to follow, or manually trigger additional feedback as needed.
4. Winner Selection and Review
After evaluation completes, you select a winning variant—either manually by reviewing the options, or automatically based on judge scores. With a winner selected, you can:
-
Review the code changes: Examine exactly what the agent modified, added, or removed. The diff view quickly highlights all changes against the original codebase and allows yout to make adjustments. You can also review changes in an IDE (browser-based VS Code environment or your local IDE for deeper work).
-
Run the application: Launch the modified application directly from the container to test functionality. For web applications, CoderFlow provides URLs to access the running server. You can interact with the application, verify the fix works, and check for regressions.
-
Provide additional feedback: If the solution is close but needs adjustments, send follow-up instructions to the agent. It resumes work in the same container with full context of what it already did, making targeted improvements without starting over.
5. Approve and Deploy
When you're satisfied with the solution:
-
Approve the changes: This commits the agent's modifications to your repository. CoderFlow generates a commit message summarizing the work, which you can customize before finalizing.
-
Choose your branch strategy: Commit directly to the working branch, create a new feature branch, or open a pull request for team review.
-
Deploy (optional): If your environment is configured with deployment pipelines, you can trigger deployment after the approval workflow, pushing the changes to staging or production.
Every approval is logged with full traceability—who approved, when, what changed, and which agent produced the work.
Objectives
Objectives are where you plan and draft your requirements before executing work. They provide a permanent home for your ideas as they evolve from initial concepts into well-defined specifications ready for AI agents to implement.
For simple, well-understood tasks, you can create and launch a task directly. But for complex work—where requirements need refinement, or you're still forming your approach—starting with an objective gives you space to think and iterate.
Hierarchical Organization
Objectives support multiple levels of nesting, letting you break down large initiatives into smaller, manageable pieces. The home page displays your objectives as a tree view, making it easy to see how work is organized and navigate between related items.
For example, a high-level objective like "Modernize the reporting module" can be broken down into sub-objectives: "Update data models," "Redesign report templates," "Add export functionality." Each sub-objective can be further decomposed as needed.
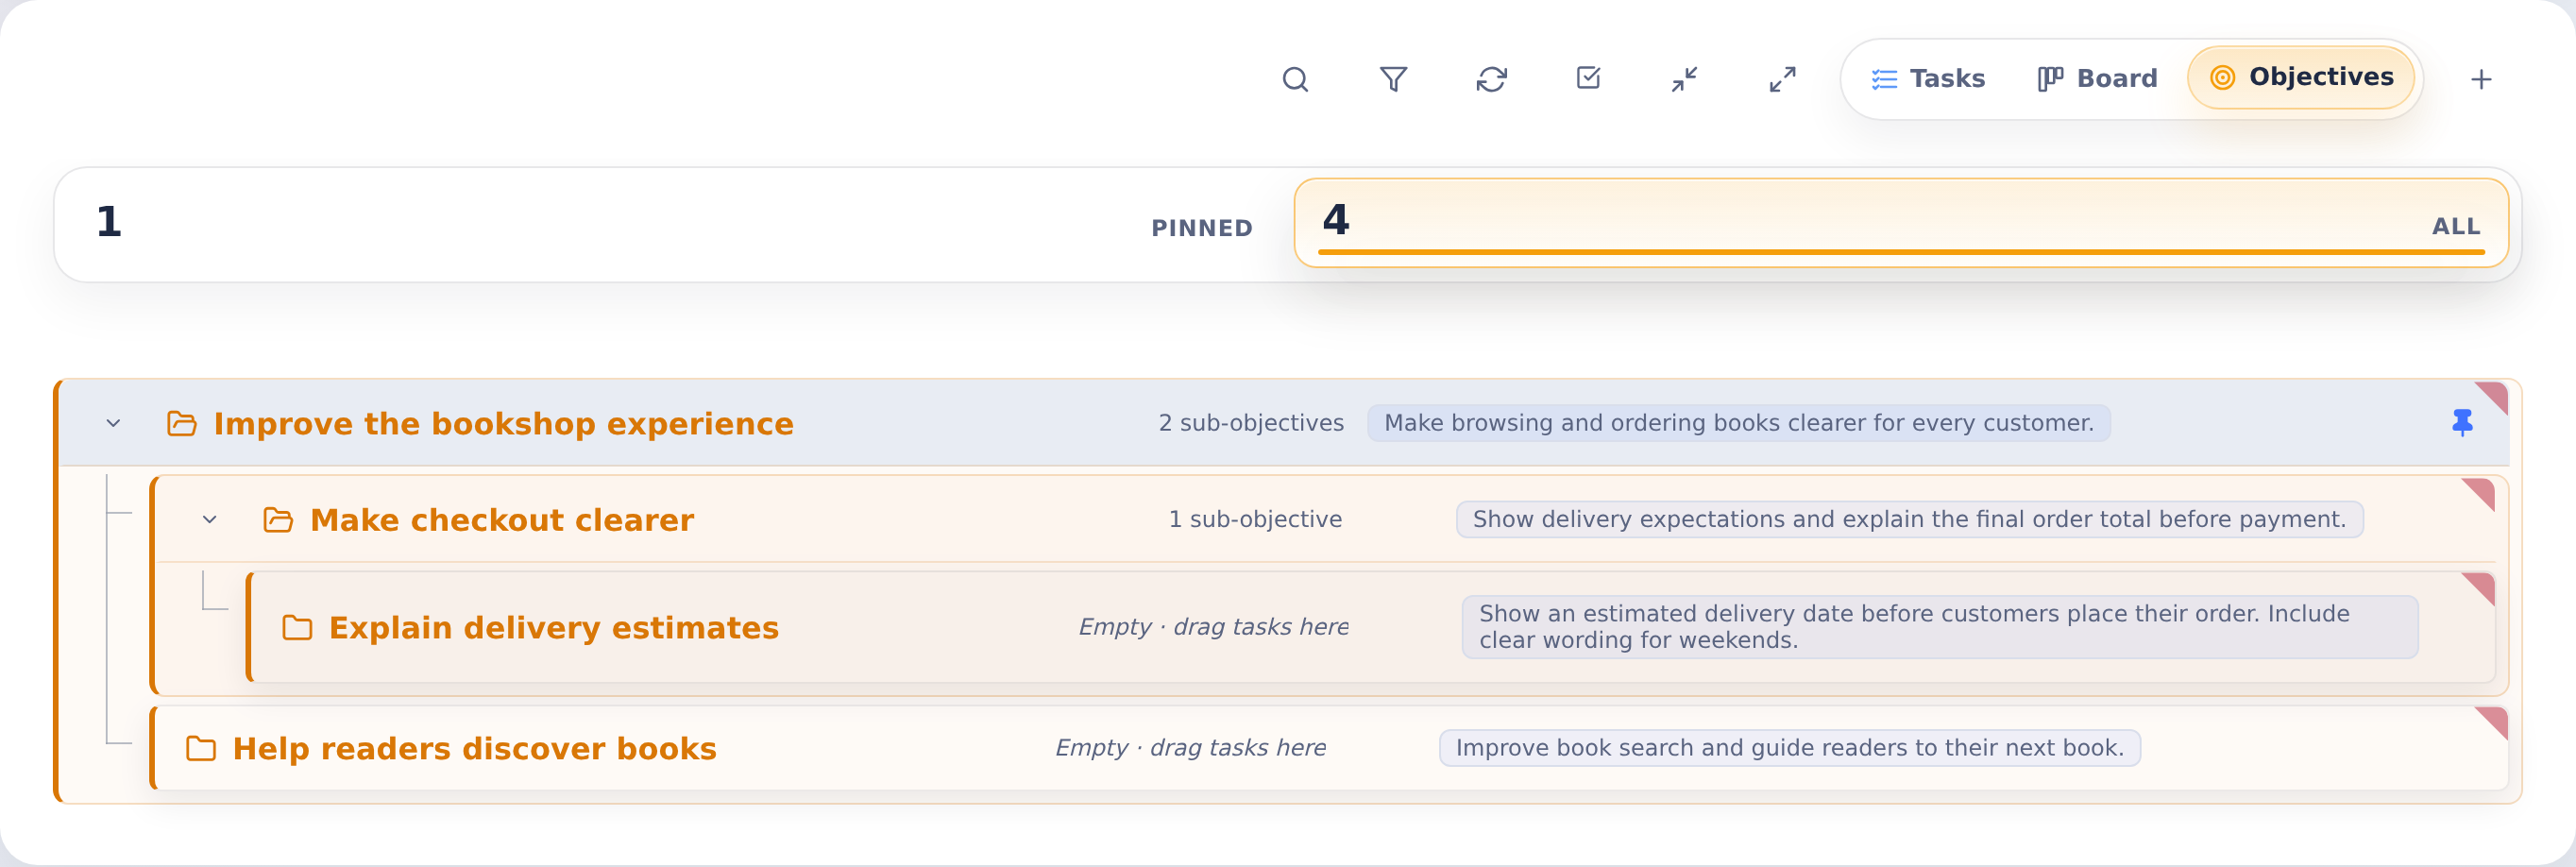
The Iterative Workflow
Objectives support an iterative approach to getting work done:
-
Draft your objective: Write your initial requirements, attach relevant screenshots or documentation, and specify which environment and agents to use.
-
Launch a task: When ready, launch a task from the objective. The task runs in its own container while the objective remains unchanged.
-
Evaluate and refine: Review the agent's work. If the requirements weren't complete or specific enough, revise the objective based on what you learned.
-
Relaunch: Submit another task with the refined requirements. Repeat until the work meets your expectations.
This workflow means objectives serve as living documents that improve over time. Each task launched from an objective is independent, so you maintain a history of attempts and can compare approaches.
Tasks
A task is a single unit of work executed by an AI agent. When you create a task—either directly or by launching from an objective—CoderFlow spins up an isolated container and runs the agent with your instructions.
Tasks progress through a simple lifecycle:
- Pending: Task is created and waiting to be queued
- Queued: Waiting for an available container slot
- Running: Agent is actively working on the task
- Completed: Agent finished successfully
- Failed: Agent encountered an error
You can monitor running tasks in real-time, watching the agent's activity feed as it explores code, makes changes, and runs tests.
Staged Tasks
For situations where you want to prepare a task but control exactly when the agent starts working, staged tasks launch the container and set up the environment but pause before the agent begins. This is useful for:
- Manually adjusting the environment before execution
- Coordinating task timing with external dependencies
- Reviewing the setup before committing compute resources to agent work
When ready, you start the staged task and the agent begins immediately in the pre-warmed container.
Pinned Items
As you work with objectives and tasks, pinning helps you focus on what's currently active. Pin objectives you're actively planning and tasks you're evaluating. When work is complete, unpin items to move them out of your primary view.
Your default view shows only pinned items—the objectives and tasks that need your attention right now. Switch to the "All" view when you need to reference historical work or revisit completed items.
This approach keeps your workspace uncluttered while preserving full history. Nothing is deleted; completed work simply moves out of your active view until you need it again.
New tasks from the dashboard prompt are auto-pinned by default. To start them unpinned, turn off Auto-pin new tasks in Task options, the sliders/settings icon at the bottom-left of the prompt area. See Auto-pin New Tasks for the steps and how this saved preference differs from automation pinning.
Your Own List
Pinned is each person's own list. When you pin an item you created, the pin is the item's own, as it has always been. When you pin a teammate's item, it goes on your list only, and its pin button says Pinned on your list only. The teammate's list, and their own pin on the item, stay exactly as they were. Unpinning and snoozing work the same way: they change only your list.
- Keeping someone else's item on your list changes nothing on the item, so it needs only permission to view it. A Viewer can keep a list too.
- Unpinning an objective also unpins what's under it, but only on your own list. A teammate's pins under it stay.
- Server Admins are not special: their Pinned section is their own list as well.
- Deleting an item removes it from everyone's list, and deleting a user removes their list.
- Items with no recorded creator, such as some automation tasks, keep one shared pin for everyone. If you may change such an item, pinning, unpinning or snoozing something it belongs to (its objective or group, say) changes its pin for everyone. If you may not, as a Viewer, it is left as it is and the rest still changes; the toast says how many shared items stayed.
Snoozing a Pin
When a pinned item is not relevant right now but you are not ready to unpin it, snooze it. Snoozing hides the item from regular task listings until a time you choose, then returns it automatically. It remains available in the dedicated Snoozed view. Open the pin menu on a task or objective tile, or use the pin control on the task page. Under Snooze until, choose Later today, Tomorrow or Next week to snooze right away, or Custom… for the snooze dialog.
In the dialog, pick a quick preset (In 30 minutes, In 1 hour, Later today, This evening, Tomorrow, This weekend, Next week) or set an exact date and time. Snoozed items move to a Snoozed view that appears whenever you have any, and each shows its return time. A snoozed item stays pinned, but its pin button shows a clock instead of the filled pin until it returns. Select the clock to open the pin menu, then choose Custom… to pick a new time or Unsnooze to return it to Pinned immediately. Every change shows an undo toast, and an item that has just come back is highlighted at the top of Pinned for a day.
While a task, or a child task it created, is queued or running, or has a follow-up queued or scheduled for later, the pin menu also offers It finishes, and the snooze dialog an Until done tab beside Duration and Date & time: the task stays snoozed until it and its child tasks stop running and have no follow-up or wake-up still to come, then returns on its own, with Until done in place of a return time. See Snooze a Pin for the details.
Snoozing a grouped task, or an objective, snoozes its related variants, launched tasks, and judge together, so they all return as a single item.
A snooze is yours too: snoozing a teammate's item hides it from your lists only.
A snoozed item stays pinned underneath, so its running container keeps the 48-hour inactivity grace. That grace comes from its creator's own pin; a pin on someone else's item doesn't give the container any. Pinning and snoozing do not prevent stopping or removal after the stopped-container retention period. To exempt an existing container from automatic removal, use More actions → Protect container on the task page (see Container Lifecycle).