Screen and Report Designers
Use the Screen Designer to edit DDS display files (.dspf) and the Report Designer to edit DDS printer files (.prtf) visually. Both work on source in a task's repositories, keep untouched source lines exactly as they were, and save your edits back into the task for review.
Prerequisites
- You can view the task. Opening a designer requires task view permission; saving or creating files requires task change permission and an edition that allows source editing. Task execute permission is not required for the designer.
- The task container is running. The designer reads and writes the files in that container, so restart a stopped container from the task page before opening a file.
- The file is a UTF-8
.dspfor.prtffile, up to 2 MiB, inside a configured task repository. Extensions are case-insensitive;.dspf38and.prtf38are not supported. Files and folders reached through symlinks cannot be opened. - To save or create a file, wait until the agent's turn has finished. Saving is paused while the agent is working; an already open designer keeps your unsaved edits.
You do not need an IBM i connection to design or preview these files. Referenced field definitions are looked up in the task's repositories, not in a live IBM i library.
The designer explains why editing or saving is unavailable, for example missing change permission, an edition restriction, an active agent turn, or a stopped or unavailable container. A temporary save pause keeps your buffer; a permission restriction disables editing. Download DDS in More actions lets you keep a local copy of the current source.
A Profound UI Rich Display .dspf containing HTML() keywords opens read-only, with its outline, inspector, Problems and Show DDS source, rather than a 5250 canvas. Use the appropriate Profound UI design workflow for Rich Displays.
Opening a Designer
On a .dspf file, choose Open in Screen Designer. On a .prtf file, choose Open in Report Designer. These actions are available in three places on the task page:
- In Changed Files, use the designer icon beside the file's other actions. Deleted files have no designer action.
- In the File Browser, hover over a file in a folder listing or search results to reveal its designer icon.
- In the file viewer, use the designer button in the header.
Each file opens in its own browser tab. Opening the same file again returns to its existing designer tab without reloading your work. If the browser blocks the tab, allow the pop-up and try again.
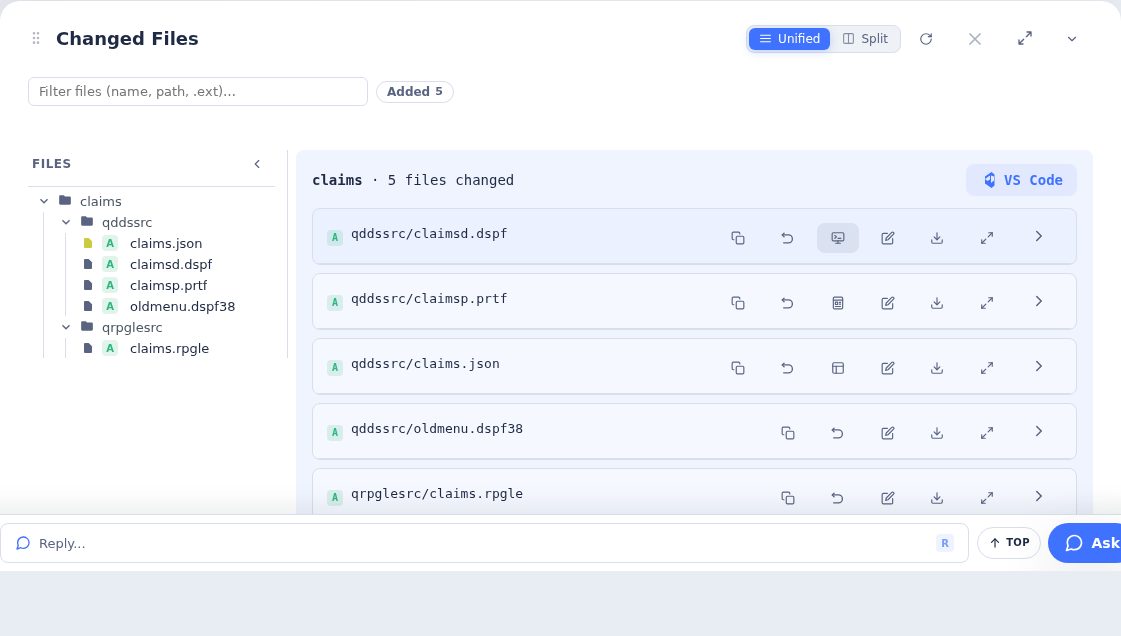
Creating a Display or Printer File
- In the File Browser, navigate to an existing folder inside a task repository.
- Use New display or printer file in the panel header, then New display file… or New printer file….
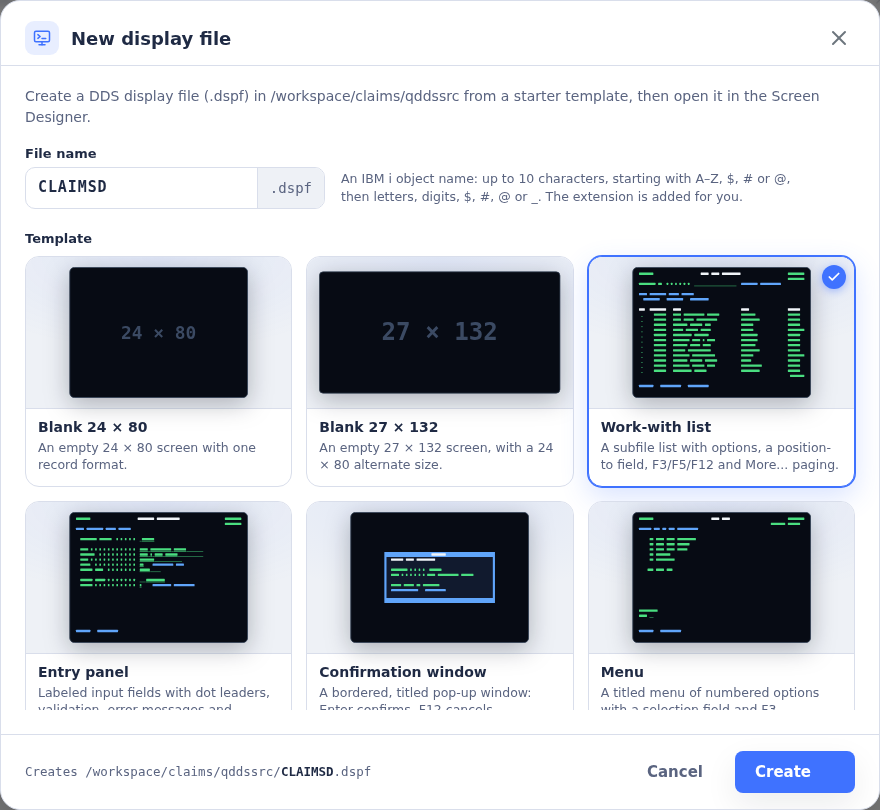
- Enter a File name. Use an IBM i object name: 1–10 characters, starting with a letter,
@,#or$, followed by letters, digits,@,#,$or_. The name is uppercased and the extension is added for you. - Choose a card in the Template gallery and click Create.
The new file is saved in that folder, the listing refreshes, and the file opens in its designer tab. An existing name is refused rather than overwritten. If creation is refused for another reason, such as a missing folder, a permission restriction or an active agent turn, the dialog explains the problem and stays open.
Display templates include Blank 24 × 80, Blank 27 × 132, Work-with list, Entry panel, Confirmation window and Menu. Printer templates include Blank report, List report and Summary with level breaks. Templates provide DDS layouts and keywords; they do not generate the application program that uses them.
Inside either designer, choose More actions → New from template…, or find New from template… in Commands. Choose the Kind, file name and template, then Create. This creates a sibling file in the open file's folder and opens it in another tab, keeping your current file open.
Saving and Reviewing Changes
Visual edits stay in the designer until you click Save or press Ctrl+S (Cmd+S on macOS). The save-state pill shows whether changes are unsaved, saved or temporarily paused. Saving writes the DDS into the task's repository and refreshes the task's Changes. It does not approve the task, commit it, compile it or sync it to IBM i.
Use Review changes before saving to compare your buffer with its saved baseline. The designer's Changes tab also summarizes unsaved changes. The diff shows added and removed source lines, including line-ending changes when relevant.
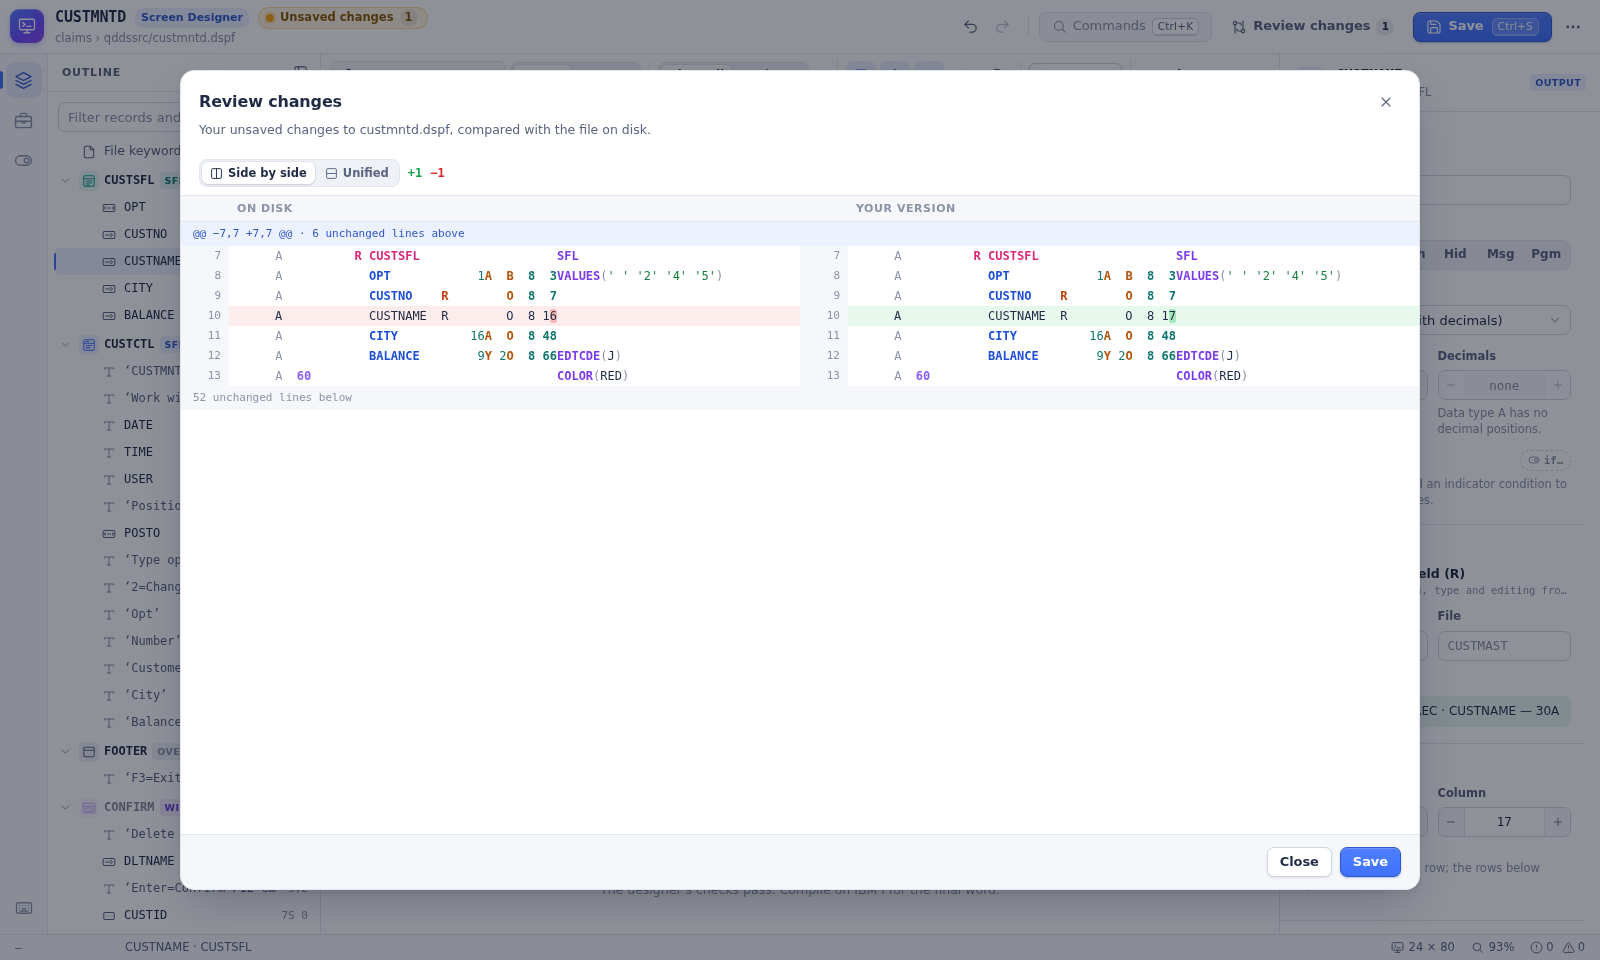
Edits produce minimal diffs. Untouched lines retain their exact text, spaces, sequence and date areas, and line endings. A simple screen-field move changes its declaration line without reformatting the rest of the source. New or changed keywords may need continuation lines; report spacing edits can also change neighboring gaps or printing order. Undoing an edit restores its original source.
When the File Changes Elsewhere
The designer checks for changes made by an agent, another tab or another editor. It keeps your unsaved version if a save conflicts.
- Compare — opens a comparison when the file has changed on disk. After a save conflict, the banner calls this Compare with disk.
- Reload — loads the current disk version. After a conflict, Reload (discard mine) makes clear that this discards your unsaved changes; confirm only when you want the disk version.
- Overwrite… — asks for confirmation before replacing the disk version with yours. Another intervening edit can still cause a new conflict.
You can also choose More actions → Reload from disk. If the file was deleted, the designer offers to recreate it with your version. Check the comparison before choosing which version to keep.
After saving, review the task's Changes and use your usual approval workflow. Build with your existing IBM i build flow, or sync source to a library when appropriate. There is no compile action in the designer.
Designing a Screen
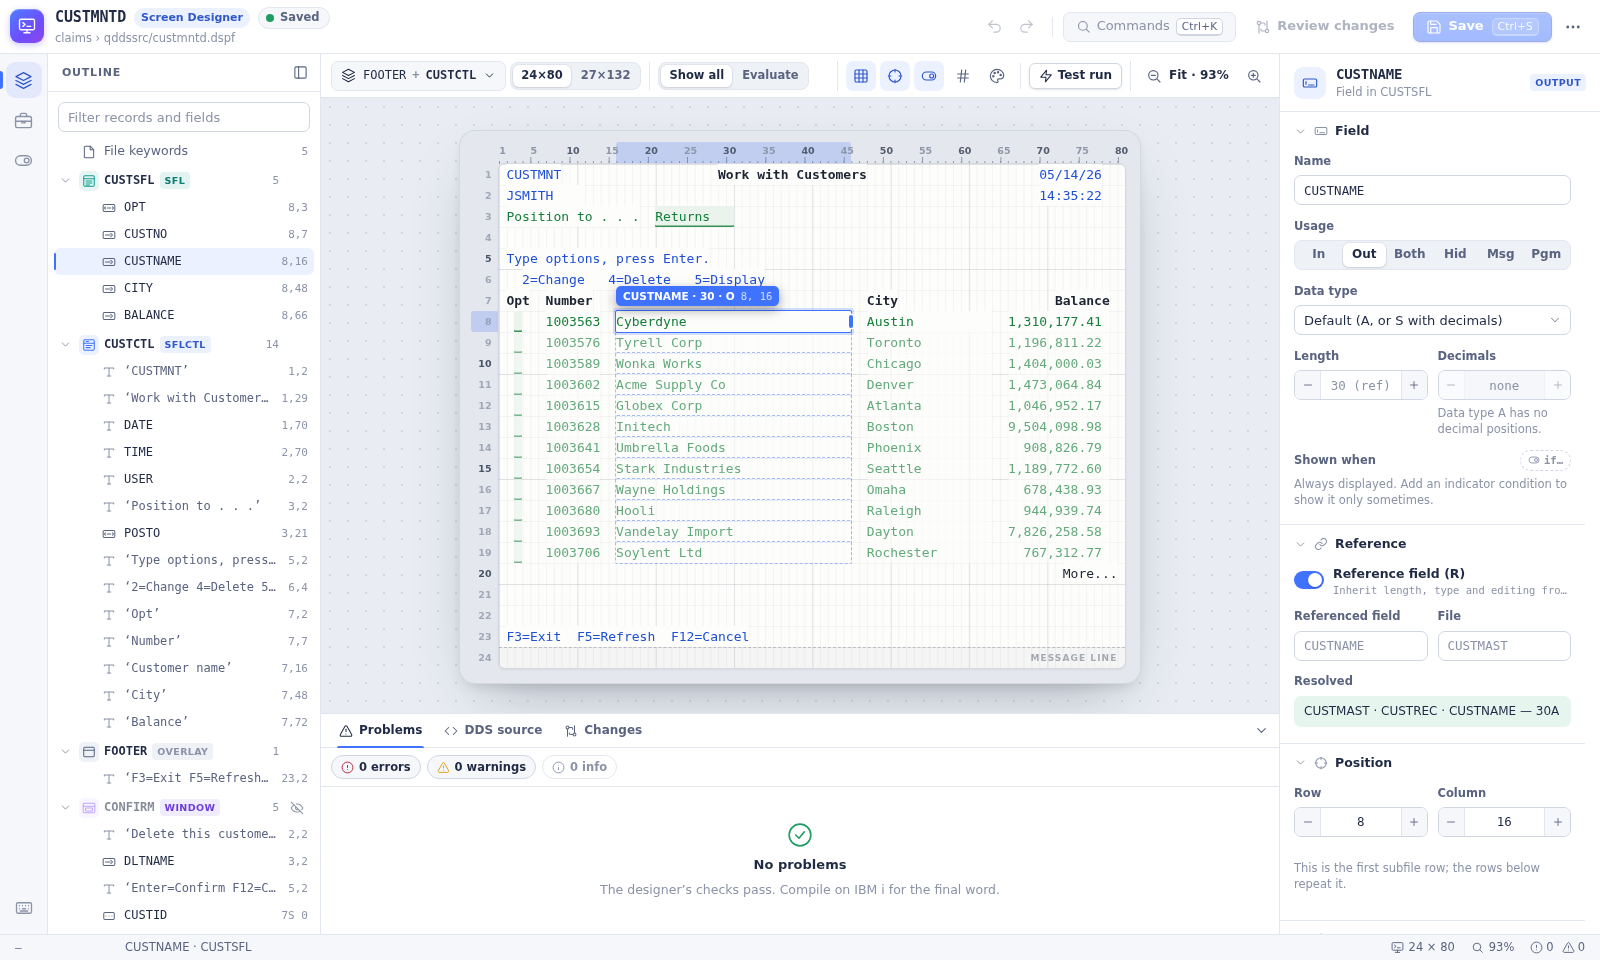
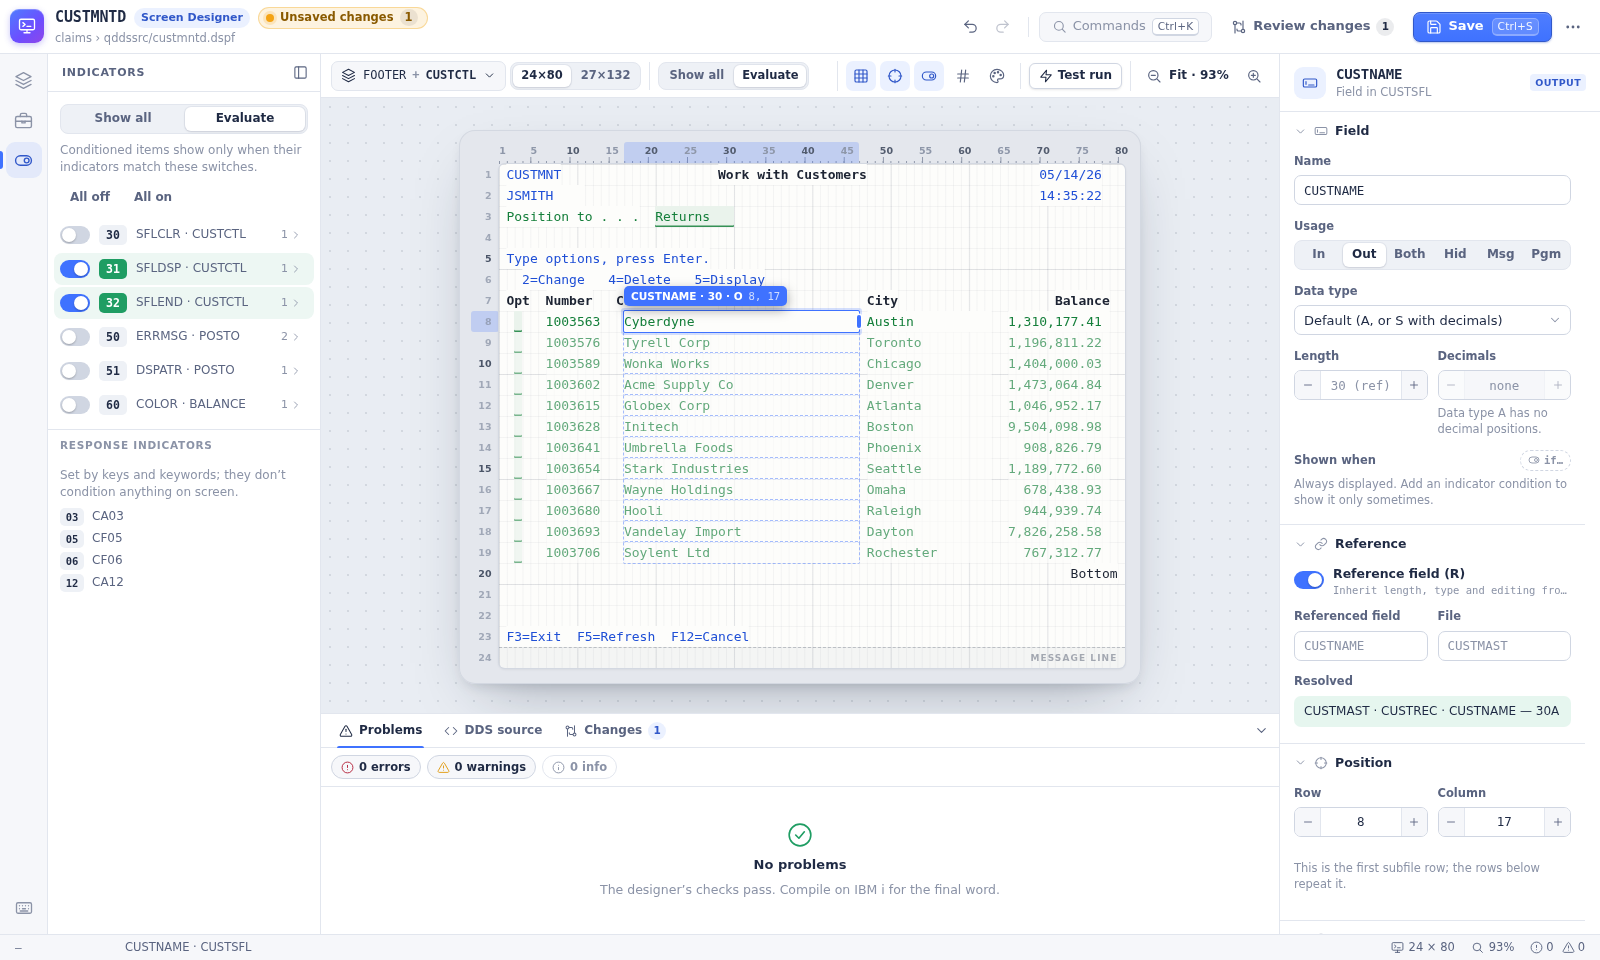
The canvas shows a character-cell display with row and column rulers. Select a field or constant to edit it, drag to move it, or use the arrow keys for precise placement. Use multi-selection and the alignment and distribution tools to arrange several items. Double-click a text constant to edit its text.
The toolbar controls the records shown together, display size, indicator evaluation, grid, sample data or field names, and zoom. When the DDS declares both sizes, switch between 24×80 and 27×132 to check each layout. These are preview settings, not changes to DSPSIZ.
Choose Canvas theme for Classic 5250, Modern or Light. The canvas theme is separate from the application's light/dark theme, available in More actions. View choices stay in your browser and are not written into DDS.
Outline, Toolbox and Inspector
- Outline — lists file keywords, records, fields and constants. Select an item to find it on the canvas and in the inspector. Record visibility controls let you show records together or focus on one.
- Toolbox — adds text, input/output fields, hidden and program fields, messages, date/time values, system and user names, and function-key legends. Drag an item onto the canvas, or click it to preview a free position; move the preview with the arrow keys and press Enter to place it. Escape cancels placement.
- Inspector — edits the selected file, record, field, constant or group. Depending on the selection, it offers names, usage, type, length, decimals, position, references, conditions, color, display attributes and edit codes. All keywords shows the item's DDS keywords.
Check the Toolbox's insertion record before adding an item. Hidden and program fields appear below the canvas because they have no screen position. Fields using REF or REFFLD show inherited information when their source definitions can be found; unresolved references are reported in Problems.
The Toolbox's Record, Subfile and Window items open wizards:
- A record wizard adds a format, with optional heading, overlay and function keys.
- A subfile wizard creates the
SFLandSFLCTLpair, page and record counts, display/clear/end indicators, and optional option column and function keys. - A window wizard adds the window record, dimensions, border and title.
Records, Composites, Subfiles and Windows
A program can write several record formats to make one screen. The records menu chooses the composite shown on the canvas. Selecting a subfile control record brings its subfile into the view; overlays and a window can appear with the main screen.
For a subfile, edit the first row's fields. The repeated preview rows show how that definition fills SFLPAG; they are not separate DDS fields. Sample data and the More... or Bottom marker help you check widths, spacing and the last-page state.
A window is drawn over the records behind it. Its fields use coordinates relative to the window's usable area. Select its record or fields to adjust the layout in the inspector.
Trying Indicator Combinations
Open Indicators to see conditioning indicators and where they are used. Show all displays conditioned items without applying the switches. Choose Evaluate, then turn individual switches on or off, or use All on and All off. Expand an indicator's usage list to find the fields and keywords it affects.
For example, toggle the indicator controlling SFLDSP to inspect subfile visibility, or the indicator controlling SFLEND(*MORE) to preview the last page. Response-only indicators are listed separately. These switches are browser-local preview state; they do not edit the DDS conditions or call a program.
Problems and DDS Source
The Problems tab reports errors, warnings and information such as overlaps, out-of-bounds fields, invalid keyword combinations and unresolved references. Select a problem to locate its source. Checks cover all declared display sizes, with size-specific messages where needed. A clean Problems panel is not a substitute for compiling and testing on IBM i.
Open DDS source to inspect the source and its changed lines. Edit source opens text editing; Apply reparses the text into the designer as one undoable edit. Applying source does not save it: use Save afterward.
Commands and Keyboard Shortcuts
Click Commands or press Ctrl/Cmd+K to search designer actions. Open Keyboard shortcuts, or press ? outside an input, for the full list.
| Shortcut | Action |
|---|---|
| Ctrl/Cmd+S | Save |
| Ctrl/Cmd+Shift+D | Review changes |
| Ctrl/Cmd+Z | Undo |
| Ctrl/Cmd+Shift+Z or Ctrl/Cmd+Y | Redo |
| Arrow keys on the canvas | Move the selection one cell |
| Shift+Arrow keys on the canvas | Move the selection five cells |
| Ctrl/Cmd+D | Duplicate the selection |
| Delete or Backspace on the canvas | Delete the selection |
| Ctrl/Cmd+Enter | Open Test run in the Screen Designer |
| F6 / Shift+F6 | Move forward/backward between the app bar, side panel, canvas, Inspector and bottom panel |
Tab navigates controls and leaves the canvas after its last item. Shortcuts for moving or deleting canvas items do not replace normal text editing inside inputs.
Test Run: Simulating a Screen
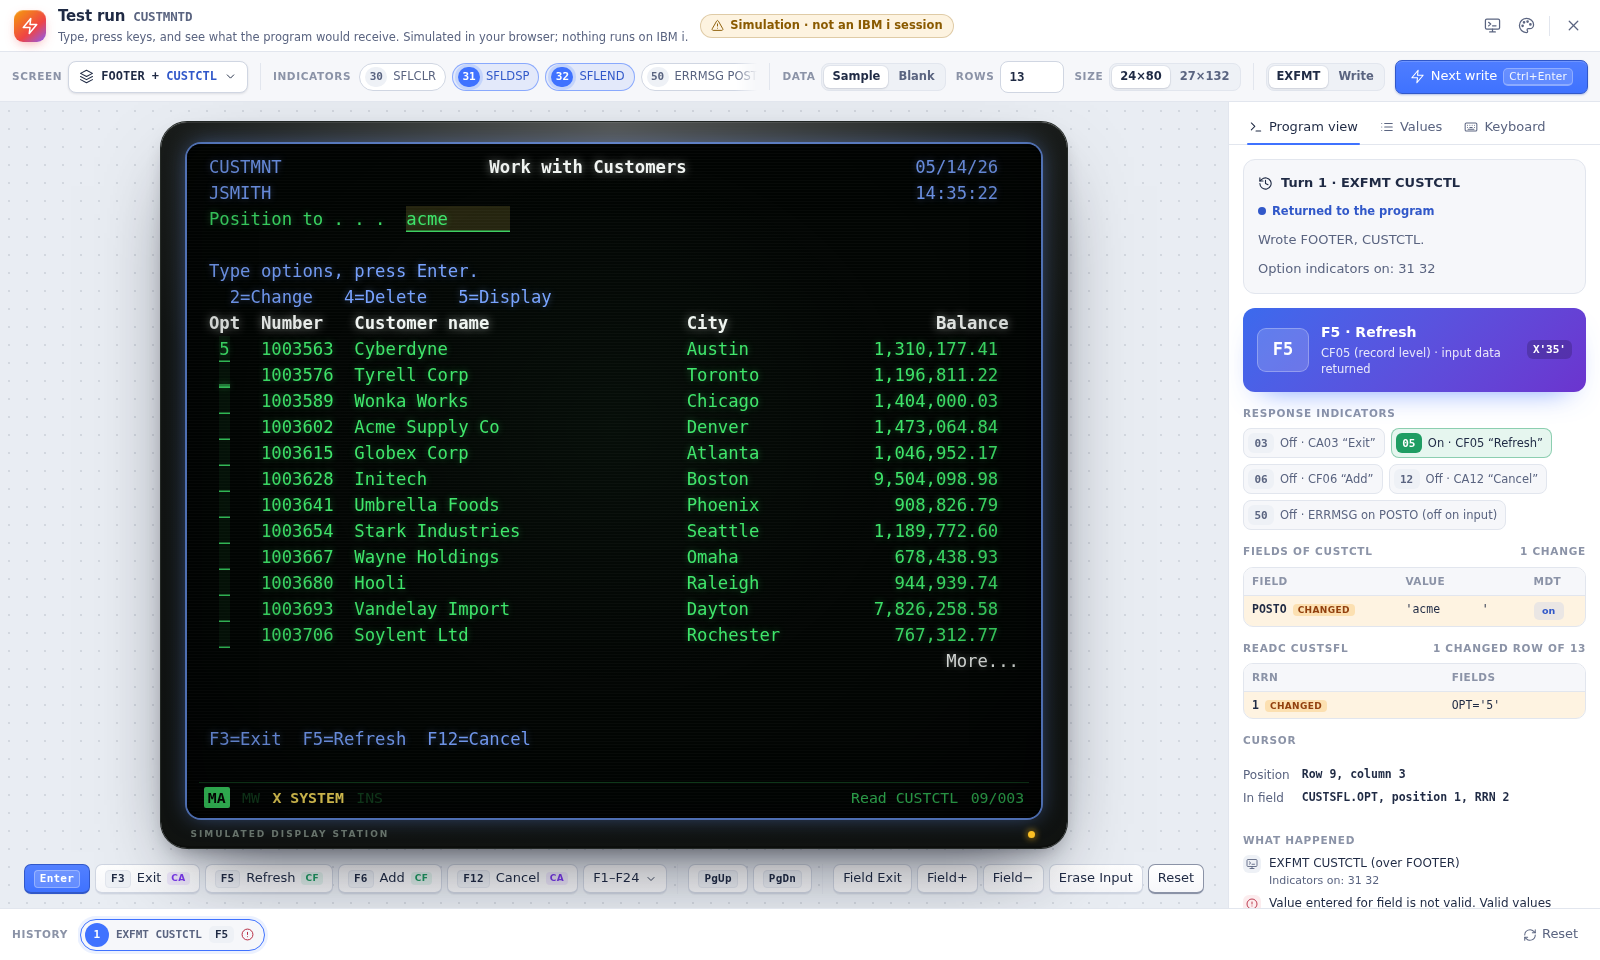
Click Test run to try the current display-file buffer, including unsaved changes. It opens a simulated 5250 display where you can type, page through subfile rows, test function keys and see what a program would receive.
Test run runs entirely in the browser. It does not connect to IBM i, execute RPG or another application program, access a database, or save the values you type into the DDS. Use it to check the screen's DDS behavior, then test the application on IBM i.
Set Up a Write
In the scenario bar, choose Screen for the records written and the record read. Set Indicators, Data (sample data or blanks), Rows for a subfile, and Size when multiple display sizes are available. The Values tab lets you change the simulated program's field values or individual subfile rows.
EXFMT writes and reads the screen. Write only writes it; a key waits until you choose Read. After changing the scenario or program values, use Next write (Ctrl/Cmd+Enter) to write again. Scenario changes take effect on the next write, not during the current input operation.
Type and Press Keys
Click the simulated display to give it keyboard focus. It handles input-capable fields, protected fields, case and numeric entry rules, field exits, common validity checks, conditioned attributes, windows, subfile paging and supported fold/drop behavior. Undefined function keys and failed checks show an operator message; use the keyboard Reset action when needed.
| Browser key | Simulated action |
|---|---|
| Enter | Enter |
| F1–F12 / Shift+F1–F12 | F1–F12 / F13–F24 |
| Tab / Shift+Tab | Next / previous input field |
| Shift+Enter | Field Exit |
| Numpad + or Alt+= | Field+ |
| Numpad − or Alt+- | Field− |
| Page Up / Page Down | Roll down / roll up |
| Ctrl+End / Alt+End | Erase EOF / Erase Input |
| Tap Ctrl | Reset the keyboard after an operator error |
| Escape | Leave the simulated screen; press again to close Test run |
Field Exit, Field+ and Field− clear from the cursor to the end of the field, apply the relevant adjustment/sign rules, and move to the next field. Use the on-screen key strip and F1–F24 menu for keys the browser keeps, such as F11. The Keyboard tab lists the complete mapping; F5 outside the focused simulation remains the browser's reload key.
Inspect What the Program Receives
After a key returns input, open Program view. It shows the AID and its INFDS byte, response indicators, returned field values and modified data tags (MDT), cursor information, and changed subfile rows that a READC would return. CA keys return without field data and skip input checks; Enter and data-returning keys apply the supported checks.
The keyboard waits for Next write after input returns to the program. Change values or indicators, then write again to explore the next screen state. Select a turn in History to review its program view. Reset at the end of the History bar starts a fresh simulation with new data and an empty history; this is separate from resetting the keyboard after an operator error.
Simulation Limits
Test run implements a useful subset of 5250 behavior, not a complete terminal or IBM i runtime. It does not simulate DBCS/graphic fields, help screens, menu bars/pull-downs, GUI selection fields, message subfiles or message-file text, every CHECK option, or every AID such as Print, Clear and Help. Some display-management keywords, including PUTOVR, OVRDTA, OVRATR, ERASE and KEEP/ASSUME, are not simulated.
All subfile rows in a write share one set of option indicators. Rows stay loaded across writes unless the supported clear/delete conditions reload them; partial reloads and SFLINZ are not simulated. Edit codes format program-written values, not interactive typing. Messages approximate IBM i wording. Verify device-specific and application-dependent behavior on the real system.
Designing a Report
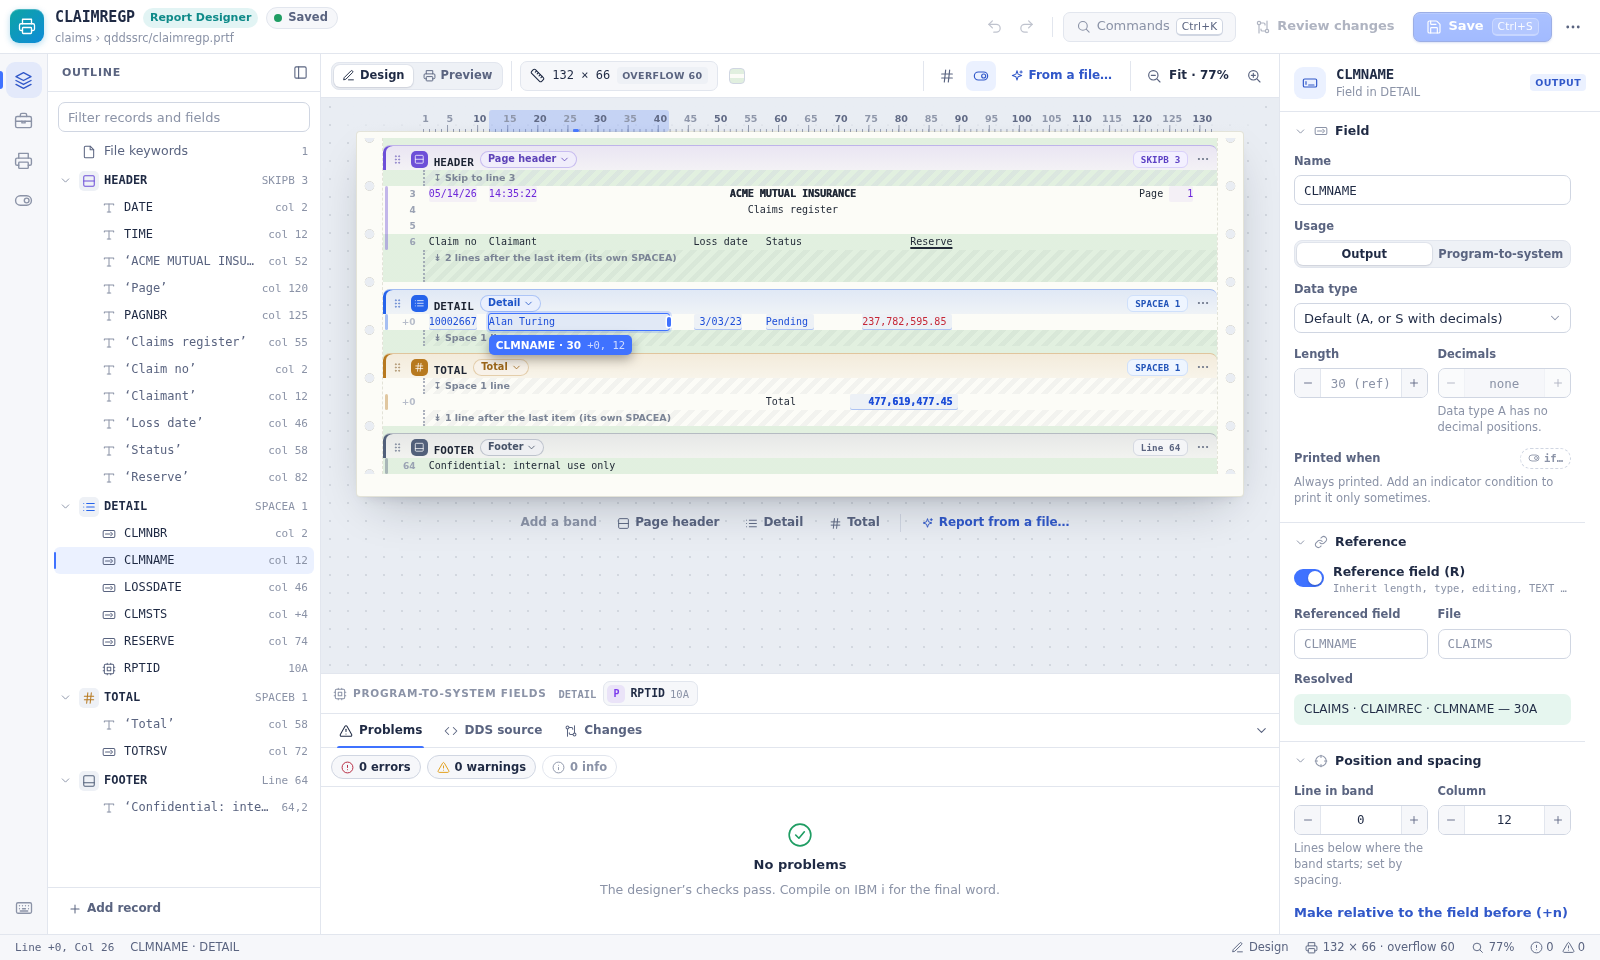
The Report Designer uses continuous-form paper with a column ruler, line labels and optional stripes. Each record format is a band, with its fields on the paper and spacing lanes before and after it. Select a field or band to edit it in the inspector; use Toolbox to add text, output/program fields, date, time, page number, underlines and bands.
Bands and Spacing
Drag a spacing lane's handle to change the space before or after a band. Click its spacing chip, such as SPACEA 1 or No spacing, to open the spacing controls, or use the inspector's Spacing section. DDS SPACEB/SPACEA advance by lines; SKIPB/SKIPA skip to a page line. Band roles such as Page header, Detail, Total and Footer are view hints, not program logic.
Vertical moves respect how the record positions its fields:
- In a line-numbered record, moving a field changes its page line. Unnumbered fields that follow it on the same line move with it. Moving one of those fields to a different line gives it its own line number and absolute column.
- In a spacing record, fields reach their lines by advancing from earlier fields. Moving one adjusts its spacing and, when necessary, neighboring gaps so other fields keep their lines. Crossing another field's line can change the moved field's order in the source.
A move that cannot be represented safely is refused with an explanation. Horizontal moves change columns; relative +n positions stay relative when possible. Review the source diff when changing spacing or printing order.
Page Setup
Open Page setup… from More actions, or click the page-size chip in the toolbar. Choose a paper preset or custom dimensions, CPI/LPI, margins, Overflow line and Stripes. The overflow line can also be dragged in the setup preview or on a print-preview page.
Page setup is stored per file in your browser. It controls the preview and width checks; it does not change printer-file creation commands, DDS or IBM i printer attributes. Band roles and the preview's print sequence are also browser-local settings.
Add Column Headings
Select the detail fields you want to label, then choose Column headings in the Toolbox, or Column headings… in the inspector. Review the heading text and layout, then click Add headings to insert aligned heading constants above the fields. Headings can use the fields' COLHDG, TEXT or names.
Generate a Report from a File
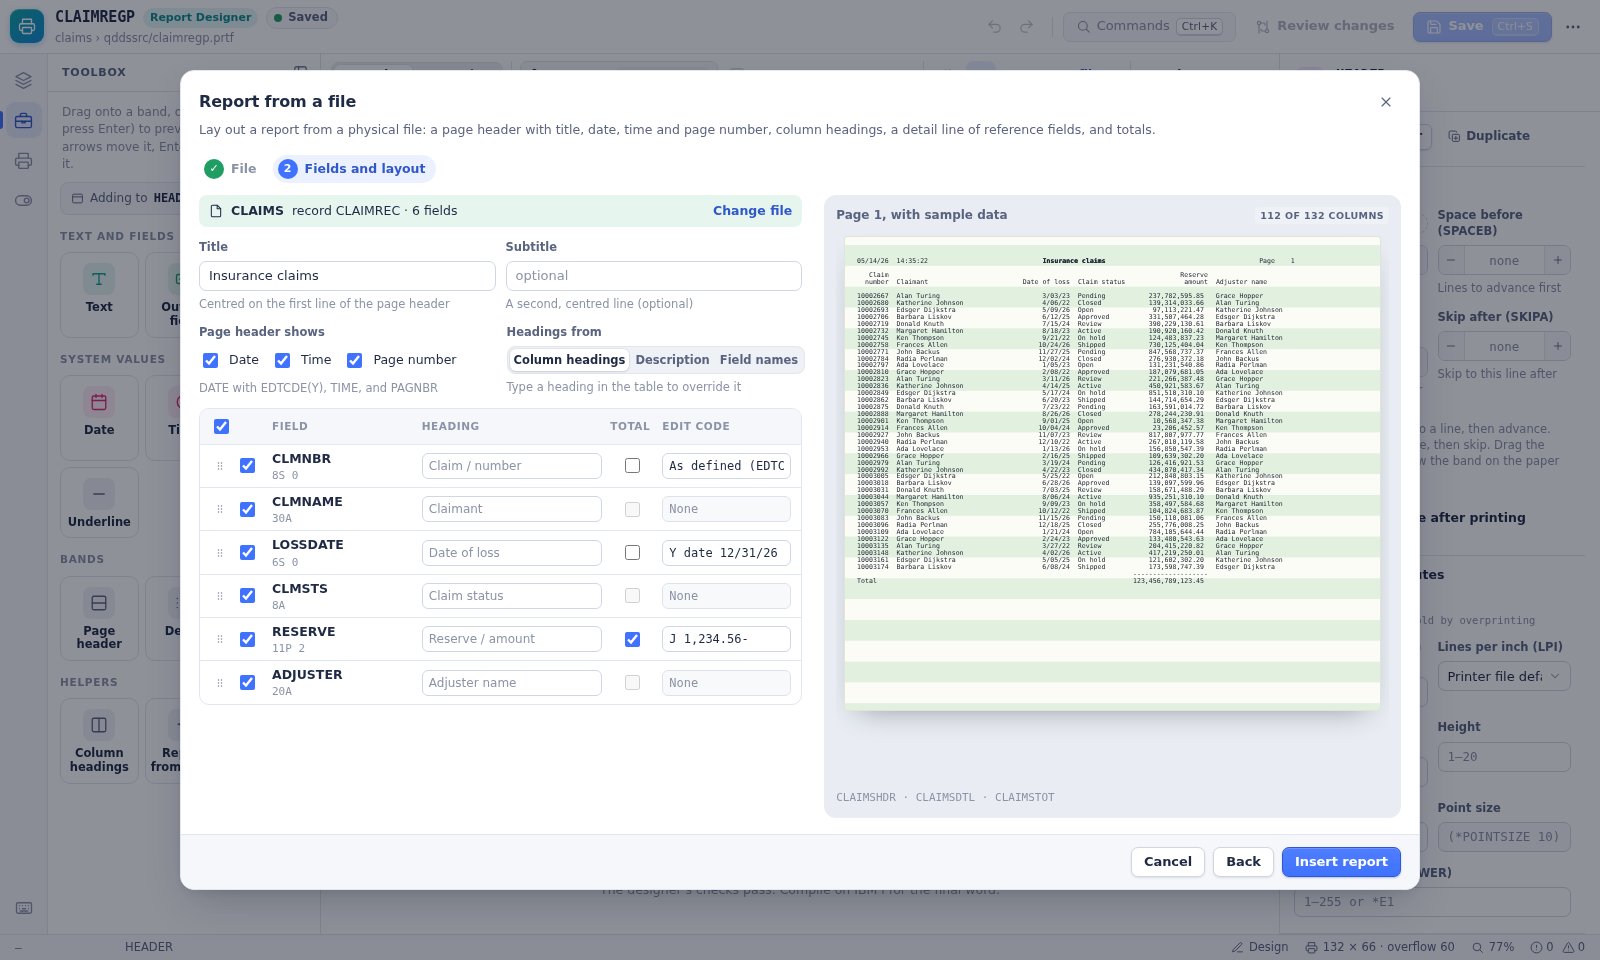
- Click From a file… in the toolbar, or Report from a file in the Toolbox.
- Enter the Physical file name and click Look up. The wizard searches
.pfor.lfsource in the task's repositories; it does not query a live database. - Choose and order the fields, adjust headings and numeric edit codes, and select numeric columns for totals. Review the sample page as you make changes.
- Click Insert report to add page-header, detail and total bands, then review and save the DDS.
The detail uses reference fields so lengths, types and editing can follow the database definition. The wizard creates report DDS, not a program to read records, calculate totals or write the bands.
Print Preview and Print Sequence
Choose Preview in the toolbar to see pages filled with sample data. Design returns to the editable bands. Open Print sequence to decide which records the simulated program writes and in what order:
- Start with Presets, or use Add step.
- Choose each step's record, repeat count and indicators; reorder steps as needed.
- Select records under Repeat on overflow to reprint them when overflow occurs, for example a page header.
- Check the page thumbnails and use the previous/next page controls to inspect the result.
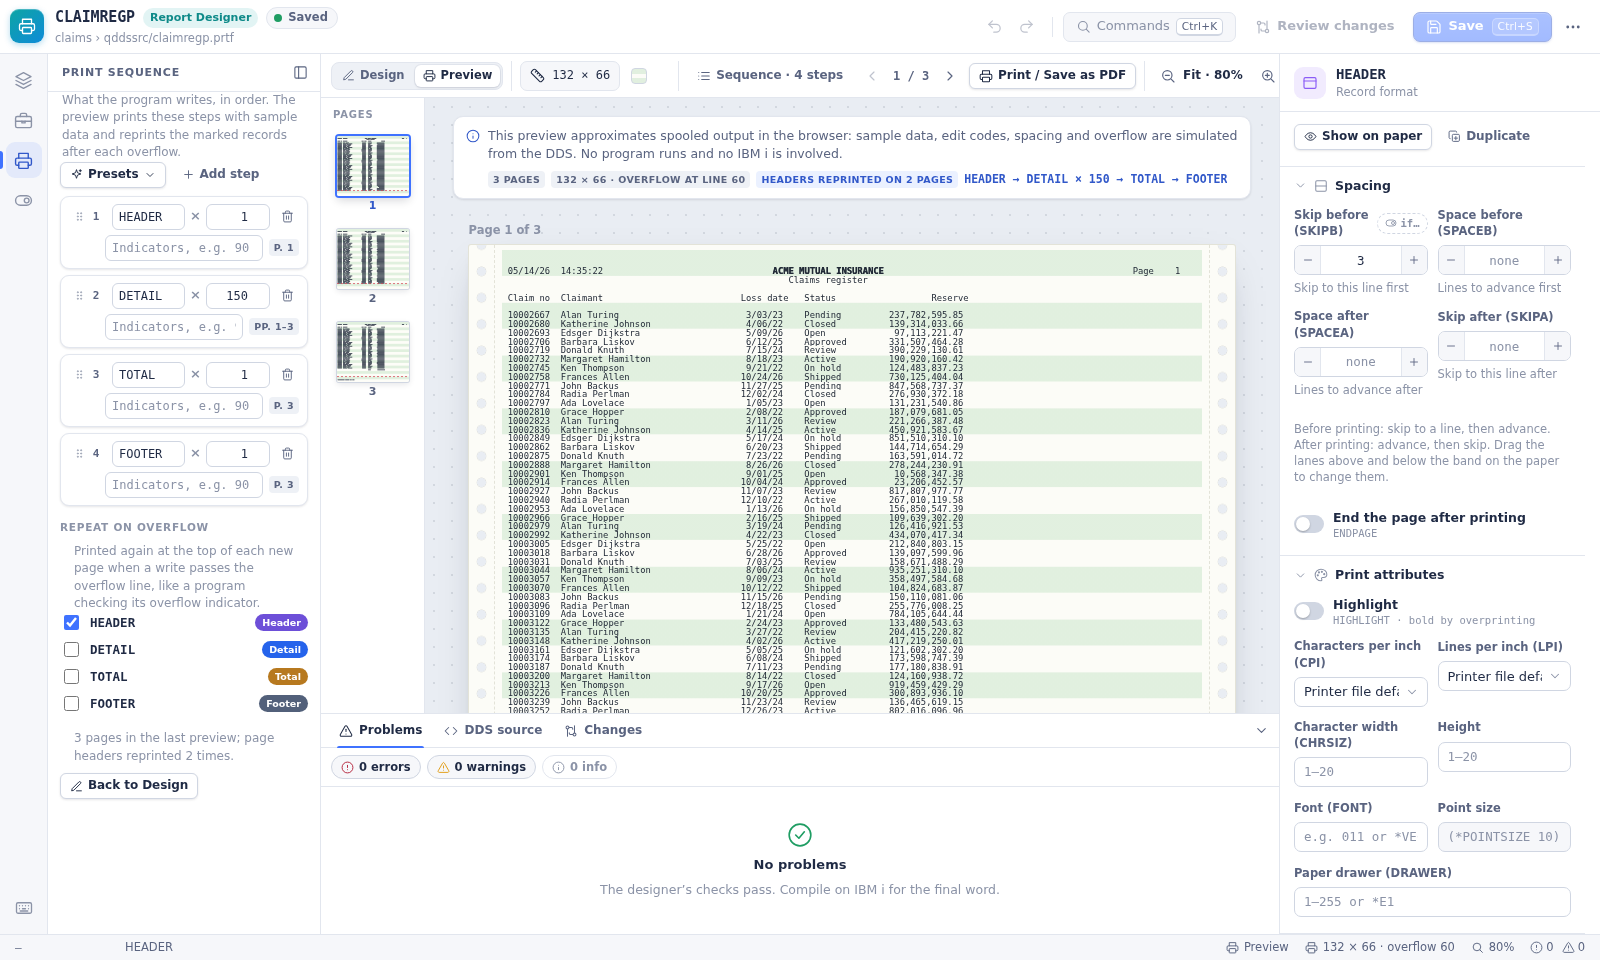
The preview approximates spooled output from the DDS and sequence. Spacing beyond the overflow line starts a new page and can split a multi-line record, reprinting selected headers between its lines. A skip or explicit position beyond the overflow line can print there and trigger header reprinting before the next write instead. Real IBM i programs react to the overflow indicator themselves, so check the actual program's page handling. Preview output is limited to 60 pages.
Print or Save as PDF
In Preview, click Print / Save as PDF to open the browser's print dialog. Choose a printer or the browser's PDF destination. The preview uses portrait orientation for narrow Letter/A4 forms and scales wide continuous forms to landscape on the browser's paper. Content beyond the page width is clipped.
The preview uses one CPI and LPI per page. Record/field font and character-size changes do not alter preview character sizes; highlight, underline and color are approximations. AFP features appear as preserved placeholders. This output is a browser rendering, not an IBM i spool file.
DDS Features Outside the Visual Designers
Unsupported DDS is preserved in the source when you edit other parts of the file, but its device behavior is not reproduced or offered as a dedicated visual editing feature. This includes DBCS and graphic fields; help specifications and HLP* keywords; menu bars and pull-downs (MNUBAR, PULLDOWN); GUI selection fields; and AFP printer keywords such as BOX, LINE, OVERLAY, PAGSEG and BARCODE.
Unknown keywords and unsupported specifications remain in the DDS and may appear as informational Problems or preserved items. Use DDS source to inspect them and Edit source when a source-level change is needed. The designers' checks are not a full DDS compiler. Save, build through your usual IBM i build flow, and validate the compiled screen or report on IBM i before relying on device-specific behavior.