AI Provider Authentication
AI Provider Authentication connects CoderFlow to Claude (Anthropic), Codex (OpenAI), Gemini (Google), Bob (IBM), Grok (xAI), and Kimi (Moonshot AI) using OAuth or API-key accounts. This enables agents to run tasks using your existing subscriptions to these services without sharing raw credentials with users.
Note: A Claude subscription (OAuth) can run tasks, but cannot power server-side API-backed features: Ask CoderFlow help assistant, automatic task names, setup repository commit messages, objective drafts, automatic model routing, and fork handoffs. Add a server-wide API-key account for the selected Utility AI provider; Ask CoderFlow specifically requires a server-wide Claude API-key account. Personal API keys do not enable these server-wide features.
Overview
CoderFlow supports multiple accounts per provider, allowing teams to:
- Connect different accounts for different purposes (e.g., production vs. development)
- Share provider access across the team without sharing credentials
- Switch between accounts as needed
- Automatically refresh tokens to maintain continuous access
Provider authentication is configured globally and applies to all environments. Each provider's Tasks use setting decides which account new tasks use: one selected account, or a round-robin rotation across several OAuth accounts. You can also leave a provider with no account selected.
Connecting Accounts
Navigate to Server Settings → AI Providers to manage AI provider accounts.
Adding an Account
- Click Add Account next to the provider you want to connect (Claude, Codex, Gemini, Bob, Grok, or Kimi)
- Optionally enter a label to identify this account (e.g., "Production", "Team Account")
- For Claude, optionally select 1-year token (see Claude sign-in lifetime)
- Click Open Sign-In Page to open the provider's authentication page
- Complete the sign-in process in your browser:
- Claude: Sign in and copy the authorization code displayed
- Gemini: Sign in and approve, then copy the authorization code shown on the Antigravity page (pasting the full callback URL also works)
- Codex: Sign in and copy the URL from your browser's address bar after the redirect
- Grok: Sign in on the displayed x.ai device-code page, confirm the user code, then return to CoderFlow and click I've signed in
- Kimi: Sign in on the displayed kimi.com device-code page, confirm the user code, then return to CoderFlow and click I've signed in
- Paste the code or URL into CoderFlow and click Complete Sign-In
The account will appear in your provider list. If this is your first account for that provider, it becomes the active account automatically: it is selected under Tasks use.
Adding an API Key Account
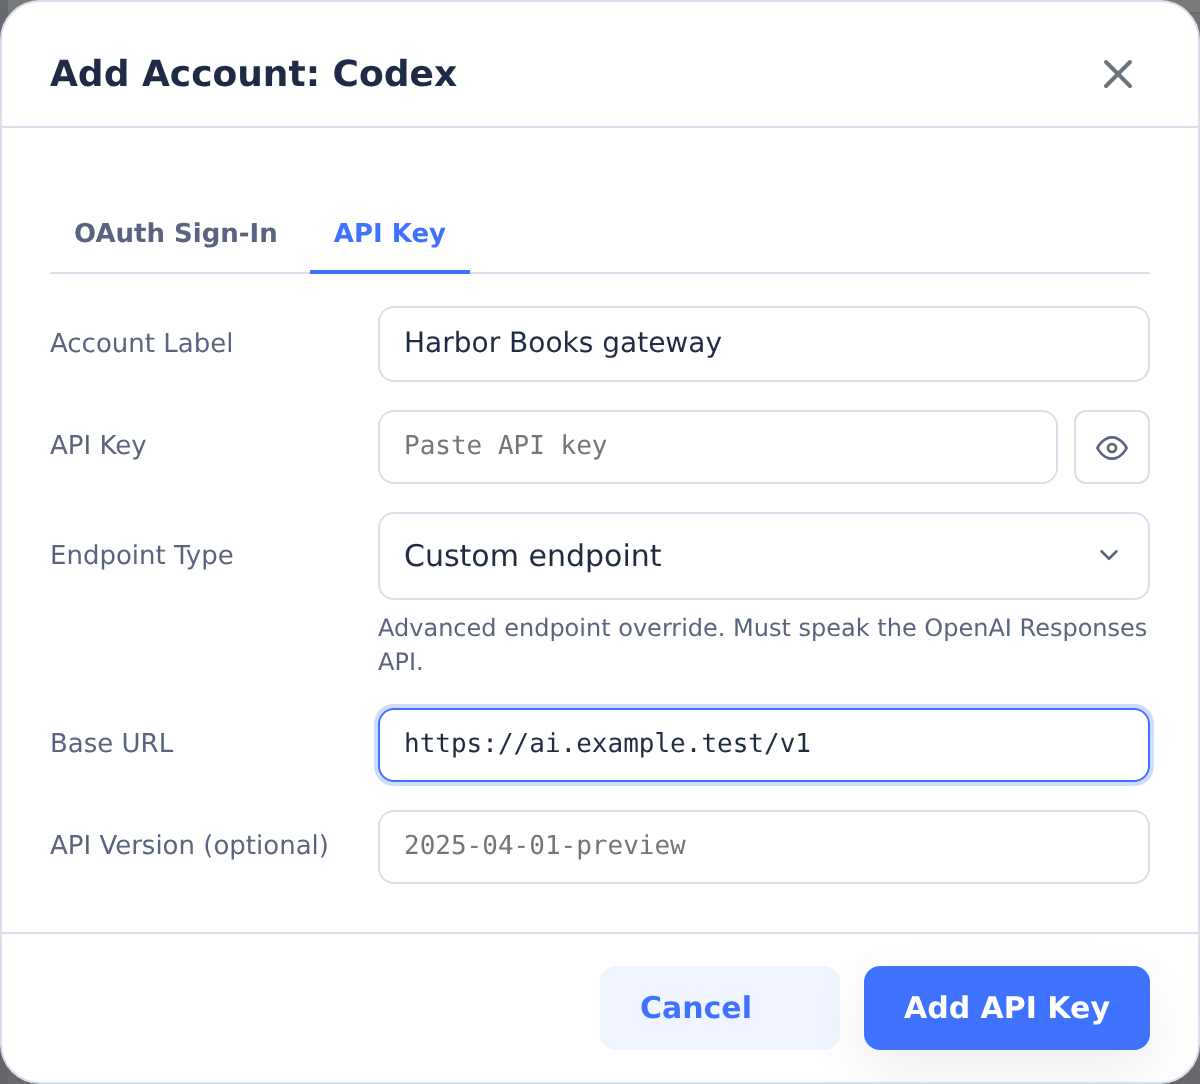
API-key accounts are useful when you want CoderFlow to inject provider API keys into task containers or use provider APIs for helper features. Click Add Account, choose the API Key tab, enter a label and key, then save the account.
In Server Settings → AI Providers, Add API Key checks the key with the provider before saving it, using the same request as the account's Test button:
- If the provider rejects the key, the dialog says so and nothing is saved. Correct the key and try again.
- If the provider can't be reached, times out or gives no clear answer (for example, a rate limit), the account is saved and the dialog explains that the key couldn't be confirmed. Use Test on the account later.
- If the check can't run, for example because an OpenAI-compatible endpoint needs a Codex model selected first, the account is saved and the dialog says the key wasn't checked.
Personal API-key accounts in Profile Settings are saved without this check.
API-key accounts can also use a Custom Endpoint. Choose Custom endpoint from Endpoint Type and enter the endpoint's Base URL. Codex and Gemini accounts also accept an optional API Version. CoderFlow normalizes the endpoint and only sends custom endpoint environment variables when that API-key account is selected for the provider.
Common custom endpoint uses include:
- Azure or proxy-hosted Responses-compatible endpoints for Codex
- Anthropic-compatible gateways or on-prem proxies for Claude
- Gemini-compatible gateways
- Bob Shell endpoints that should receive
BOBSHELL_API_BASE_URL - The Moonshot Platform API or another Kimi-compatible Chat Completions endpoint for Kimi
Custom endpoints apply to task execution and to API-backed helpers such as task-name or commit-message generation when the helper uses that provider.
Private and Local Custom Endpoints
Personal accounts in Profile Settings → AI Providers use public endpoint addresses by default for server-side connection tests and Gemini task preflight. A blocked personal Gemini API-key endpoint also blocks Gemini task launch, not just the connection test. An internal enterprise gateway on a private network will fail these checks unless the administrator enables CODERFLOW_AI_ALLOW_PERSONAL_PRIVATE_ENDPOINTS=true in the CoderFlow server process environment and restarts the server. Setting it in a task or environment's container variables does not enable it for the server.
This opt-in allows personal endpoints on RFC1918 IPv4 networks (10.0.0.0/8, 172.16.0.0/12, 192.168.0.0/16) and IPv6 unique-local networks (fc00::/7), including hostnames resolving to those addresses. It applies to all personal accounts on that server. Loopback, link-local/metadata, and other special ranges remain blocked, including IPv4-mapped IPv6 forms. See server configuration for setup instructions.
For a loopback gateway, ask an administrator to configure a server account under Server Settings → AI Providers instead. Server accounts retain access to local and private destinations without this opt-in. Remember that localhost means the machine or container making the request: a successful server-side connection test does not establish connectivity from a task container.
For both personal and server accounts, provider connection tests, Gemini preflight, and Claude model-context lookups refuse HTTP redirects and compressed responses. Enter the final API URL directly and configure the gateway to honor Accept-Encoding: identity without returning gzip, br, deflate, or zstd. Responses must also finish within the request deadline and byte limit (1 MiB, or 8 MiB for Grok's model-list connection probe). These checks do not change networking inside task containers or every server-side AI feature.
Endpoint Type Presets
Codex API-key accounts expose Endpoint Type presets so CoderFlow can build the Codex CLI provider config correctly. Codex CLI only speaks the OpenAI Responses API — chat-completions support was removed upstream in early 2026 (discussion #7782). All presets therefore wire to responses:
- Default provider endpoint: Use the Codex CLI's built-in provider behavior.
- Responses-compatible hosted: For hosted endpoints that speak the OpenAI Responses API. In practice this means a LiteLLM proxy in front of OpenRouter / Together / Groq / Fireworks, or any other Responses-speaking gateway. Direct OpenRouter/Together/etc. URLs no longer work because they only speak Chat Completions.
- Local Responses-compatible: For local servers that speak the Responses API. LM Studio is the most common option (native Responses support, default port 1234). vLLM and Ollama do not yet support Responses; front them with a LiteLLM proxy.
- Azure OpenAI: For Azure OpenAI resources. CoderFlow rewrites the runtime base URL to the Codex CLI
/v1/responsesshape automatically. API version is optional metadata; the v1 API surface does not require it. - Custom endpoint: Generic advanced override. The URL must speak the OpenAI Responses API.
If a hosted OSS provider (OpenRouter, Together, Groq, DeepInfra…) is what you want to use, see Walkthrough A below.
Before You Go Down the OSS Path
CoderFlow's first-class path is the Claude / Codex / Gemini subscriptions — they deliver the best results for the kind of multi-file, agentic coding work CoderFlow exists to support. Pursue open-source models only when you have a specific reason: a compliance requirement against the major providers, an air-gapped environment, or a per-task cost target the hosted subscriptions don't meet. For everyone else, OSS will be a downgrade in tool-call quality, multi-step planning, and refactor success rates.
If you've decided OSS is the right call, the walkthroughs below cover the two realistic paths.
Walkthrough A: Hosted OSS via OpenRouter (LiteLLM in front)
Use this path to drive frontier-class OSS models (Qwen3-Coder, DeepSeek V3.1, Kimi K2, GLM 4.5) without owning GPU hardware. This is the production-realistic option for OSS use. Since Codex requires the Responses API but OpenRouter only speaks Chat Completions, you run a small LiteLLM proxy that translates between them. LiteLLM lives outside CoderFlow — typically as a single Docker container on the same host as the server.
This walkthrough configures the server-wide Codex account and model. Per-user overrides live under Profile Settings → AI Providers (same forms, scoped to the signed-in user); per-environment model overrides live under Environments.
- Get an OpenRouter API key. Sign up at openrouter.ai, add credit, and create a key (format:
sk-or-…). Frontier OSS models run cents-per-task; budget accordingly for sustained use. - Write a LiteLLM config at
litellm-config.yaml:Themodel_list:- model_name: qwen3-coderlitellm_params:model: openrouter/qwen/qwen3-coderapi_key: os.environ/OPENROUTER_API_KEY- model_name: deepseek-v3.1litellm_params:model: openrouter/deepseek/deepseek-v3.1api_key: os.environ/OPENROUTER_API_KEYmodel_namekeys are what you'll type in CoderFlow's Codex Model field; thelitellm_params.modelvalues are OpenRouter's identifiers. - Run LiteLLM as a container:
docker run -d --name litellm -p 4000:4000 \-e OPENROUTER_API_KEY=sk-or-... \-v $PWD/litellm-config.yaml:/app/config.yaml \ghcr.io/berriai/litellm:main-latest \--config /app/config.yaml --port 4000
- Add a Codex API-key account in CoderFlow. Open Server Settings → AI Providers, click Add Account next to Codex, and choose the API Key tab. Label it
OpenRouter (LiteLLM), then configure the endpoint fields:- Endpoint Type:
Local Responses-compatible - Base URL:
http://host.docker.internal:4000/v1 - API Key: any non-empty string unless you configured a master key in LiteLLM
- Endpoint Type:
- Save and Test. Connection-successful means the CoderFlow server can reach LiteLLM and complete the provider probe. Task containers must also be able to reach the configured URL.
- Select it for tasks: under Tasks use, choose One account and select the account. Then in Server Settings → Models enter one of your LiteLLM
model_namealiases (e.g.qwen3-coder) in the Codex Model field. Save. - Launch a task with the Codex agent. Start with a small, low-stakes task to validate tool calls round-trip cleanly through the LiteLLM bridge before relying on it.
Caveats:
- LiteLLM is separate infrastructure your team has to run somewhere. The one-container setup above is fine for a single developer or small team; multi-user deployments may want auth and observability layered on.
- LiteLLM's Responses→Chat-Completions translation is not explicitly documented for OpenRouter as an upstream. The pieces fit on paper (LiteLLM exposes
/v1/responsesand auto-bridges to chat-completions providers, OpenRouter is OpenAI-style), but tool-call fidelity through the bridge isn't guaranteed. Verify with a trivial task first. - Some OSS models do not produce well-formed tool calls regardless of the proxy. Qwen3-Coder, DeepSeek V3.1, and Kimi K2 are the most reliable choices for agentic coding in early 2026.
Walkthrough B: Local OSS via LM Studio (Smoke Tests / Air-Gapped)
This path is useful for smoke-testing the Responses-API wiring, running offline or air-gapped, or handling trivial single-file tasks on local hardware. It is not production-grade for serious coding work unless you're running a workstation-class machine (M3 Max 128 GB unified, RTX 4090 + 64 GB RAM, etc.) with a 30B+ quantized coding model — and even then, expect a meaningful capability gap vs. the hosted frontier models from Walkthrough A or the Claude / Codex subscriptions.
LM Studio speaks the Responses API natively, so no proxy or translation layer is needed.
- Install LM Studio from lmstudio.ai on the machine that will host the model (typically the same host that runs CoderFlow).
- Download a coding model in LM Studio. Pick the largest variant your hardware can fit comfortably — Qwen3-Coder 32B-quantized is the practical floor for tool-call reliability; 7B-14B models will frequently mangle agentic flows.
- Start the server. In LM Studio, switch to the Developer tab and click Start Server. By default it listens on
http://localhost:1234/v1. Note the model identifier shown in the loaded model card — you'll need it in step 6. - Add a Codex API-key account in CoderFlow. Open Server Settings → AI Providers, click Add Account next to Codex, and choose the API Key tab. Give it a label like
LM Studio, then configure the endpoint fields:- Endpoint Type:
Local Responses-compatible - Base URL:
http://host.docker.internal:1234/v1(usehost.docker.internalso task containers can reach the LM Studio server on the host) - API Key: any non-empty string — LM Studio accepts anything by default
- Endpoint Type:
- Save the account, then Test it. A green "Connection successful" result confirms task containers can reach LM Studio.
- Under Tasks use, choose One account and select the account. Then go to Server Settings → Models and enter the LM Studio model ID in the Codex Model field. Click Save.
- Launch a task with the Codex agent. The first request will take a few seconds while LM Studio warms the model up.
Account Labels
Labels help identify accounts when you have multiple connected. Good label examples:
- Production
- Development
- Team Shared
- Personal
If you don't provide a label, the account email address is used when available. For Claude (which doesn't expose email through OAuth), a timestamp-based label is generated.
Managing Accounts
Setting the Active Account
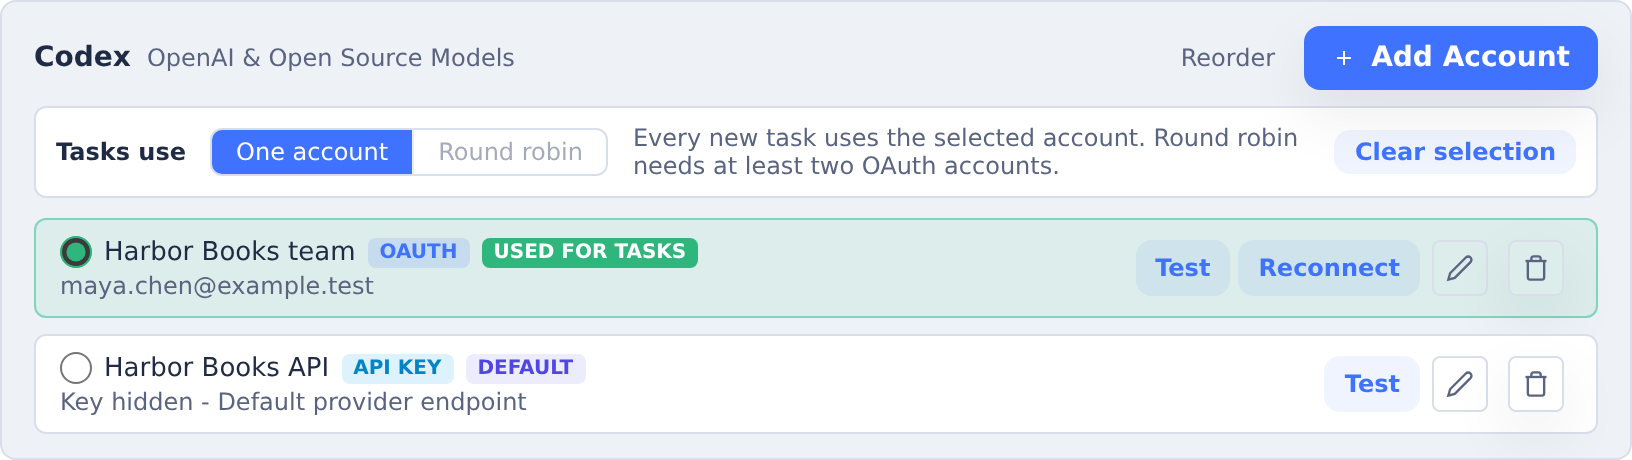
Above each provider's accounts, the Tasks use switch sets how new tasks choose an account:
- One account: every new task uses the active account. Select it with the radio button beside the account's name; the row is highlighted and marked Used for tasks. Click Clear selection to leave the provider with no active account.
- Round robin: new tasks rotate across the checked OAuth accounts. See Round-Robin OAuth Accounts.
Changes apply immediately to new task launches. Running tasks continue using the account they started with.
Round-Robin OAuth Accounts
Round robin spreads new tasks across several subscription accounts, so one account's usage limits don't hold up the whole team. It needs at least two OAuth accounts; API-key accounts cannot rotate.
- Under Tasks use, choose Round robin. CoderFlow checks every OAuth account that doesn't need reconnecting.
- Uncheck any account you want to leave out of the rotation. One account always stays checked; to stop rotating, choose One account.
Each new task goes to the checked account with the most plan usage left:
- Accounts showing Limit reached are skipped until that limit resets. If every checked account has reached its limit, the one that resets soonest is used.
- Usage left is measured by the account's tightest limit. An account at 10% of its session but 95% of its week has 5% left.
- Accounts within 10 percentage points of each other count as equal. Among them, the account with the fewest tasks running takes the task, and the rest take turns in the order the accounts are listed.
- An account with no plan usage reported yet counts as having all of its usage left.
So when no plan usage has been reported and tasks don't overlap, tasks take turns through the checked accounts in the order they are listed. The turns start again from the first account whenever the checked accounts change or you reorder the accounts. Choosing One account ends the rotation and keeps the account that was active before, or the first account in the rotation.
An API key and a rotation are never active together: selecting an API key switches the provider to One account, and choosing Round robin stops using the key. Tasks already bound to an account, such as follow-ups to an existing task, keep using that account.
Plan Usage
Claude and Codex OAuth accounts show Plan usage under the token status. It lists each of the subscription's usage limits, such as Claude's 5-hour Session and Weekly limits, with how much is used and when it resets. A Near limit or Limit reached badge appears while the provider reports one, and Using extra usage appears when Claude bills usage beyond the plan's limits. Round robin uses the same figures to choose an account for each new task.
The figures come from your tasks, not from the provider directly. Claude Code and Codex report the subscription's limits while a task runs, and CoderFlow keeps the newest report for each account:
- Reported … ago says when the figures were last reported. Hover over it for the exact time.
- Use of the same subscription outside CoderFlow, such as claude.ai or your own Claude Code, shows up only after the next task on that account reports.
- A limit that has reset since the last report shows when it reset instead of a percentage. Once every limit has reset, the account shows no plan usage until a task reports again.
- An account shows nothing until one of its tasks reports. API-key accounts and other providers don't report plan usage.
- Reconnecting an account clears its plan usage, because the new sign-in may be a different subscription.
A task's own page shows the same figures for that task in its Plan limit tile.
Reordering Accounts
Accounts are listed in the order you added them, newest last. When a provider has two or more accounts, you can change the order in Server Settings → AI Providers (server-wide accounts) or Profile Settings → AI Providers (your personal accounts):
- Click Reorder beside Add Account. Each account's buttons are replaced by Move up and Move down arrows.
- Use the arrows to move accounts. Each move is saved straight away.
- Click Done.
The order decides more than how the accounts are listed:
- Removing the active account: the first OAuth account in the list becomes active. See Removing Accounts.
- Server features: when tasks don't use an API key, Utility AI and the other API-backed features use the first API key in the server-wide list. Personal accounts don't affect this.
- Round robin: accounts that are otherwise equal take turns in this order, starting again from the top after a reorder.
- Switching a task's account: the task page lists accounts in this order.
The order doesn't change which account new tasks use. That is still set under Tasks use.
Renaming Accounts
- Click the Edit (pencil) icon next to the account
- Enter a new label
- Click Save
Removing Accounts
- Click the Delete (trash) icon next to the account
- Confirm the removal
If you remove the active account, CoderFlow makes the first remaining OAuth account in the list active (see Reordering Accounts). It never activates an API key on its own, so if only API-key accounts remain, tasks using that provider fail until you select one or connect a new account. Removing the last account in a rotation switches the provider to One account.
Token Refresh
OAuth tokens expire periodically. CoderFlow refreshes every connected OAuth account automatically, server-wide and personal accounts alike, so there is nothing to configure. It refreshes an account's token before the token expires and before handing it to a task, and it pushes refreshed tokens into running tasks so long turns stay signed in.
Each OAuth account in the account list shows its token status:
- Token valid until shows when the current access token expires. CoderFlow refreshes it before then.
- Token last refreshed appears instead for providers whose tokens carry no expiry, such as Codex.
- Automatic token refresh failed means the latest refresh did not succeed, for example because the provider was unreachable. CoderFlow tries again; click Test to retry now. Hover over the message to see the provider's reason.
Failed refreshes are retried up to 3 times. If token refresh fails repeatedly (e.g., if you revoked access from the provider), you may need to reconnect the account.
If the provider rejects an account's refresh token, the account shows Sign-in expired and CoderFlow stops retrying it. Click Reconnect to sign in again. Reconnecting keeps the same account, so tasks already using it keep working.
Claude sign-in lifetime
Refreshing cannot extend a Claude subscription sign-in. It ends after a fixed time, which CoderFlow assumes is 30 days unless Anthropic reports it, and then needs a new browser sign-in. The account shows a warning during its last week.
To avoid this, select 1-year token when adding or reconnecting a Claude account. This is the same token claude setup-token creates. It lasts a year and covers model inference only, which is what tasks use. Hover over the account's 1-Year Token badge to see when it expires.
Provider-Specific Notes
Claude (Anthropic)
- Uses Anthropic's OAuth flow with PKCE for security
- Displays an authorization code that you copy back to CoderFlow
- Email address is not available through OAuth (labels are especially useful)
- Access includes Claude Code inference capabilities
- Sign-ins must be renewed about once a month unless you use a 1-year token
- An effort level (low, medium, high, xhigh, max) can be set per user, per environment, or per task; tasks pass it to the Claude Code CLI via
--effort(env var:CLAUDE_CODE_EFFORT_LEVEL) - The model can be set to Auto (Task Classifier) to let CoderFlow choose per task — see Automatic Model Selection
Codex (OpenAI)
- Uses OpenAI's OAuth flow with PKCE
- Redirects to a URL that you copy back to CoderFlow
- Email is extracted from the OAuth token
- Provides access to ChatGPT subscription models
- A reasoning level can be set per user, per environment, or per task; the valid values depend on the selected model
- The model can be set to Auto (Task Classifier) to let CoderFlow choose per task — see Automatic Model Selection
Gemini (Google)
- Tasks run the Antigravity CLI (
agy), Google's native-Go replacement for the deprecated Gemini CLI (Google ends OAuth Gemini CLI access on June 18, 2026) - Uses agy's own Google OAuth client with PKCE. After you sign in and approve, the Antigravity page displays an authorization code that you copy back to CoderFlow
- Email is fetched from Google's user info endpoint
- CoderFlow keeps the access token fresh and injects it into agy's token store, so agy never refreshes inside the container
- Re-link required: agy's backend only accepts tokens issued by agy's own OAuth client, so Gemini accounts connected before this change must be reconnected (the old Gemini CLI tokens are rejected)
- The Gemini Model and Gemini Effort Level settings are passed to agy as a pinned model slug (for example
gemini-3.8-flash-high). Gemini 4 Carbon offers low/medium/high, Gemini 4 Argon and Gemini 3.6 and 3.8 Flash offer medium/high, and Gemini 3.1 Pro offers high (the slugs Antigravity documents); when no effort level is set, agy's default (medium, or high for 3.1 Pro) is used. Model IDs saved before the Gemini 3.x catalog (such asgemini-2.5-pro) and the deprecated Gemini 3.7 and 3.5 Flash run as Gemini 3.8 Flash. Antigravity serves Gemini 4 Carbon and Gemini 4 Argon only to Google AI Ultra subscribers and eligible Gemini Enterprise accounts; choose a Flash model for other accounts. Google recommends Argon for most coding work and Carbon for the hardest multi-step tasks, where it spends more tokens. The live activity feed is reconstructed from agy's on-disk transcript
Bob (IBM)
- Uses IBM Bob Shell authentication
- Redirects through the Bob backend, which handles the OAuth flow
- The test action validates the account by refreshing the Bob token
- Task containers receive Bob credentials as a
.bobprofile; CoderFlow mounts the selected profile at/mnt/boband copies it to/home/coder/.bob - If no selected provider profile directory exists and the server has a
~/.bobdirectory, CoderFlow can mount that directory as a fallback
Grok (xAI)
- Uses xAI's OIDC device-code flow (auth.x.ai), so no callback URL is required
- CoderFlow displays both a sign-in URL and a short user code; sign in on any device, confirm the code, then click I've signed in
- Email and name are fetched from the OIDC userinfo endpoint
- Tokens are refreshed automatically; the test action validates by attempting a refresh
- Task containers receive Grok credentials as a
.grokprofile; CoderFlow mounts the selected profile at/mnt/grokand copies it to/home/coder/.grok - An effort level can be set per account from the provider settings; tasks pass it to the Grok CLI via
--effort. Valid values depend on the selected model:grok-4.7(the current flagship) andgrok-4.6acceptlow,medium,high,xhigh(defaulthigh);grok-4.5acceptslow,medium,high(defaulthigh);grok-4.3acceptslow(default),medium,high;grok-4.20-multi-agent-0309acceptslow,medium,high,xhigh(controls parallel agent count rather than depth)
Kimi (Moonshot AI)
- Uses the official Kimi Code device-code flow (auth.kimi.com), so no callback URL is required
- CoderFlow displays a sign-in URL and a short user code; sign in on any device, confirm the code, then click I've signed in
- The test action validates the account against Kimi's coding API
- Task containers receive Kimi credentials as a
.kimi-codeprofile; CoderFlow mounts the selected profile at/mnt/kimiand copies it to/home/coder/.kimi-code - Tasks run the official Kimi Code CLI in ACP (Agent Client Protocol) mode; follow-ups resume the same Kimi session when the effective model settings are unchanged
- Select Kimi K3.1 Pro (
k3.1-pro), Kimi K3.1 Pro Highspeed (k3.1-pro-highspeed), or Kimi K3 (k3) on Kimi's managed coding API. Their Platform API IDs arekimi-k3.1-pro,kimi-k3.1-pro-highspeed, andkimi-k3, respectively; CoderFlow maps each pair automatically based on the account's endpoint type - K3.1 Pro models require thinking mode; CoderFlow offers Max reasoning. Highspeed provides faster output with higher quota usage and requires an eligible Kimi Code plan
- Kimi Code accounts can also select Kimi K2.8 Preview (
kimi-for-coding), which Moonshot describes as close to K3 with more efficient thinking. The Moonshot Open Platform has no K2.8 model ID, so custom endpoints should use a supported K3 or K3.1 Pro Platform model - A reasoning effort and a context window (256K standard; 1M on every Kimi Code plan for K2.8 Preview and on eligible plans for K3 and K3.1 Pro) can be set in Server Settings → Models, per account, per environment, or per task
CoderFlow maintains compatibility with Claude Code, Codex CLI, the Antigravity CLI (agy), Bob Shell, Grok Build, and Kimi Code by synchronizing the active account's credentials to the standard CLI credential files where applicable:
- Claude:
~/.claude/.credentials.json - Codex:
~/.codex/auth.json - Gemini (Antigravity CLI):
~/.gemini/antigravity-cli/antigravity-oauth-token - Bob:
~/.bob/credentials.json - Grok:
~/.grok/auth.json - Kimi:
~/.kimi-code/credentials/kimi-code.json
When you change the active account in CoderFlow, the CLI credential files are updated automatically. This allows you to use the CLI tools with the same account that CoderFlow is using. With Round robin, the files keep the OAuth account that was active under One account, if there was one.
Automatic Model Selection
Instead of picking a model yourself, you can select Auto (Task Classifier) in the Claude or Codex model picker. CoderFlow then sends the task's instructions to the server-wide Utility AI model (Claude Haiku by default), which rates the work as low, medium, or high complexity, and launches the task on the model configured for that tier. Out of the box the tiers map to:
| Complexity | Claude | Codex |
|---|---|---|
| Low — typo fixes, small config tweaks, single-file edits, simple lookups | Haiku 5.5 | GPT-6 Luna |
| Medium — a well-defined feature or bug fix, routine refactors, tests for existing code | Sonnet 5.5 | GPT-6 Sol |
| High — multi-file features, architectural or security-sensitive changes, debugging with an unclear cause | Opus 5.5 | GPT-6 Astra |
Auto is available anywhere a Claude or Codex model can be chosen: Server Settings → Models, a per-environment default, or a per-task override on the launch form (Task options → Model Configuration). It is not offered for Gemini, Bob, Grok, or Kimi.
Classification happens once, when the task launches, and the task then records the concrete model it chose — the follow-up and resubmit forms show that model as the current selection rather than "Auto". Your effort or reasoning level selection is passed through unchanged.
Follow-ups. If you select Auto when sending feedback to a task, CoderFlow classifies that follow-up's own instructions and switches the task to the resulting model. A small follow-up on a task that started on Opus can therefore run on Haiku, and vice versa.
Requirements. Classification uses the server-wide Utility AI provider, model, and API-key account described in Automatic Names and Commit Messages. A Claude OAuth account cannot power it, and personal or task-specific accounts do not change its account selection.
If classification cannot run — no usable Utility AI API key, an unreachable endpoint, or an unreadable response — the task launches on the medium tier rather than failing. Check the server log for Task classifier fell back to the mid-tier model, which records the reason.
Choosing the models Auto may use
Administrators can change which model each tier launches in Server Settings → Models: expand Automatic model selection (Auto tiers) at the bottom of Task execution defaults. The section opens by itself when the Claude or Codex server default is Auto. Each of the three tiers has its own picker for Claude and for Codex; leaving a tier on Default keeps the built-in model shown in its label. The tiers save with the card's Save button.
Use this to narrow the range Auto chooses from. For example, to keep Auto from ever routing a coding task to Haiku, set the Claude Low tier to Sonnet 5; to let the hardest tasks use Fable, set the High tier to Fable 5.1. Picking the same model for two tiers is fine — that is how you express "never below Sonnet" or "never above Opus". A tier must name a model from the catalog; the save is rejected otherwise. The exception is Codex on a custom endpoint (LiteLLM, LM Studio, Azure), where any model ID the endpoint serves is accepted, as in the Codex Model field.
An environment can override the server-wide tiers, though there is no control for it in the environment editor yet. Ask CoderFlow can read and explain this override, but changing it is outside Ask’s write scope, with no page pointer. Add an auto_tier_models map to the environment's environment.json in the setup repository, keyed by agent and tier, for example { "claude": { "low": "claude-sonnet-5" } }. A tier that is absent inherits the server-wide choice, which in turn inherits the built-in default. The same catalog validation applies when the environment is saved through the API.
Only Auto is affected by these tiers. A model chosen explicitly for a task, environment, or server default always runs as selected, and the classifier itself keeps using the model configured in Server Settings → Models → Utility AI. To pin a task to a specific model, select that model instead of Auto.
Automatic Names and Commit Messages
CoderFlow uses provider APIs for these server-side features:
- Ask CoderFlow help assistant — answers questions about using CoderFlow; requires a server-wide Claude API-key account and configured documentation.
- Automatic task names — generates names from task instructions and for tasks created from the Outlook add-in (from the email's subject, not its body), updates a generated name during the first few follow-ups when they show what the task is for (the Auto-update generated names preference), and suggests a name from the conversation when you click the sparkle (Suggest a name) button at the end of the name field while renaming a task on the dashboard or the task page.
- Setup repository commit messages — generates commit messages in setup-repository git workflows, including Environments and Skills.
- Objective drafts — drafts objectives for task groups.
- Automatic model routing — classifies task complexity to choose a task model.
- Fork handoffs — prepares context for a forked task.
- Retrospectives — produces lessons from recorded task activity.
The last six features use Server Settings → Models → Utility AI, which selects the server-wide provider and model. On a fresh Essentials installation, the default is Claude Haiku. Utility AI supports Claude, Codex, Gemini, and Kimi. Ask CoderFlow has its own model setting and always uses Claude.
In Server Settings → AI Providers, click Add Account beside the required provider, choose API Key, and save the key. You can keep your OAuth account selected under Tasks use; the API-key account can serve these helpers without becoming the task account. Utility AI uses the server's auxiliary account selection and its endpoint configuration: the API key tasks use, if any, otherwise the first API key in the provider's list (see Reordering Accounts). Personal API keys do not enable these server-wide features. Claude subscription OAuth cannot be used for them.
API usage for these helper features is typically low and billed separately from your subscription. Costs vary by usage and model.
Essentials onboarding
In Essentials setup → Bring your AI provider, an OAuth-only Claude setup shows a non-blocking notice when the server has no API-key account for Claude as the selected Utility AI provider. Add Claude API key opens the existing account dialog in Settings on its API Key tab. Return to the dashboard after saving; the wizard rechecks availability and removes the notice when a server key is available.
You can choose Continue or Skip for now without adding a key and still run tasks with your subscription. Add the key later to enable the API-backed features listed above. If you cannot manage server providers, ask a server administrator to add it.
Troubleshooting
"Provider not configured" Error
This error appears when launching tasks if no account is connected for the required provider, or if all connected accounts are currently unselected. Connect an account or mark one active in Server Settings → AI Providers.
Authentication Expired
If you see authentication errors during task execution:
- Check that the account still appears under AI Providers and whether it shows Sign-in expired
- Click Reconnect on the account and sign in again
- Verify your subscription is still active with the provider
Token Refresh Failures
An account whose latest automatic refresh failed shows Automatic token refresh failed in the account list; hover over it for the provider's reason. The server logs have more detail. Common causes:
- A Claude sign-in reached its time limit (
Refresh token expired) — see Claude sign-in lifetime - Provider subscription expired
- Access revoked from provider's settings
- Network connectivity issues
Click Reconnect on the account to sign in again. Tasks already using it keep working.