Approval & Deployment
Once a task completes successfully, you review the changes and decide whether to approve and deploy them. This is the final step before code goes into your repositories.
Reviewing Changes
Before approving, carefully review what the agent changed.
Changes Review Process
- Open task detail page for completed task
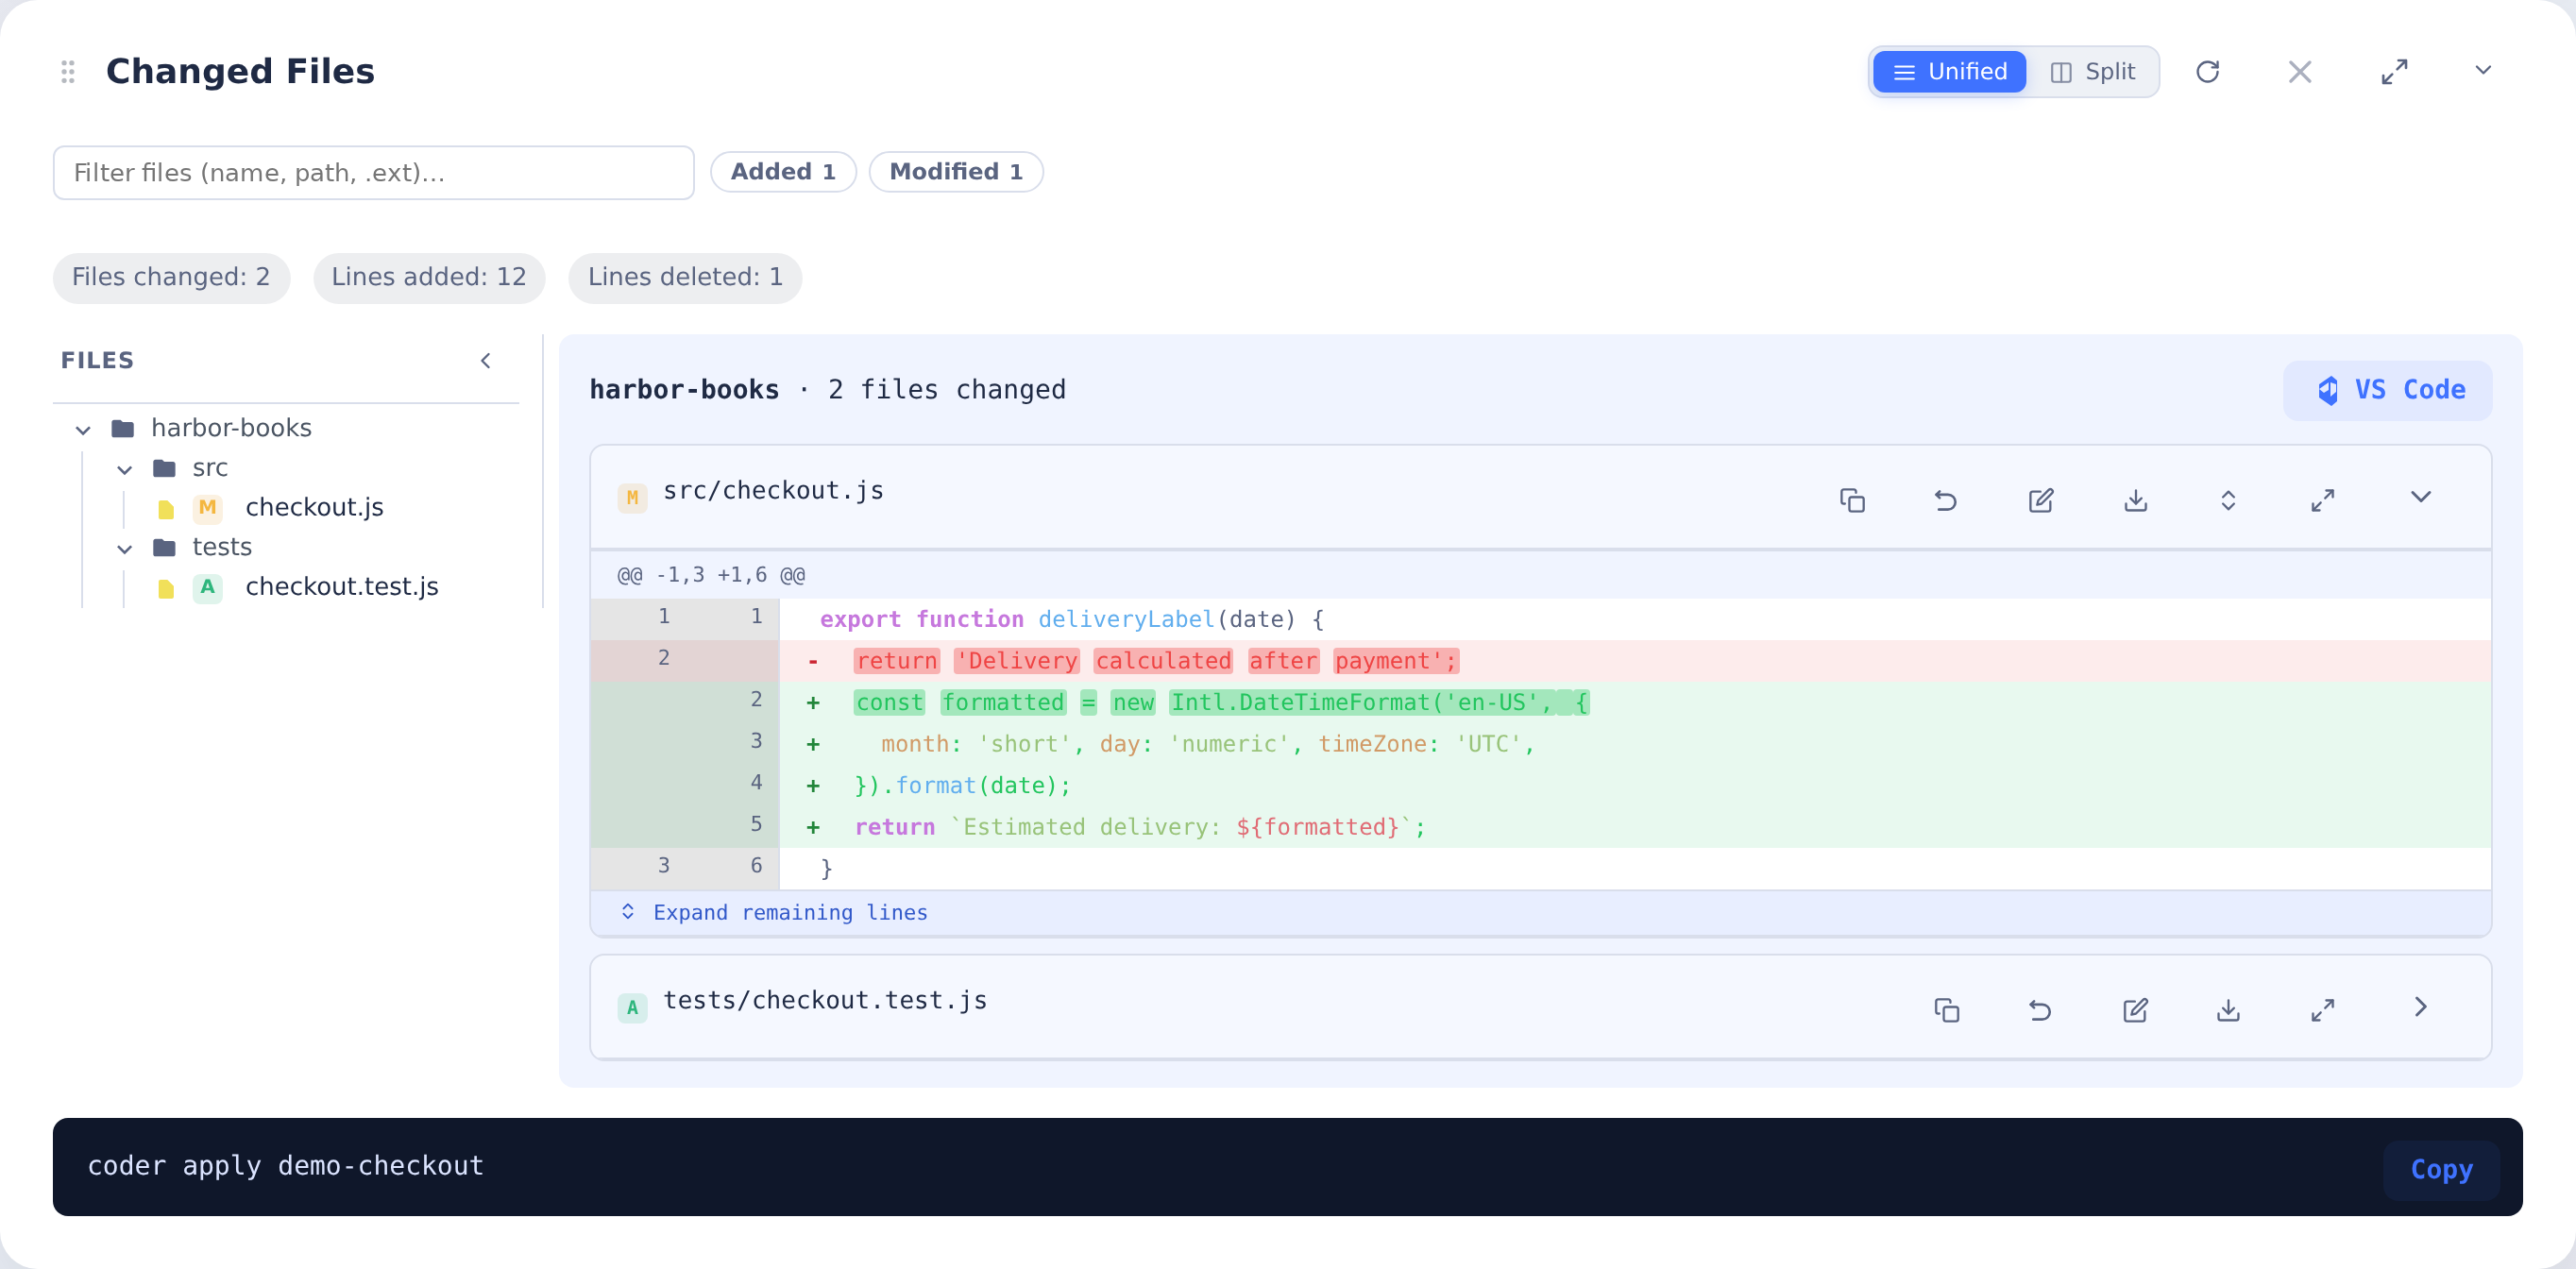
- Open the Changed Files section
- View files changed showing git diffs for each repository
- Review test results (passed/failed counts)
- Read activity feed to understand what was done
Approving Tasks
When you're satisfied with the changes, approve them to commit and optionally push.
Approval Workflow
- Click "Approve" button on task detail
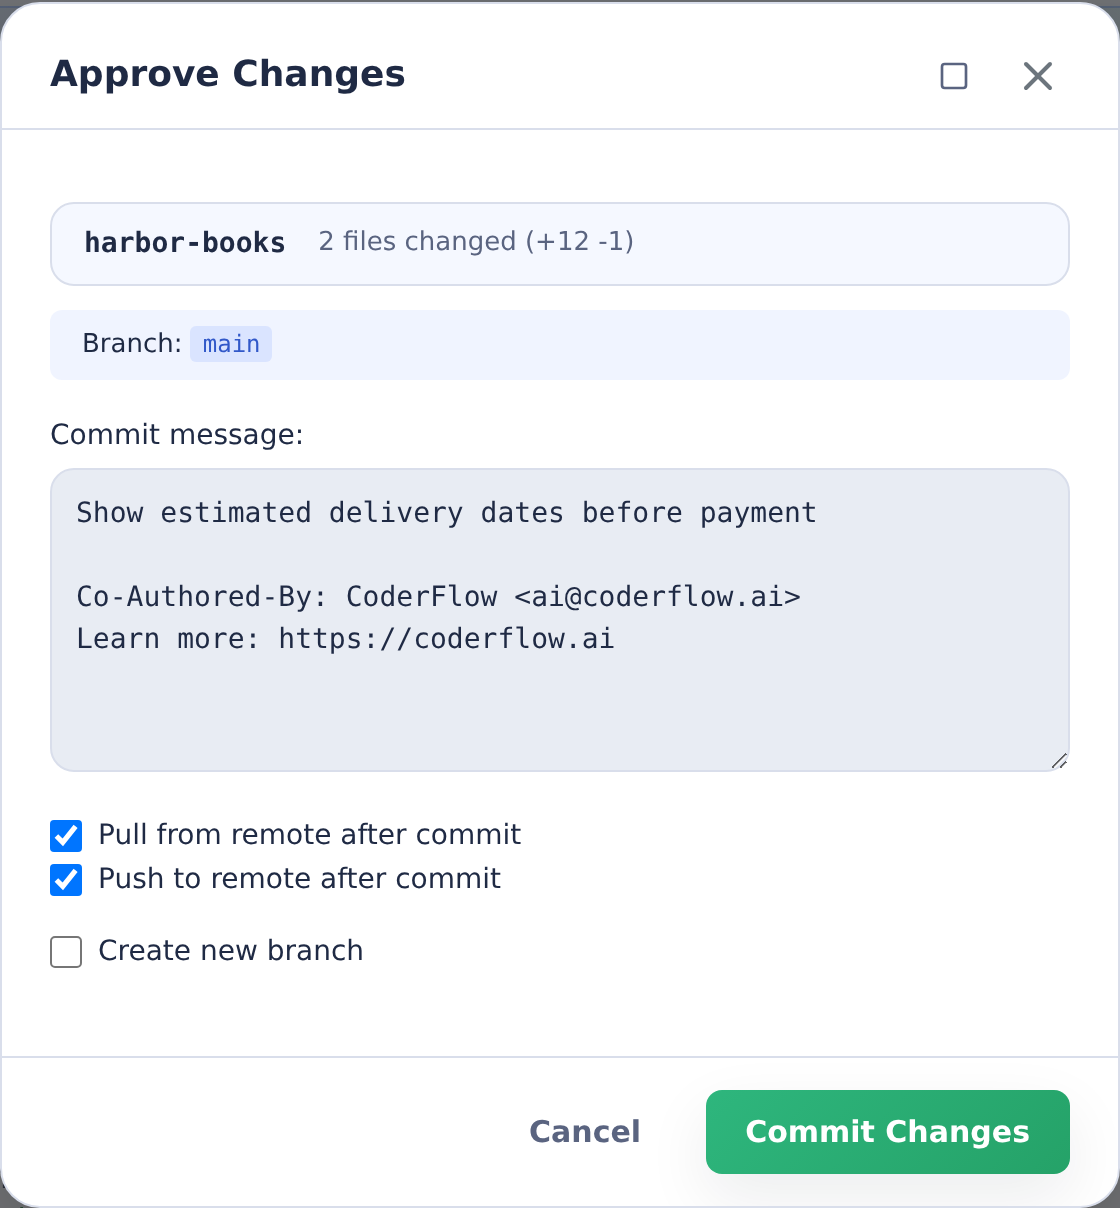
- Adjust generated commit message if desired
- Choose deployment options:
- Pull from remote after commit: Keep local branch up to date. CoderFlow rebases the approval commit onto the remote branch, and merges instead if the rebase conflicts. If the branch has unpushed merge commits, for example because the task left a merge in progress, CoderFlow pulls with a merge, because a rebase would drop the merge commits and anything resolved in them.
- Push to branch: Immediately push to the current/default branch
- Create new branch: Create a new branch for this work
- Commit only: Commit but don't push (manual push later)
- Click Commit Changes when ready
From Ask CoderFlow
Ask CoderFlow can summarize a task's changes for review and say whether the task can be approved now. When it can, Ask offers an Open approve dialog button. Clicking it opens this task's page and the same approve dialog as the Approve button, with the repositories, branches and commit message filled in the same way. The button does not approve anything: you review the dialog and click Commit Changes. If the task changed after Ask's summary, the dialog shows a warning. See Reviewing a task before you approve it.
With Allow Actions on, Ask can also approve (commit, and optionally push) or reject a task itself, after you click Confirm on a card that names the task, the reviewed revision, each repository and branch, whether it pushes, and the exact commit message. Confirming synchronizes the working tree as this dialog does and refuses if anything changed since the review. Ask never pulls before pushing. Some approvals, such as documentation publishing, project landings and finishing a partly completed approval, are intentionally not available in Ask; use this dialog instead, which Ask opens with its Open approve dialog button. See Approving, rejecting and opening pull requests.
Protected Branches
If the branch a push would land on is protected, the dialog checks Create new branch (and Create pull request where supported) and says why. Protection set on the Git provider does not block approval in CoderFlow. If the identity CoderFlow pushes with may bypass it, clear Create new branch to push directly; the provider accepts or rejects the push. After a direct push succeeds, the dialog stops redirecting that repository and branch in your browser.
The identity depends on the repository's credential mode. With App Credentials, the GitHub App pushes, so the app itself must be allowed to bypass the protection. With User Credentials, the push uses a connected personal account, normally that of the user who launched the task. Branches listed in the repository's protected_branches setting are always refused for direct pushes.
Project Branch Cleanup
When you approve a project orchestrator whose project is staged for CoderFlow approval, the dialog offers Delete the project branch after landing. It is off by default. When checked, CoderFlow deletes the project/... branch from each repository once that repository's landing is pushed to its base branch. The delete carries a lease on the commit that was staged, so CoderFlow keeps the branch if it changed after staging. It also keeps it when the landing goes to a new branch instead of the base, for example for a protected base; delete it later, once that branch lands. The option is unavailable when Push to remote after commit is off or Create new branch is on. The approval message reports the outcome, including for repositories that landed when another repository failed; a refused delete never fails the approval. If the push fails and CoderFlow keeps the landing commit, the option is offered again, unchecked, when you retry the push.
To delete the branch after an approval that kept it, click Delete Project Branch on the orchestrator task's page and confirm. The action appears for people who may approve the task once a landing is pushed, and is hidden while a new landing is staged, whose approval offers the checkbox instead. CoderFlow deletes the branch from each repository whose latest landing was pushed, with a lease on the commit that landed, so it keeps a branch that changed after landing. It also keeps the branch in a repository that has since been made read-only. A message reports each repository's outcome. Like approval, the delete runs in the task's container: start the container if it is stopped, and if the container has been removed, delete the branch on your Git provider. If a landing went to a new branch, the confirmation names it; delete the project branch only once that branch has landed.
Delete the branch only when the project is finished. Child tasks still working from it would bring its commits back when approved.
Approval Restrictions
You cannot approve if:
- No changes: Task made no file modifications
- No container: Environment has been deleted
- Task is queued or running: Wait for task to complete
- Permissions: You don't have permission to approve for this environment
After Approval
Once approved:
- Changes are committed with your commit message
- Changes are pushed (if you selected that option)
- Task status shows "Approved"
- Approver info is recorded (name, email, timestamp)
- Previous approval status is cleared if you provide follow-up instructions
If the environment has automatic retrospectives enabled, your approval can also start a read-only reflection on the task. Suggestions appear in its Lessons card for you to keep or skip. This runs after approval and never delays it or makes it fail.
Creating Pull Requests
After approving task changes, you can create pull requests on GitHub or Azure DevOps to merge your work into target branches.
From Approval Dialog
Create pull requests directly when approving:
- Click Approve button
- Check Create pull request (requires pushing the approved changes)
- Reuse the current branch, or check Create new branch and enter a branch name. A new branch is selected automatically when needed, and required when all PR repositories are on their target branch or a protected branch.
- Review the Target branch selector for each repository. Source and target must differ.
- Click Commit Changes. The PR is created after approval using the commit message for its title and description. If additional review or authorization is needed, complete the separate PR dialog.
When creating a new branch, the suggested target remains the branch selected at task launch. When reusing the current branch, CoderFlow chooses a distinct target from the launch branch, configured repository branch, or provider default. Changing Create new branch refreshes the target defaults; review them before committing.
After Approval
If you already approved and pushed an existing or new feature branch, even without selecting the PR option:
- Click Create Pull Request in the task actions
- Review the title, description, and target branch
- Click Create Pull Request
The button appears when an approved repository has a recorded successful push, a supported provider, and a distinct target, and the task has no PRs yet. A direct push to the only configured/default target does not qualify. Older approvals are checked against the current repository targets too.
Opening pull requests from Ask CoderFlow
After an approval that pushed, Ask CoderFlow can open the pull requests as a separate confirmed card: one per pushed repository, from the pushed branch into the target this page would use. It first looks for an open pull request for the same branches and reports it instead of opening a second one, and the card shows one receipt per repository with a link to each pull request. See Approving, rejecting and opening pull requests.
Requirements
- Approved changes successfully pushed to an existing or new branch with a distinct target
- Git provider supports PRs (GitHub, Azure DevOps)
- OAuth connection authorized (prompted if needed)
After Creation
- PR links appear in task detail
- Review and merge through Git provider
IBM i Sync
For environments with an IBM i connection that has the Sync feature enabled, you can sync changed source files directly to an IBM i library. This writes source members to the target library—useful for getting code onto IBM i for integration with traditional source member-based IBM i source control / change management systems.
Sync / Deploy Credentials
How member sync and UI deploy authenticate depends on the Sync / deploy credentials setting on the connection (configured in Environments > Connections):
- Prompt (default for new connections) — You are prompted for a user profile and password each time you sync or deploy. The password is used once to establish the connection and is never stored.
- Connection — Sync and deploy use the SSH user and key already configured on the connection. No additional credentials are needed at runtime.
From Approval Dialog
Sync as part of the approval step:
- Click Approve on a completed task
- Check Sync to IBM i (appears when source-member sync or htdocs deploy is configured)
- Enter a library name (max 10 characters, alphanumeric)
- If the selected actions use Prompt mode, enter your user profile and password
- Select files to sync from the file tree
- Click Commit Changes — approval proceeds, then the sync runs automatically
- A live log streams the sync progress
The library is created if it doesn't exist. Source physical files and members are created from the changed files.
From the Task Page
Sync does not require approval. Run it from the task page whenever the task has changed files — before approving, after approving, or repeatedly across a QA cycle. See Syncing Across a QA Cycle.
- Click the Sync to IBM i / Deploy htdocs button (top-right actions on task detail). The button label adapts based on which types of changed files exist: Sync to IBM i for source members only, Deploy htdocs for Profound UI htdocs files only, or Sync to IBM i & Deploy htdocs when both are present.
- Enter the target library name when syncing source members
- If the task also has changed Profound UI htdocs files, the same dialog includes those files in the selection tree and shows the IBM i IFS target path
- If the selected sync or deploy actions require prompted credentials, enter your user profile and password
- Select files to sync or deploy from the file tree
- Click Sync, Deploy, or Sync & Deploy to start
- A live log streams the progress
If both source sync and htdocs deploy files are selected, source sync runs first and htdocs deploy runs second. The button appears when the task container is running, the environment has an IBM i connection with Sync, Profound UI htdocs, or Agentic Display Files enabled, and there are eligible changed files to operate on.
Note that syncing an unapproved task writes source to IBM i that is not yet committed to Git. Approve the task when the change is ready so the work is committed and pushed.
File Selection
The sync dialog shows a file tree of all changed files. Files with recognized IBM i extensions are pre-selected. Files that can't be IBM i source members (name too long, non-source file types like .gitignore, *.md, etc.) are disabled.
Sync Details
After a sync completes, the task metadata shows the synced library name, timestamp, and a link to view the full sync log.
File mapping follows IBM i conventions:
- Member name — filename without extension (max 10 characters)
- Source type — last file extension (e.g.,
RPGLE,SQL) - Source physical file — parent directory name (e.g.,
QRPGLESRC)
Deployment Workflow
Full Task Lifecycle
- Create task with instructions
- Agent runs autonomously
- Review changes (patches, logs, tests)
- Provide feedback if needed (follow-up instructions)
- Agent resumes and refines work
- Repeat until satisfied (steps 3-5)
- Approve changes when complete
- Changes deployed to your deployment target
Multi-Variant Deployment
When comparing multiple agents (task groups):
- All variants complete
- Judge tasks evaluate (if auto-judge enabled)
- You select winner (manually or via judge recommendation)
- Approve winner variant
- Changes from winner are deployed
- Other variants remain available for reference
- Loser variants can be deleted or archived
Approval Audit Trail
CoderFlow tracks:
- Approver: Who approved the changes
- Approval time: When approval was given
- Commit message: What was written
- Branch deployed to: Where changes went
- Remote push: Whether changes were pushed
This creates an audit trail for compliance and history.