QA Mode
QA Mode lets you capture observations from a running application and turn them into objectives. Instead of writing requirements from scratch, you interact with your application while a proxy captures screenshots, DOM elements, and screen data—giving AI agents the exact context they need to understand what you want.
How It Works
QA Mode creates a transparent proxy between you and your application. As you navigate and interact:
- Screenshots are captured and can be annotated
- DOM elements can be selected for inspection
- 5250 terminal buffers are recorded (for terminal applications)
- Rich Display data is captured (for RDF applications)
All captured context is bundled into objectives that agents can interpret and act on.
Accessing Applications via Proxy
When QA Mode is enabled for an environment, you access your application through a special proxy URL provided in the CoderFlow interface. The proxy:
- Injects a feedback widget into your application's pages
- Rewrites URLs so assets load correctly through the proxy
- Handles redirects transparently
- Preserves normal application functionality while adding observation capabilities
Your environment's QA URLs are displayed in the environment settings or when starting QA Mode.
Opening QA Mode from Ask CoderFlow
You can also ask Ask CoderFlow which QA destinations an environment has, and to open one. It lists the same destinations as the Quick Actions menu, without their URLs or credentials, and gives you a link under its answer. The destination opens in a new tab only when you click the link, after CoderFlow checks your QA access and the destination again. Capturing context is intentionally not available in Ask; use the feedback widget described below instead, including to create objectives from what you capture.
Configured destinations and authentication
QA Mode accepts only HTTP(S) origins derived from the environment's configured QA URLs. The Quick Actions menu and the development shortcut use these same URLs. Manually constructing a proxy link to another origin returns 403, even for a user with QA access. Disabling QA also disables proxy access.
The allowed origins come from application launch URLs, the default qa.base_url or application_server.qa_url, port-specific application_server.port_qa_urls used by launch URLs, and qa.additional_urls. Effective application configuration from external connections is included. Paths on an allowed origin remain accessible; this is an origin allow-list, not a path allow-list. Explicitly configured internal application origins remain supported. Configure only destinations you trust.
Templates such as {{origin}}, {{host}}, {{hostname}}, and {{protocol}} resolve against the administrator-configured Site URL (site_url, or SITE_URL when no site_url is set). Browser Origin, Referer, Host and X-Client-Origin headers do not authorize destinations. If Site URL is unset, template URLs are omitted and the server logs a warning; configure Site URL or use literal QA URLs. Installations previously relying on browser-specific template resolution must update their configuration.
Stored application Basic authentication is sent only to the origin of application_server.proxy, or, when no proxy target is set, qa.base_url / application_server.qa_url. Additional URLs, explicit launch URLs and port overrides do not independently receive those credentials. If your QA URL uses a different origin from the application's proxy, it will no longer inherit the proxy's credentials. Scheme-less proxy targets such as app.example:8080 are treated as http://app.example:8080 for this exact-origin credential binding. The user's incoming Authorization header is not forwarded, including on requests using Expect: 100-continue. These rules apply to both HTTP and WebSocket connections.
CoderFlow cookies named coder.*.sid or coder.task.* are stripped from outgoing HTTP and WebSocket requests, except when the target is the Site URL origin itself (self-QA). Upstream Set-Cookie headers using those reserved names are dropped, including on WebSocket handshakes and self-QA responses. Other application cookies are preserved. QA WebSocket upgrades require an Origin exactly matching the configured Site URL origin; missing, cross-site and opaque (null) origins are rejected. Site URL must be configured for QA WebSockets, even when application URLs are literal.
Trust boundary
QA application pages execute JavaScript on the CoderFlow origin so the feedback widget can access CoderFlow. They are not sandboxed. Only use QA for trusted applications: malicious code in a configured application can make CoderFlow requests with the viewing user's session, including an administrator's session. HttpOnly cookies do not prevent those requests. Cookie filtering prevents direct session-cookie disclosure and reserved-cookie overwrite by upstreams, and the WebSocket Origin check blocks cross-site handshakes; neither isolates scripts already executing in a QA page on the CoderFlow origin. An origin allow-list prevents links to unconfigured attacker sites, but does not isolate a configured application from CoderFlow. Isolation on a separate origin with a narrowly scoped messaging interface is required before QA can safely host untrusted applications.
Capturing Context
The feedback widget appears as a floating panel on your application. It captures multiple types of context depending on your application type:
Screenshots
Click Capture Screenshot to snapshot the current page. Screenshots appear in the widget and can be edited with the built-in annotation tools—add highlights, arrows, or text to clarify what you're pointing out.
DOM Elements
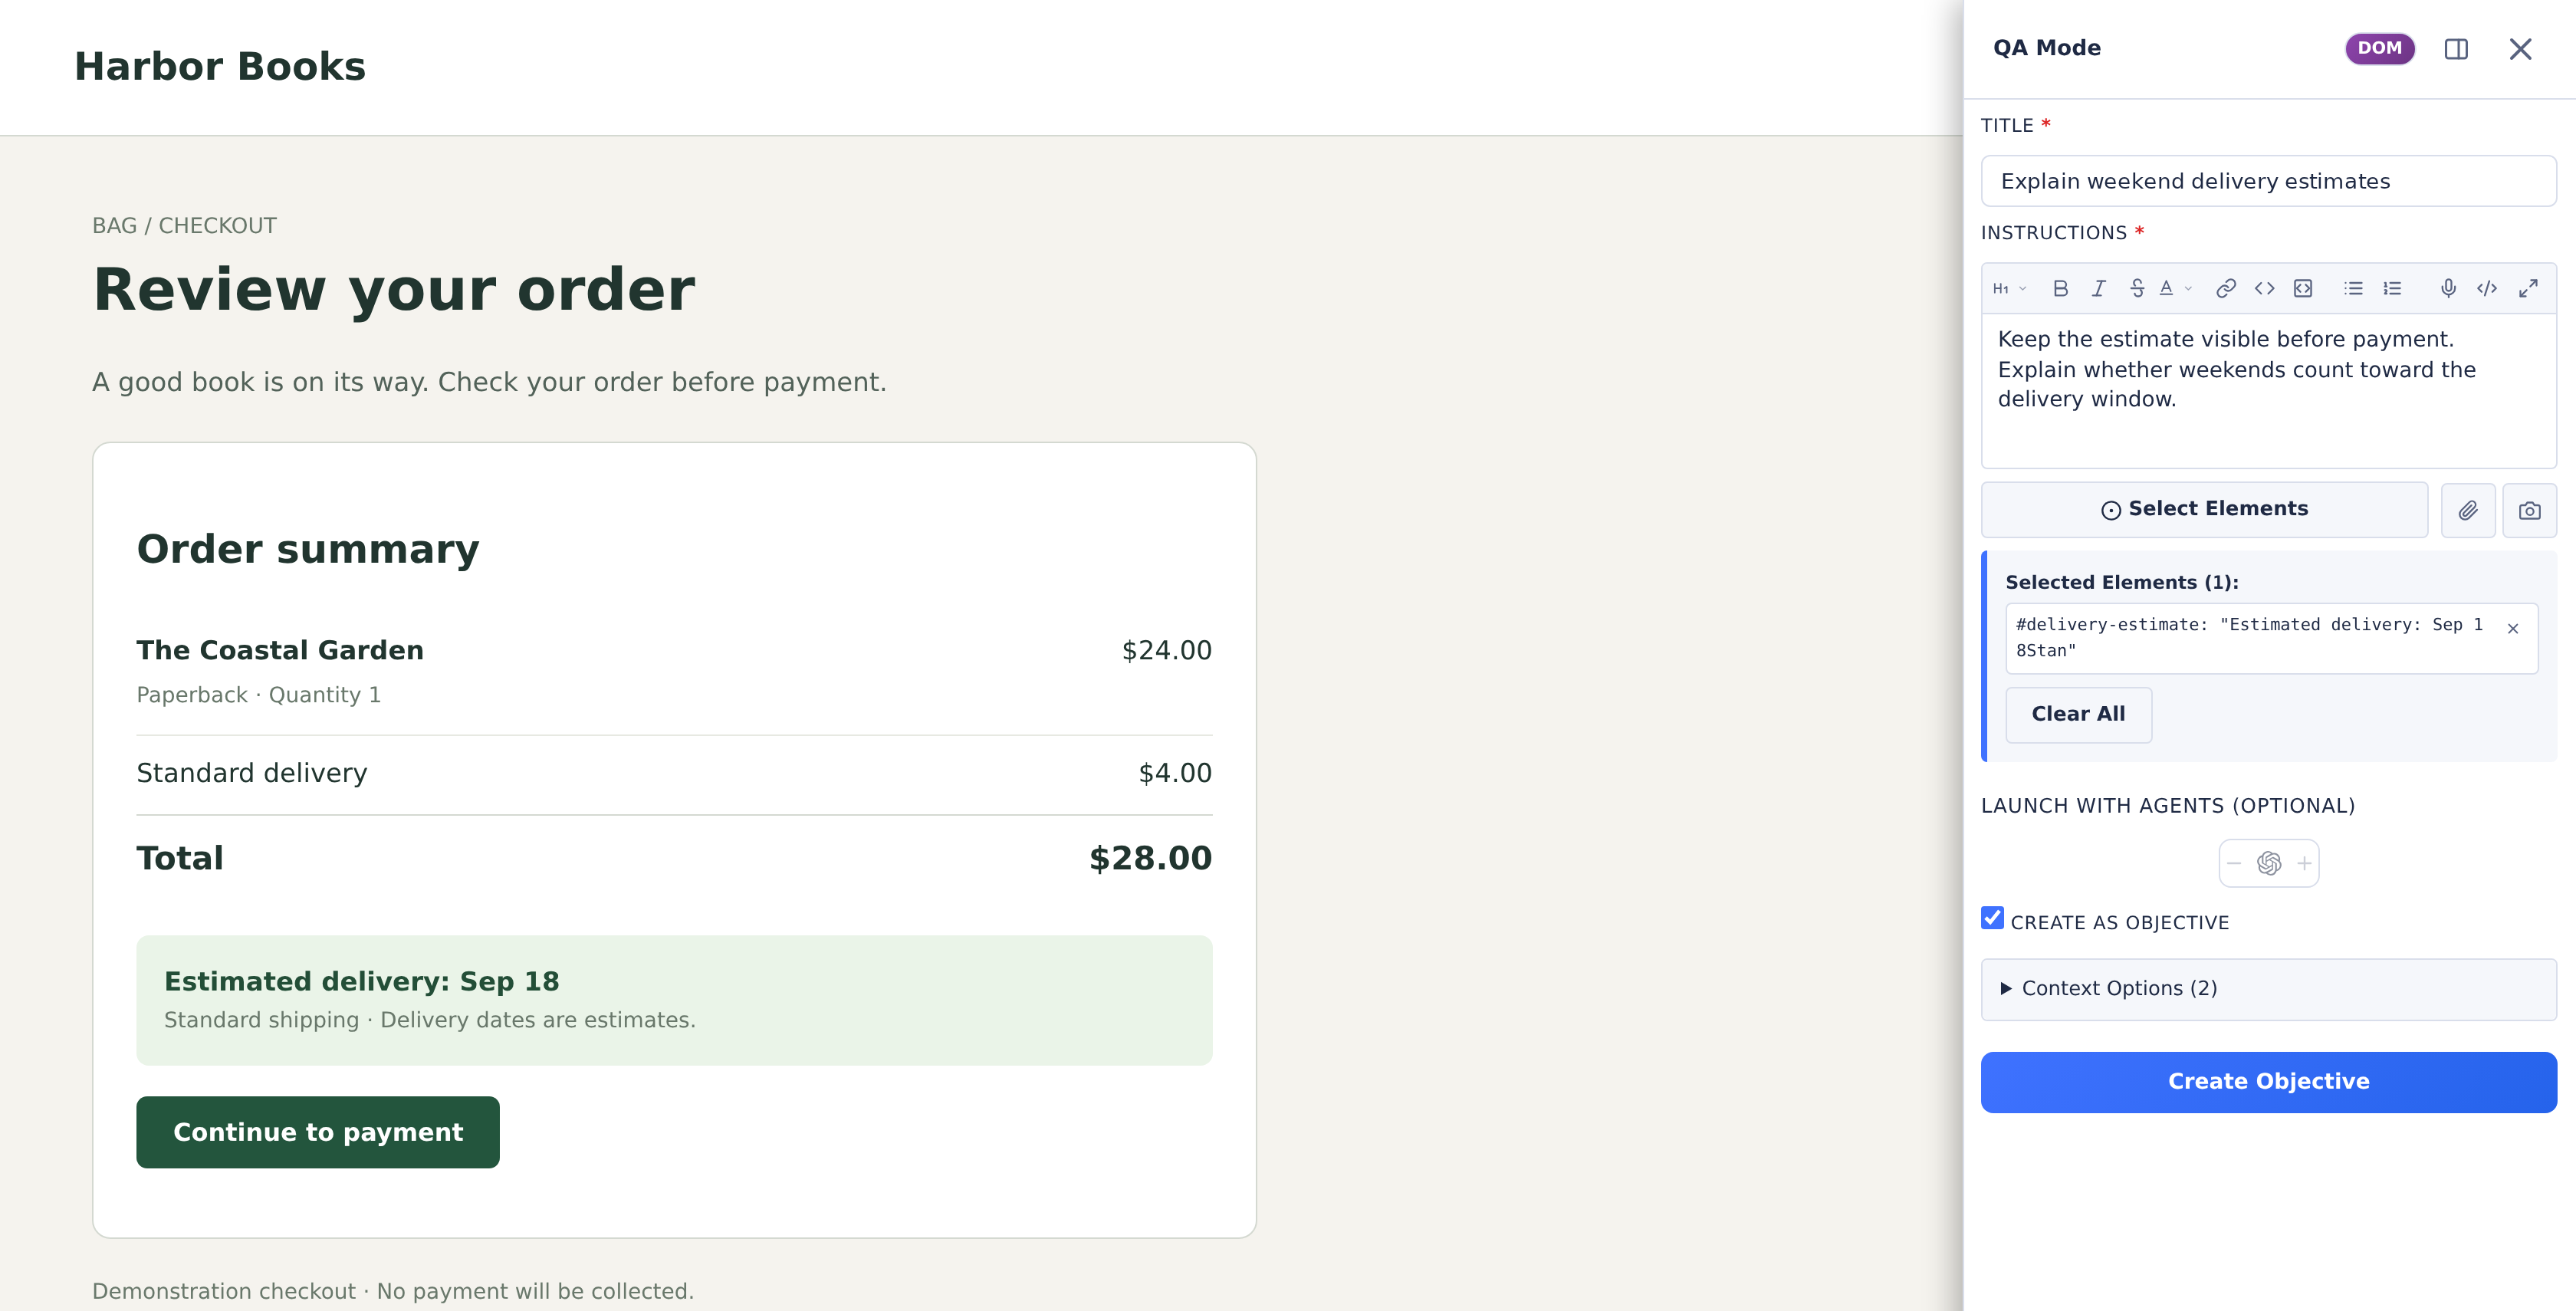
Use Select Elements to highlight and capture specific parts of the page:
- Click elements to select them (they highlight with an overlay)
- Right-click to deselect
- Click Done when you have selected the elements you need
- Captured DOM includes element hierarchy and attributes, helping agents understand page structure
5250 Terminal Buffers
For terminal-based applications, QA Mode automatically captures:
- Current screen buffer contents
- Screen state and field positions
- Optional full screen payload for detailed context
Rich Display Data
For Rich Display (RDF) applications, the widget captures:
- Structured widget data and hierarchy
- Field values and display properties
- Rendering context that helps agents understand the UI
Creating Objectives
Once you've captured context, create an objective directly from the widget:
- Enter a title describing the work
- Write instructions explaining what you want the agent to do
- Review the captured context shown in the widget
- Leave Create as objective checked and click Create Objective
The objective is created with your instructions plus all captured context—screenshots, selected elements, and application data. Agents see exactly what you saw when you created the objective.
Launching Tasks from QA Mode
When creating an objective, you can optionally launch tasks immediately:
- Leave Create as objective checked
- Under Launch with agents (optional), increase the count for each agent you want to use
- Click Create Objective + 1 Task (or the corresponding task count)
This creates the objective and immediately launches one or more tasks from it. Each task receives a copy of the instructions and captured context.
If you prefer to review the objective first, skip the launch option. You can always launch tasks later from the objectives view.
Best Practices
Capture before explaining: Take screenshots and select elements first, then write your instructions. This ensures you have visual context to reference.
Annotate meaningfully: Use the screenshot editor to highlight the specific area you're discussing. A circle around a button is clearer than describing its location in text.
Be specific about the problem: Captured context shows what the application looks like—your instructions should explain what's wrong and what you want instead.
Combine context types: For complex issues, capture a screenshot AND select relevant DOM elements. More context helps agents understand the full picture.