Creating Tasks
A task is a unit of work executed by an AI agent. When you create a task, CoderFlow launches an isolated container, runs the agent with your instructions, and captures the results for your review.
Tasks vs. Objectives
You can create tasks in two ways:
-
Direct tasks: Create and launch immediately when you know exactly what needs to be done. Best for simple, well-defined work.
-
Tasks from objectives: Launch a task from an existing objective. Best when requirements need refinement, work is complex, or you expect multiple iterations. The objective serves as the parent record, tracking all tasks launched from it.
For straightforward fixes or small changes, direct tasks are efficient. For larger initiatives where you'll iterate on requirements, start with an objective and launch tasks from it.
Auto-pin New Tasks
Auto-pin new tasks is on by default. To start new tasks unpinned:
- On the dashboard, find the task prompt.
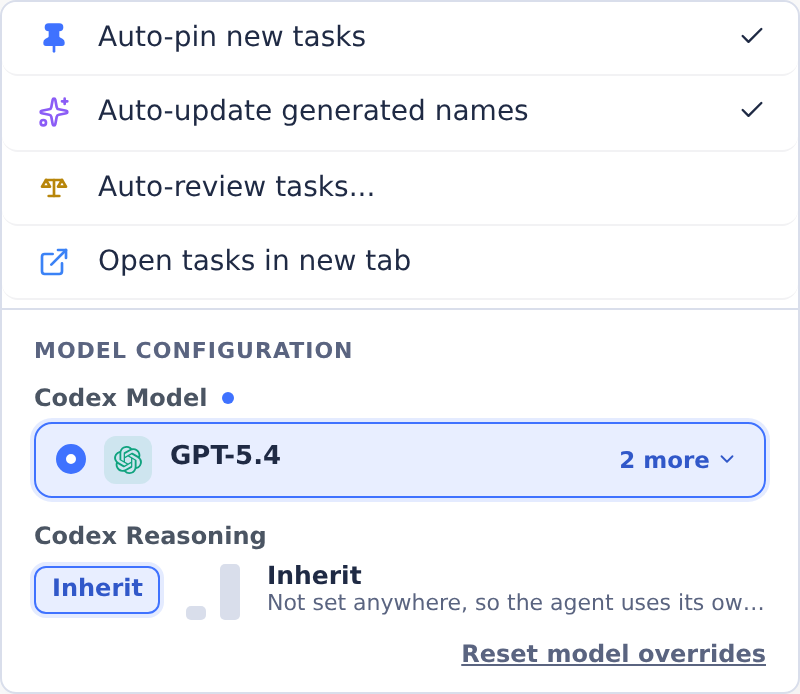
- Click Task options, the sliders/settings icon at the bottom-left of the prompt area.
- Click Auto-pin new tasks to turn it off. The checkmark disappears when it is off; click again to turn it on.
The change saves immediately as your user preference and applies to future tasks you create from the dashboard prompt. Existing pins stay unchanged. You can still pin or unpin tasks manually, and find unpinned tasks in the task board's All view.
Automations have their own task pinning settings, separate from Auto-pin new tasks.
Writing Instructions
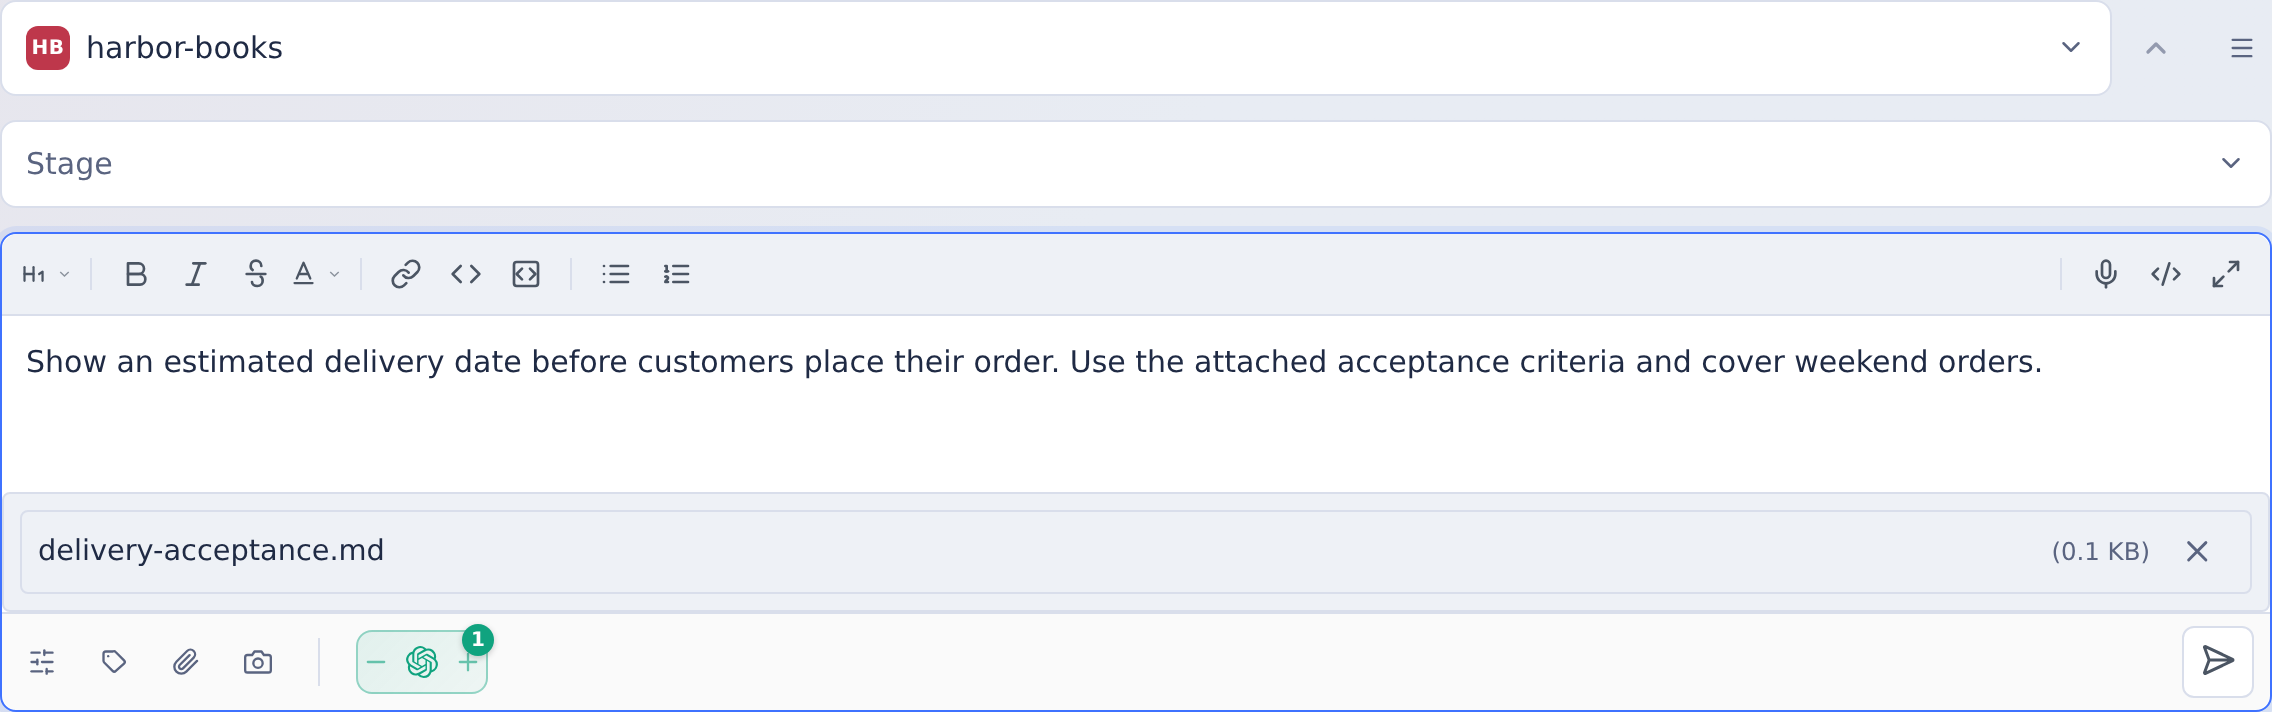
Instructions tell the agent what you want to accomplish. Clear, specific instructions lead to better results.
Best Practices
- Be specific: Instead of "fix the bug," describe the symptom, expected behavior, and relevant files
- Include context: Reference related code, error messages, or test failures
- Break down complex work: Large tasks should be decomposed into logical steps
- Specify constraints: Note performance requirements, style guides, or compatibility needs
- Define success criteria: What does "done" look like? What tests should pass?
Example
Instead of:
"Fix the login issue"
Try:
"Users clicking the login button on /auth/login see a spinning loader that never resolves. The expected behavior is a redirect to /dashboard after successful authentication. Check the authentication service for timeout issues—recent logs show 504 errors from the identity provider."
Attachments
Attach files and screenshots to provide additional context.
Supported Types
- Images: Screenshots, mockups, diagrams (PNG, JPG, GIF, WebP)
- Code files: Source code, configuration, logs
- Documents: Text files, markdown, documentation
Attachments are placed in the container where the agent can access them. Reference attachments in your instructions so the agent knows to use them.
Adding Attachments
- Click Attachments in the task form
- Select files or paste images from your clipboard
- Add up to 10 files, 50MB total
Alternatively, drag and drop files directly into the instructions field.
You can also paste screenshots directly into the instructions box using Ctrl+V (Cmd+V on Mac).
Importing from Jira
If your administrator has configured Jira integration, you can create tasks and objectives directly from Jira issues.
In the Web UI, click Import from Jira to search for an issue by key or text. The issue's summary, description, type, status, priority, assignee, and labels are pulled in as context for the agent. You can add additional instructions on top of the imported issue.
From the CLI, use the --jira flag:
coder run <task-type> --jira=PROJ-123
After a task completes, you can post the summary back to the Jira issue as a comment using the Post to Jira button on the task page.
Selecting Agents
Choose which AI agent will work on the task.
Available Agents
- Claude: Strong at complex reasoning and multi-step engineering tasks. Good default for most work.
- Codex: Fast at translating specifications into code. Use for straightforward coding tasks.
- Gemini: Large context window for tasks requiring deep file understanding.
- Bob: IBM's coding agent, tuned for IBM i and enterprise workloads.
- Grok: xAI's Grok Build coding agent, with adjustable effort levels.
- Kimi: Moonshot AI's Kimi K3.1 Pro, K3.1 Pro Highspeed, K3, and K2.8 Preview models running through the official Kimi Code CLI. Managed IDs
k3.1-pro,k3.1-pro-highspeed, andk3map automatically to Platform API IDskimi-k3.1-pro,kimi-k3.1-pro-highspeed, andkimi-k3for custom endpoints. K2.8 Preview useskimi-for-codingon Kimi Code only. Choose 256K or 1M context; 1M is available on every Kimi Code plan for K2.8 Preview and on eligible plans for K3 and K3.1 Pro.
Choosing a Model
Each agent runs on the model configured for it — the environment's default, or the server-wide default when the environment sets none. When nothing is configured anywhere, Claude runs on Opus 5.5 and Codex on GPT-6 Astra, CoderFlow's built-in defaults. When no effort or reasoning level is set, Claude runs each model at Claude Code's recommended level (medium for Opus 5.5, high for Fable 5.1), and Codex runs at medium. When nothing is set, Gemini, Grok, and Bob choose their own model and level, and so does any agent on an account with a custom endpoint.
To choose the model before you launch:
- On the dashboard, click Task options, the sliders icon at the bottom-left of the prompt area.
- Under Model Configuration, choose a model for each selected agent: Claude Model, Codex Model, and so on. Claude Effort and Codex Reasoning set the effort or reasoning level. A row appears only for an agent you have selected that offers more than one choice.
- Launch the task.
Inherit names the model it resolves to and where that setting comes from. Your choices are remembered for future tasks in this browser. While any are set, Overrides active under the prompt lists them, with Change and Reset model overrides.
For Claude and Codex you can also select Auto (Task Classifier), which rates the task's complexity and picks a low, mid, or high-end model to match. See Automatic Model Selection.
Running Multiple Agents
Select multiple agents to run the same task in parallel, creating a task group. Each agent works independently in its own container. You can then compare their approaches and select the best result.
This is especially powerful for complex tasks where different agents might find different solutions.
Coordinating a Project
To divide a project into separate child tasks with reviews and phase approvals, choose Manual prompt, select one agent, and choose Quick Actions → Run as project orchestrator. The option appears in CoderFlow Full when both the environment's Task orchestration and the server's MCP endpoint are on. The Project orchestrator chip offers Edit to explain the option and applicable policy, and an × reset button to turn it off. See Project Orchestrator for requirements and the workflow.
Skills in Tasks
Tasks automatically inherit the skills assigned to the selected environment. Those skills are injected into the task container at launch, so the agent can invoke them immediately.
If a task needs additional skills, update the environment's skill assignments before launching the task.
Custom Task Fields
If the environment defines custom task fields — for example an SDLC stage or a project code — they appear on the launch form below the template parameters. Fields may come pre-filled with defaults; values can also be added or changed later from the task page's Details card.
Custom field values are searchable from the task board, and a designated set-list field can drive the board's swimlane view.
Selecting Branches
Whether your environment has one or multiple repositories, you can specify which branch to use for each. After selecting an environment, open Quick Actions → Branch Options in the launcher. Branch choices are available for repositories with Allow Branch Selection enabled.
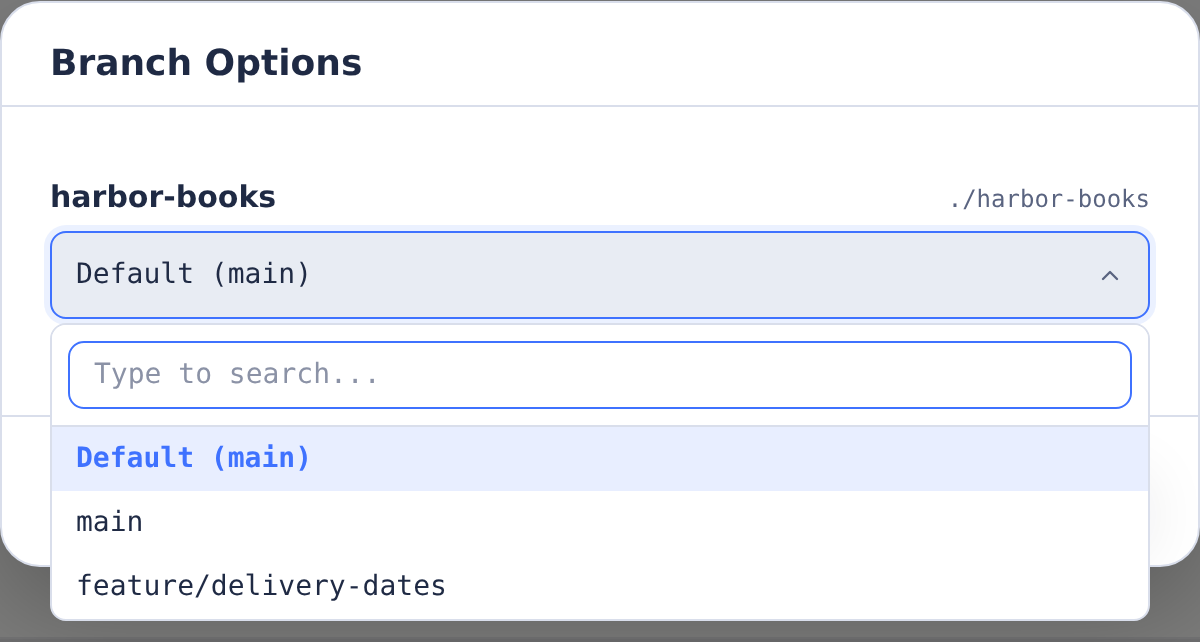
- Default branch: Used unless you select another
- Branch restrictions: Some repositories may be locked to specific branches
- New branches: You can create new branches during the approval step
The agent checks out your selected branches before starting work. During approval, you choose whether to push to the same branch, create a new one, or commit without pushing.
For CLI-created tasks, pass branch overrides with --branch. In multi-repo environments, qualify each branch with the repository name from the environment's Repositories tab:
coder run bug-fix --environment=my-env --branch=web=feature/login-fix
coder run feature --branch api=feature/search --branch ui=feature/search
The CLI also accepts the space-separated form, --branch repo=branch. Repository-qualified values are the safest form for multi-repo environments because the server validates each repository name and rejects overrides for repositories where Allow Branch Selection is disabled.
Selecting an IBM i Build Library List
When the environment's IBM i build connection has library lists, open Quick Actions → IBM i Build Library List to choose the one the task compiles with. (Ask CoderFlow can fill in the launcher and then point at this and the other launch options it cannot set itself, such as Share task, Task options and Run Tests....) The connection's default list appears first, marked (default); choose None — user profile library list to compile with the user profile's library list instead.
- Default list: Used unless you choose another
- Other choices: Shown in a strip below the environment selector, with Edit to change the choice and × to return to the default. The choice is remembered for that environment for the rest of your browser session.
The task page shows the list a task compiled with below the task title. Tasks started outside the launcher — from automations, objectives, or the CLI — use the default list. Through the API, pass ibmi_library_list with a list name, or an empty string for none.
Running the Task
Once you've entered instructions and selected options:
- Click Launch Task (or press Ctrl-Enter)
- Task enters the queue if all agent slots are full
- Agent starts when a slot is available
- Live updates appear in the Activity Feed
- Task completes when the agent finishes
- Review results and approve, or send follow-up instructions
If the agent needs a choice, it can include an interactive reply: a question, triage list, or ranking. Select your answer, review what will be sent, and press Send, or type a normal follow-up.
Task States
- Pending: Created, waiting to be queued
- Queued: Waiting for an available agent slot
- Running: Agent is actively working
- Completed: Agent finished successfully
- Failed: Agent encountered an error
- Staged: Container ready, waiting for you to start the agent
Queue Management
When all slots are occupied, tasks wait in a first-in-first-out queue. Your position is displayed in the UI. Tasks run automatically when slots open.